
Nikon D700 + Nikkor 14-24mm f/2.8 @ 17 mm — 1/40 sec, f/7.1, ISO 1600 — full exif
My Home Office
brightened up with a bit of art on the wall
The Problem
The room I use as my office at home has a layout not good for much of anything but the bedroom it was designed to be, but space is always tight in Japan, so one makes do as best one can. In this case, my desk is “floating” (not up against a wall as I used to have it when I used a different room for my office) and faces a set of floor-to-ceiling closet doors. This unorthodox arrangement allows the rest of the room to be gainfully employed with bookshelves, exercise stuff, and a bigger-than-most-Japanese-houses La-Z-Boy we brought with us from The States.
The down side is that I face a bland wall of floor-to-ceiling closet doors, but that has recently been remedied with some artwork.
An Idea Presents Itself
A friend recently got a very nice printer (an Epson Stylus Pro 3880), and kindly offered to let me use it. It can print paper up to 17″ wide, which means it can handle A2 paper, about like a medium-sized poster. It can produce very nice results, but it's pricey: one set of ink cartridges (just the ink!) costs 3× what my own consumer all-in-one printer/scanner/copier cost in the first place.
The printer I already have can print photos, of course, but I rarely print anything because I seem to have a huge mental block about the commitment of rendering to a physical medium. I don't quite understand this silly mental limitation, but it's hard to overcome; this opportunity to use large paper with a nice printer gives me a chance to try (to overcome) in a meaningful way.
I did a test, printing this shot of Anthony, fitting it into a frame we already had with a green mat that matches the new photo perfectly.
A Solution Unfolds
I got particularly excited about the prospects when I realized that the floor-to-ceiling closet doors that my desk faces would make a perfect place to display some prints. After some testing, I decided that the fairly tall/narrow “A3+” paper size (“A3 nobi” in Japanese, about 13″ × 19″) would fit very nicely.
I found some excellent frames at a local shop.... simple black metal frames by Hakuba that are quite heavy duty and very well constructed. I'd have easily paid $50 for them, but happily they were less than $15 each! I chose black because I figured that a thin black border would nicely set off the print from the off-white color of the closet doors. I would put something on the four middle doors, keeping balance by leaving the edge doors blank. To mount the frames, I used 3M “Command Mini Hooks” Strips (sort of like Velcro™, but better for this kind of application).
Choices, Choices...
I've got 100,000+ photos in my Lightroom catalog, and have published a lot of nice ones on my blog over the years (2,559 photos total last year alone, of which at least some can be considered nice). So when I sat down to consider which few photos to print and display, I suddenly felt overwhelmed.
As I got into it, I started to realize that my bar for what might make a good print was much higher than what might make a good photo online. Part of this is my aforementioned mental block about printing, but part is also an extension of what one naturally notices. An ugly utility pole among fall foliage, for example, like this, sticks out in a photo like a sore thumb because one sees the entire scene in focus at once, whereas in real life most people's attention is drawn elsewhere (the foliage) and the wires and such are not even noticed. (That a photographer does notice them, and proactively considers them during composition, is part of what makes a good photographer good.) So, with that idea extended to a print hung on a wall, suddenly any little imperfection jumps out.
Also, a photo on screen is generally seen in just one general environment (on screen right in front of the viewer), but a print on a wall must look good from across the room where fine detail is lost, yet withstand up-close inspection where little imperfections become big.
I eventually realized that I could hide imperfections, as well as lend a less sterile look to the prints, by giving them a “painted look” with Corel Painter Essentials. I'd played with before, as I described several years ago. I think I have higher artistic standards now, but to a geek like me, “artistic standards” is always an oxymoron. You can get some really wonderful results from Corel Painter Essentials, but it's quite an ordeal because Corel's software design is ridiculously bad. This will all be the subject of a later post.
Oh, and the hiding of imperfections also meant that I could blow up from a smaller crop, using only a portion of a photo. This gave me more options, since the prints were to be tall and narrow, but my tendency in taking pictures has been toward the landscape orientation that presents itself better in a blog setting.
Results
It took the better part of a week (the “busy with a project” mentioned last month on “Feeding Frenzy on the Kamo River”), but I finally came up with a dozen or so items to print. The selection process was an emotionally anguishing task... it's really hard to choose which treatment to give which photo, from among the infinite possibilities to be found in 100,000 photos! I'll eventually print more than I can display at once so that I can cycle them in sync with the seasons, but for now here are the ones I've printed...
(But note that I generated these for print, so even clicking through to the larger version gives only an imperfect sense of the printed result.)

 |
 |
 |
 |
 | |
 |
 |
 |

|
|
|
|
| |
|
|
|

( I would have really liked to use the originally-posted photo, but it wouldn't fit the tall/narrow format I needed here )

I also did an A2-sized print (about 24″ × 17″) in portrait mode for a side wall...
|
|
|
|
| |
|
|
|

... and another A3+ print as well...

I printed them on Epson professional “Velvet Fine Art” paper, which is very matte (that is, not glossy or shiny like common photo paper). Combined with the professional printer and inks, the quality is much better than consumer-level stuff like my own printer. I put them in frames without any glass cover, so reflections don't mar the view.
You'll notice that these were all prepared so that they don't require a mat. A straight-up photo generally looks better with a mat, so the ability to generate good faux matting is an ongoing project.
Anyway, I'm really happy with the results, and they make the room so much more alive and balanced.
It took a week to produce the images for print, but it took a month to prepare this post up because it took that long before I got around to cleaning my room enough to hazard a photo of it. In the end, I got sick of the delay so just shoved all the clutter to the back of the room (because, you know, if it's not in frame, it doesn't exist).
The desktop backgrounds seen on the monitors in the home-office photo above are the ones that just happened to be showing when I snapped the photo. I've got them configured to cycle every so often, via images from the RSS feeds on my widescreen desktop-background photostream and my vertical desktop-background photostream. The ones showing in the photo are from this post and this post.

Nikon D700 + Voigtländer 125mm f/2.5 — 1/400 sec, f/2.5, ISO 220 — full exif
Dispassionate Observer
deep in the mountains of Kansai, Japan


 -- Japan -- Copyright Jeffrey Friedl, https://regex.info/blog/")
Nikon D700 + Voigtländer 125mm f/2.5 — 1/400 sec, f/4, ISO 560 — full exif
I'd Love That Dude For My Garden
( if I had a garden, that is )


Nikon D700 + Voigtländer 125mm f/2.5 — 1/400 sec, f/2.5, ISO 320 — full exif
Variety of Recent Dates
third from the left is dated March 26th, 1943
the one in the middle dates from July 1987
others seem to be in between


If you want visible presence at a shrine or temple, you make a donation and your name is put to something, such as the orange gates of various sizes at the Fushimi Inari Shrine, or affixed under a small statuette as at the Sanzen-in Temple, or engraved into a stone (such as a gravestone, or some kind of offering seen a bazillion times in passing on my blog, such as here and here and here).
Things such
as the wooden gates eventually rot, but stone
lasts a bit longer, so if you or your ancestors stop paying the annual
maintenance, your rock may get shipped off to a muenbotoke holding ground
— “Buddha without fate connection” (thanks, Zak, for the fixed translation) — to await the elements (or, perhaps, payment of fees).

Nikon D700 + Nikkor 70-200mm f/2.8 @ 120 mm — 1/320 sec, f/2.8, ISO 1250 — map & image data — nearby photos
Photo Op From the Big Red Bridge
early last year
I've still got lots of photos yet to go through from our trip to Toyama Prefecture (a few hours north of Kyoto) more than a year ago. At the time I noted that it was really snowy, but I need to tone the description down after the massive snowstorms in the US Midwest and East Coast this year.
Still, it was a lot of snow for us, and really pretty, with visits to historic and picturesque villages of Gokayama and Shirakawago.
It was snowing heavily in the afternoon of the third day of the trip, as it had been all day, so we didn't venture too far out, but we did take a short drive on a road through a steep valley, overlooking a river. Much of the road was protected by a snow roof with one open side...

Nikon D700 + Nikkor 24-70mm f/2.8 @ 56 mm — 1/200 sec, f/6.3, ISO 4000 — map & image data — nearby photos
Three-Sided “Tunnel”
This was convenient because we could stop pretty much anywhere and still enjoy the view from the protection of the roof.
The vistas were wonderful, and quite monochromatic. These are all color photos...

Nikon D700 + Nikkor 24-70mm f/2.8 @ 32 mm — 1/200 sec, f/6.3, ISO 3200 — map & image data — nearby photos
Remnants of an Old Bridge

Nikon D700 + Nikkor 24-70mm f/2.8 @ 70 mm — 1/200 sec, f/6.3, ISO 2800 — map & image data — nearby photos

Nikon D700 + Nikkor 70-200mm f/2.8 @ 150 mm — 1/200 sec, f/4, ISO 1250 — map & image data — nearby photos
It sort of reminds me of Kyoto's Bridge to Nowhere, though from the other end of the history spectrum.
I guess I was enamored with the sight... I took enough pictures of it. 🙂

Nikon D700 + Nikkor 70-200mm f/2.8 @ 116 mm — 1/320 sec, f/2.8, ISO 1250 — map & image data — nearby photos
A bit further along was a non-missing bridge...

Nikon D700 + Nikkor 70-200mm f/2.8 @ 120 mm — 1/250 sec, f/6.3, ISO 6400 — map & image data — nearby photos
Actual Bridge
This is the same bridge featured from a different perspective in what is one of my all-time favorite photos: Bridge Over Icy Water.
While we were there in the darkening dusk, a boat slowly plied the frozen waters, making it seems all the more cold...

Nikon D700 + Nikkor 70-200mm f/2.8 @ 70 mm — 1/320 sec, f/2.8, ISO 2500 — map & image data — nearby photos
Tourist Boat
It was still snowing very heavily and getting darker, so the boat was difficult to see. Perhaps this is a “you had to be there” situation, but I really like this next shot:

Nikon D700 + Nikkor 70-200mm f/2.8 @ 70 mm — 1/320 sec, f/2.8, ISO 2200 — map & image data — nearby photos
Almost Nothing
Nothing really stands out at first, so it's almost as if it's just a smudge, but then you see the waves from the boat, then the boat, then eventually (if you're in not too bright a room) other details emerge from the fog, such as the line of the road across the top of the frame. The engineer in me wants to lock onto specific, concrete things, but I guess some other facet enjoys the lack of it in this photo.
Next to the red bridge were the support towers of the bridge it apparently replaced, unlike the first non-bridge in this post, also missing its entire road bed...

Nikon D700 + Nikkor 70-200mm f/2.8 @ 110 mm — 1/320 sec, f/2.8, ISO 2200 — map & image data — nearby photos
Remnants of Another Bridge
 road -- Nanto, Toyama, Japan -- Copyright 2010 Jeffrey Friedl, https://regex.info/blog/")
Nikon D700 + Nikkor 70-200mm f/2.8 @ 70 mm — 1/320 sec, f/2.8, ISO 2800 — map & image data — nearby photos
View from the Bridge
back to the main (relatively speaking) road
Almost no one was around in this storm, but surprisingly, a car actually took the bridge while we were there...

Nikon D700 + Nikkor 70-200mm f/2.8 @ 200 mm — 1/320 sec, f/2.8, ISO 2000 — map & image data — nearby photos
More Guts than Me
I wouldn't have minded trying the bridge, but even with my good snow tires, the road beyond it looked too steep and curvy for my taste, especially since it had likely never been visited by snowplows.
 -- Copyright 2010 Jeffrey Friedl, https://regex.info/blog/")
Nikon D700 + Nikkor 50mm f/1.4 @ 50 mm — 1/60 sec, f/13, ISO 6400 — map & image data — nearby photos
View from the Ice Room
Himuro Shrine, Kyoto Japan
Click through to the large version to see how compensating for severe underexposure has left a dreamy, almost drawing-like quality to the result.
On the outing last fall with Paul Barr into the mountains north of Kyoto that produced “Kyoto Mountain Restaurant 'Yama no Ie Hasegawa'” and “Carpet of Yellow at the Iwato Ochiba Shrine”, we first made a detour on a small path even deeper into the middle of nowhere to stop into a remote village I'd spotted on a map, to check out its shrine. There's certainly appeal to the big, rich, fancy shrines and temples like the one we live near, but I find a certain appeal in simple, local ones as well (like this and this), so I like to pop in to check them out when I notice them on the map.
 -- Kyoto, Japan -- Copyright 2010 Jeffrey Friedl, https://regex.info/blog/")
Nikon D700 + Nikkor 24mm f/1.4 @ 24 mm — 1/160 sec, f/2.8, ISO 640 — map & image data — nearby photos
Not Much To See From the Road
 -- Kyoto, Japan -- Copyright 2010 Jeffrey Friedl, https://regex.info/blog/")
Nikon D700 + Nikkor 24mm f/1.4 @ 24 mm — 1/160 sec, f/1.4, ISO 1250 — map & image data — nearby photos
Not Much Up Close, Either
There wasn't much there but a small stage with an ornate roof, the entire of which was protected by a big ugly corrugated roof. The ornate roof didn't look particularly old, but I suppose it must have been to merit the protection.
The ornate roof had a lot of wood carving, done perhaps without much skill, but clearly with a lot of love...
 -- Kyoto, Japan -- Copyright 2010 Jeffrey Friedl, https://regex.info/blog/")
Nikon D700 + Nikkor 24mm f/1.4 @ 24 mm — 1/60 sec, f/2.8, ISO 6400 — map & image data — nearby photos
My mom is a skilled wood carver, so random carvings around the house are much better than these, but like I said, they have a certain appeal....
 -- Kyoto, Japan -- Copyright 2010 Jeffrey Friedl, https://regex.info/blog/")
Nikon D700 + Voigtländer 125mm f/2.5 — 1/80 sec, f/2.5, ISO 6400 — map & image data — nearby photos
West Side
 -- Kyoto, Japan -- Copyright 2010 Jeffrey Friedl, https://regex.info/blog/")
Nikon D700 + Voigtländer 125mm f/2.5 — 1/320 sec, f/4, ISO 2000 — map & image data — nearby photos
South Side
 -- Kyoto, Japan -- Copyright 2010 Jeffrey Friedl, https://regex.info/blog/")
Nikon D700 + Voigtländer 125mm f/2.5 — 1/80 sec, f/2.5, ISO 6400 — map & image data — nearby photos
North Side
The shrine's stonework wasn't something you'd be likely to find at Nishimura Stonecarvers, but they share an appeal with the wood carvings...
 -- Kyoto, Japan -- Copyright 2010 Jeffrey Friedl, https://regex.info/blog/")
Nikon D700 + Voigtländer 125mm f/2.5 — 1/160 sec, f/2.5, ISO 3600 — map & image data — nearby photos
Seemingly Random
Despite such a remote feeling of the area, it was pretty important in the history of Kyoto; because it kept the coolest during the summer, it's where winter ice was stored during the summer. The shrine's name means “Ice Room”, being that's the name for the area.
 -- Kyoto, Japan -- Copyright 2010 Jeffrey Friedl, https://regex.info/blog/")
Nikon D700 + Nikkor 50mm f/1.4 @ 50 mm — 1/2500 sec, f/1.4, ISO 200 — map & image data — nearby photos
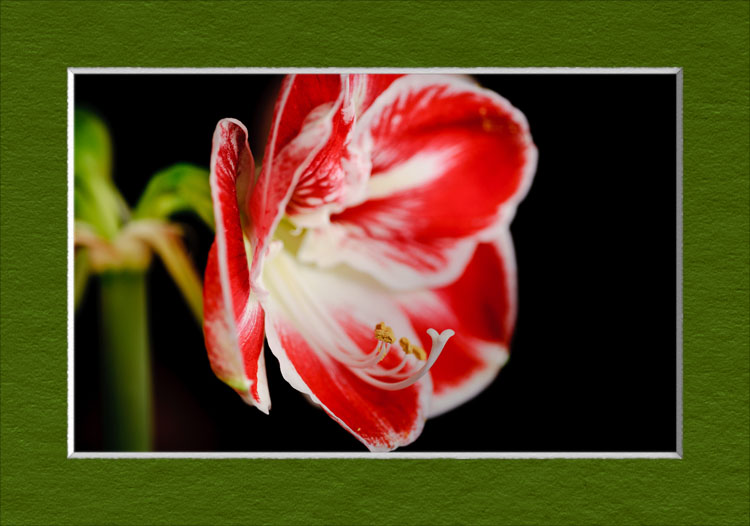
Low-Resolution Example
of a fake-matted photo
This post is a request for ideas from Photoshop-savvy folk, about how to best approach a particular Photoshop issue I'm facing.
So, I'm working on a Photoshop CS5 script to generate photo-realistic fake matting around an image, for when you want to display a print on the wall, but don't want to go to the trouble of having matting custom cut and fitted. Once it's done, I'll join the calendar-template-building script I built long ago, which has been well received over the years.
It's trivial to make a fake-looking fake mat in Photoshop, but it's quite another thing to make a photo-realistic fake mat that fools the eye even upon fairly close inspection. The script I'm working on even goes so far as to take the expected viewer and lighting positions into account for perspective and shading.
The results are great, though I must be clear that you can't tell much from the image above... the proof is in the “printed on good paper with a good printer and displayed in a nice frame” pudding.
Anyway, the problem I've run into is that the process of selecting the color for the mat is not as flexible as I'd like, so I'm wondering whether there's a better way.
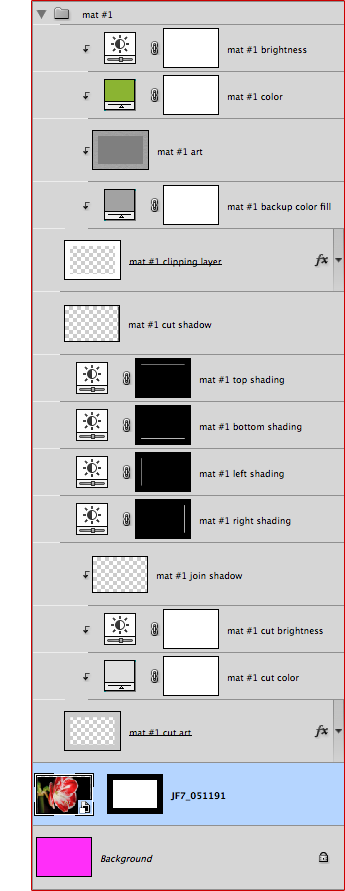
For a simple one-mat, one-cut, one-photo situation, the script makes a 16-layer Photoshop document, as illustrated at right. (The sample document itself can be downloaded here: sample-mat.psd).
After being presented with this document, the user would simply adjust layer #15 to pick a color for the mat, likely plucking one from the photo with the eye-dropper tool. There are many other adjustments the user can make to tweak the look and feel of the mat, but for the most part, only the color needs to be adjusted.
The problem is that layer #15 adjusts only the mat chromaticity, and not its brightness, so to truly pick what humans think of as “color”, you must make a separate brightness/darkness adjustment with layer #16. To make matters worse, that brightness/darkness adjustment layer doesn't allow you to reach the extremes — black or white matting — so that's another problem with the current approach.
Is there a better way?
My goal for the script is to be able to build a Photoshop document that can be color-customized after the fact (e.g. by someone who has downloaded only the Photoshop document, and not the script).
The actual mat texture is in layer #14, and is derived from an actual high-resolution photo of a mat, adjusted to the current document's intended print resolution. It finds itself here as a grayscale of average brightness, but I can build different texture sources if need be.
I can't help but wonder whether there's some combination of blending modes that can do what I want, which is to make subtle adjustments to a base color-adjustment layer based upon whether the mat-photo pixels are brighter or darker than their average. In reading about the various blending modes, I'd think that putting the mat pixels (layer #14) above the color layer (#15) with an “overlay” blending mode would be exactly what I want, but it doesn't work at all, even when I ensure that the mat layer's overall average is exactly 50% gray.
So, if anyone has ideas, I'd love to hear them. Thanks!