
Panasonic LX100 at an effective 24mm — 1/125 sec, f/5, ISO 200 — map & image data — nearby photos
Muddy River
the morning after typhoon-effect torrential rains
Now that I'm out of action for a while, I'll try to make some headway in my blogging. This post is sort of a followup to last month's “Lovely Bicycle Ride Revisiting Uji Countryside Photographed Five Years Ago”, because I returned to the area on my next ride to continue exploring.
The ride ended up being lovely, appearing on Strava as “Uji #3 - Wet & Slimy Satisfaction 宇治市の満足”:
I hit as many mountain climbs as I could fit in, so the ride ended up with over 3000m (10,000') of climb, but I was just enjoying to explore, so taking it slow and easy made it not a challenge. Just fun. I truly enjoyed myself.

Panasonic LX100 at an effective 41mm — 1/125 sec, f/5.6, ISO 200 — map & image data — nearby photos
Small-Plot Rice Ready for Harvest
I doubt anyone actually lives in the house, though

Panasonic LX100 at an effective 24mm — 1/320 sec, f/5.6, ISO 200 — map & image data — nearby photos
Across the Street
harvest likely just finished
One thing that helps me enjoy a ride is purposefully sandbagging climbs that are new for me. I've never been competitive by nature, but in cycling I find that I'm extremely competitive with myself, never wanting to go slower than last time. Taking a new climb slow on purpose has two physiological benefits: it gives me an excuse to go slow and just enjoy the ride, and it ensures that I'll get a PR the next time I try it.
I am fully aware of how utterly pathetic this is. It's so obvious that even I can see it for what it is, which I also find to be quite interesting.

Panasonic LX100 at an effective 37mm — 1/125 sec, f/3.2, ISO 200 — map & image data — nearby photos
Base of the Omine East Climb
a lovely mild climb
My cycling heatmap tells me that I did this climb last year, but I didn't remember much about it other than being a nice ride. The climb to the top is a bit rolling, averaging 5.2% over 6km. (Strava says the climb averages 4.1%, but that's only because as we've seen, Strava has a difficult time with numbers.)

Panasonic LX100 at an effective 24mm — 1/125 sec, f/1.7, ISO 640 — map & image data — nearby photos
Lovely Road Surface
though areas of wet moss would raise caution on a descent
All that stuff I said above about sandbagging a new climb does not apply to descents, which I'm happy to hit hard and fast the first time and every time, so long as it's safe. It surprises many people to find that I don't see much advantage in knowing a descent... having done it once or 100 times before doesn't (for the most part) help me do it faster. People's reaction is a good litmus test for telling me about them: if they're surprised, it tells me that they don't know how to descend safely.
But today would not be a day for fast descents, with the torrential rains the evening before and all.

Panasonic LX100 at an effective 24mm — 1/125 sec, f/1.7, ISO 1000 — map & image data — nearby photos
Effects of the Storm
apparently I'm the first to use this road since last night
The tree limb laying across the road was a lot bigger than it looks in this snap, and it took some effort to cajole it over the cliff off the side of the road.
The photo was taken on the way up. I didn't use the camera on the way down the other side because I was concentrating on not crashing. (Did I mention that the roads were slimy, wet, slippery, and filled with crap?)

Panasonic LX100 at an effective 24mm — 1/500 sec, f/5.6, ISO 200 — map & image data — nearby photos
At The Base On The Other Side
Another psychological issue to talk about is my approach to big climbs. I tend to at the same time want to try them, but also am terrified of them, especially if it's a road I've never ridden up, but have ridden down, seeing all the vertical climb fly by at high speed.
I'd recently decided to take a stab at overcoming this phobia in last month's doing of the Big Buddha climb immediately after having descended it for the first time. As I descended, I could only see pain and suffering in any attempt to climb it, so it was a great psychological victory to just turn around and do the climb right away. It's here that I realized that taking it easy makes it easy and removes the phobia fear.
So I did that again today, turning around and doing Omine West right away. Part of “taking it easy the first time” meant that I could stop for photos...

Panasonic LX100 at an effective 75mm — 1/320 sec, f/5.6, ISO 200 — map & image data — nearby photos
Osaka Skyline
from early in the climb
By the time I got to the top this second time the roads were drier, so I could be a bit less ginger (but still ginger) on the second “Omine West Descent” for the day. It's started to not surprise me when I take a descent slowly and carefully yet still register the KOM, but it still amazes me. That didn't happen this time, though, as my descent time of 8:43 was seven seconds slower than the KOM. Next time I'll actually try, at least, if it's safe to do so.

Panasonic LX100 at an effective 43mm — 1/500 sec, f/5.6, ISO 200 — map & image data — nearby photos
Bonus Climb
One thing I like to do, which apparently almost no one else does, are side climbs just for the sake of the climb. Before heading off on a new route, I scour Google Earth looking for roads that are steep, paved, and accessible, and give them a try. The road above is one such little detour, 1.1km of perfect tarmac at 7%, that leads exactly nowhere. (There's some kind of landfill at the top.)
I made a segment for this lovely little climb, but it turns out that there's only one other registered ride. That's too bad, because even though the road doesn't lead anywhere, it does have a nice view:

Panasonic LX100 at an effective 75mm — 1/400 sec, f/5.6, ISO 200 — map & image data — nearby photos
Reward for the Short 1km Climb
An even better reward is the descent on the wide, pristine, deserted road.
After that I took a little shortcut, then explored another “leads nowhere” climb. This short climb is the same length as the one above, but this time it averages 11% and the road quality is much worse.

Panasonic LX100 at an effective 24mm — 1/125 sec, f/1.8, ISO 200 — map & image data — nearby photos
Tunnel Vision
Only five people have done this climb. I guess most folks just don't like climbs for the sake of it, or to explore new locations, but it doesn't make sense to me. If your goal is just to get from Point A to Point B, why not take a cab?
My route then was supposed to take me down a super-twisty steep little road, but it turns out to be closed for the next few years for some big construction:

Panasonic LX100 at an effective 30mm — 1/125 sec, f/4, ISO 200 — map & image data — nearby photos
Not as Fast and Fun as I had Hoped

Panasonic LX100 at an effective 24mm — 1/125 sec, f/5, ISO 200 — map & image data — nearby photos
Amagase Dam
天ヶ瀬ダム
and an old building
The next goal was to climb the long Mt. Kisen descent I had done on the previous ride (and posted a video of that descent).

Panasonic LX100 at an effective 49mm — 1/125 sec, f/5.6, ISO 200 — map & image data — nearby photos
Long and Winding Road
π km @ 8%
Of course since it was my first attempt, I took my time and stopped for photos.

Panasonic LX100 at an effective 27mm — 1/400 sec, f/5.6, ISO 200 — map & image data — nearby photos
Pretty Moss
kindly keeping to the side, off the road

Panasonic LX100 at an effective 35mm — 1/2000 sec, f/6.3, ISO 200 — map & image data — nearby photos
Wish I Had a Good Camera
with a nice macro lens for this rich moss
The roughly 10 gazillion moss-related articles I've posed in the past with better photos include this, this, and this.
After this climb I found myself at the top of the lovely Sumiyama East Descent, which is 2.7km at 7% of mostly twisty mountain roads, but with a long wide section in the middle where you can really let loose. The pavement is very nice, at least for the first half.
I'd done this for the first time earlier in the ride, when the roads were quite scary... steep , wet, slimy, littered. By now there were nicer, so I had more fun. I reached 75kph (46mph) on the fast middle part. But you've still got to be defensive any time you're on the road, and I (figuratively) ran into cars coming around a blind corner in my lane, sections of wet and slimy road, etc. As I do on all descents, I choose to ride a way that allows for these kinds of issues. Still got the KOM. 😉
As I continued, I came across the site of the abandoned thatched-roof restaurant that I posed about the other day.
I made my way to Otsu and the brutal Iwanoma Temple Climb. The road was so steep and slippery in parts that I put my weight toward the back, to give the rear tire more grip, but because the road was so steep the front wheel came off the road and I came that close to falling over. Scary.
Still, it was easier than the first time I did this climb (on my second long ride ever) and so I was happy to make a PR.
I made a PR on the descent as well, but I don't think there will ever be a KOM for me on this descent; the current KOM (3:35) just doesn't seem safe at any skill level.
Finally, I headed back over to Kyoto via the climb up Mt. Hiei that took an hour earlier in the month on my first ride after returning from America. I was so wiped out by heat and fatigue that I had to stop continuously.
This time it was a bit cooler, and I was in much better shape, so I made a PR with 15:46, so I was very satisfied. (To put things into context, though, while I often do well relative to others on descents and on short, intense climbs, I'm quite weak on climbs that are not ultra short; among all the male friends and acquaintances that I follow on Strava, my PR time on this climb is ranked #16 of 19. Optimistically, I'll call that “room for improvement” 🙂 )
Lightroom allows for a variety of metadata for each photo or video... capture date, caption, keywords, etc., and plugins can add further, custom fields, but sometimes what's offered by Lightroom or existing plugins just doesn't fulfill one's own specific needs. Luckily, it's actually fairly easy to make your very own Lightroom plugin to add your own metadata fields. In this post, I'll show you how.
It's fairly quick and simple. It will take far longer to read this post about how to do it than it takes to actually do it.
The kind of fields we can add this way are simple text fields, where you can enter whatever text you like. The example we'll use throughout this article is adding these three fields to track co-artists of a modeling shoot:
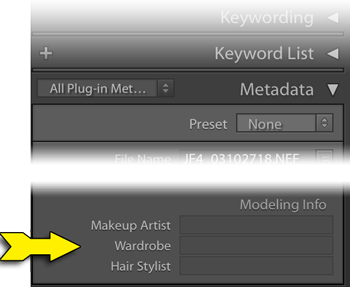
our example “Modeling Info” plugin
Your plugin can have more or fewer fields, and of course you can make different plugins for different sets of data.
As I said, it's fairly simple to set up, but since it does involve editing program files, some things must be done exactly as described, so take care to follow instructions.
The outline of the process:
- Create a folder (with a special name, as I'll describe) for the plugin.
- Add two starter files into the folder.
- Personalize the first file.
- Personalize the second file.
- Point Lightroom at your new plugin and start using it.
- (Optional) Create a metadata-view template to ease access your new data fields.
Again, the process is pretty quick once you're used to it, but we'll go over the steps in detail below.
Steps three and four involves editing program files, and in doing so you must not use a “document” editor (e.g. Microsoft Word). Rather, you must use a simple “text” editor that adds no formatting or “rich text”.
Under OSX you can use TextEdit, so long as you remain in “Plain Text” mode.
Under Windows you can use Notepad.
Step 1: Create the Plugin Folder
You can take care of both this step and the next by downloading the starter sample plugin this article describes, “modeling-info.lrplugin.zip”. After unzipping, you'll be left with a folder named “modeling-info.lrplugin”. Move it to wherever on your system you want your plugin to reside.
(Don't make the mistake to double-click on the folder, as it'll invoke some copy of Lightroom — on my system, it inexplicably brings up Lightroom 3! — after which it brings up the Import Dialog to try to bring non-existent photos from the plugin into Lightroom.)
Or, manually create a folder somewhere on your system where you want your plugin files to reside, naming the folder so that it ends with “.lrplugin”. The example plugin uses the name “modeling-info.lrplugin”, but other example names might include “My Archive Data.lrplugin” or “Extra Fields.lrplugin”.
Choose a name that means something to you and your use of the data; the name doesn't matter too much to Lightroom, so long as it ends with “.lrplugin”.
We'll refer to this as your “plugin folder”; as mentioned above, our example plugin folder is “modeling-info.lrplugin”.
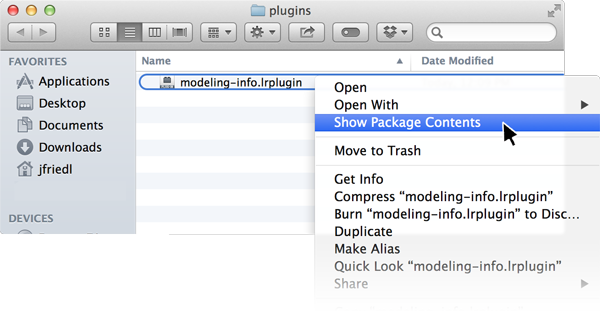
Mac-Only Note:
OSX treats a folder with this kind of name specially, as a single “package” rather than a collection of files, but for the next couple of steps we'll want to get inside so we can edit individual files. To do this, in Finder we invoke the “Show Package Contents” menu item...
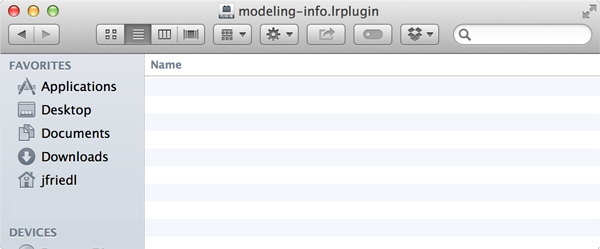
This puts us inside our plugin folder. It'll have two files in it already if this is the sample downloaded from my site, but if you created it manually you'll be presented with the empty folder:
Step 2: Copy In Starter Files
If you're not using the sample download, then you'll need to create two text files within your plugin folder, one named “Info.lua”, and the other named “CustomMetadata.lua”. You can copy them from the sample download or just copy/paste their contents from below.
Step 3: Personalize the “Info.lua” File
The starter “Info.lua” file looks something like this:
return {
   LrPluginName        = "Modeling Info",
   LrToolkitIdentifier = "jeff.friedl.modeling",
   LrSdkVersion        = 2,
   LrMetadataProvider  = 'CustomMetadata.lua',
}
The parts shown in red should be edited to your taste using a raw-text editor (like Notepad or TextEdit). Don't change anything else... these are program files, so every little bit of punctuation matters.
The first bit of text to change (“Modeling Info”) is the name Lightroom should display when referencing this plugin in its UI. It's primarly used in the plugin manager. Put something here that's meaningful for you. It's best if it's short enough to display without being truncated, so “Modeling Info” is better than, for example, “Extra metadata fields to help me track modeling sessions”.
Regardless of what name you choose now, you can always return to this file to update this name later, if you like. It's used only as a display label.
The second item that must be changed, the “plugin identifier” (shown above as “my.custom.modeling”), is extremly important: it's the key identifier used by Lightroom behind the scenes to tie your plugin to your catalog, and each photo to its extra data.
You must pick something that's unique to this plugin (that is, something not used by any other plugin that you might ever use), and once you pick it and start using the plugin, it can not be changed.
It's standard practice to combine something with your name (of yourself or your business) and something about this particular plugin. It's standard practice to use a period instead of spaces.
For example, if you're “Bob's Photo Studio” and you make one plugin to handle modeling data, and another plugin to handle archive data, you might use “bobs.photo.studio.modeling” for one plugin's identifier, and “bobs.photo.studio.archive.data” for the other's.
Remember that all editing must be done as plain, bland, un-rich raw text. In particular, make sure not to use “smart” quotes...
"Modeling Info" ← this is correct
Take a careful look at the punctuation above. See the difference?
Once you've picked the plugin label and internal identifier, save the file and move on to the other.
Step 4: Personalize the “CustomMetadata.lua” File
The other file contains your list of extra metadata fields that the plugin makes avaialble to each photo.
The starter file is the example defining our three modeling fields:
return {
 schemaVersion = 1, -- increment this value any time you make a change to the field definitions below

 metadataFieldsForPhotos = {
  -- You can have as many fields as you like (the example below shows three)... just make sure each 'id' and 'title' are unique.
  -- Set "searchable" to true to allow as a search criteria in smart collections.
  -- If both "searchable" and "browsable" are true, the field shows up under "Metadata" in Library's grid filter.
  { dataType="string", searchable=false, browsable=false, id="field1", title="Makeup Artist" },
  { dataType="string", searchable=false, browsable=false, id="field2", title="Wardrobe"      },
  { dataType="string", searchable=false, browsable=false, id="field3", title="Hair Stylist"  },
 }
}
This sample defines three data fields, so the first thing you'll want to do is update it to define the number of fields you actually want. If you need less than three, delete the extra “{ dataType...” lines. If you need more than three, replicate one of the lines until you have as many such lines as fields you want.
The “title” for each metadata field is the label that Lightroom uses when displaying the metadata field to the user. You can use most any descriptive text you like, though shorter values have a better chance of fitting within Lightroom's cramped UI.
The “id” is the internal key used by Lightroom to tie a photo to its data for this field. The “id” value must be unique for each field within this plugin (so take extra care if you replicated lines to fill out the number of fields you needed; in doing so you also replicated the title and id, and while you probably want to update the title, the id must be changed).
For the ids, you can simply use “field1”, “field2”, etc., as is shown above, or pick short descriptive words such as “makeup”, “wardrobe”, “hair”. It doesn't matter too much to Lightroom so long as there are no repeats, but as illustrated here, there's a benefit to using descriptive ids over a simple “field1” enumeration.
(Note: the plugin identifier in the Info.lua file that we edited first must be unique across all plugins, but the field ids in this file need be unique only within this particular plugin.)
You can turn on some options for how the fields work in Lightroom by updating the text shown in yellow above...
If you want a particular data field to be usable within smart-collection criteria, change the “false” after “searchable=” to “true”.
If you want the field to appear in the Library Grid Filter, change both “false” on the field's line to “true”.
If, after you've started to use the plugin, you need to return to this file to add or remove fields, or make any other change (e.g. toggling a “true” to “false” or vice-versa), increment (add one to) the “schemaVersion” value.
Step 5: Point Lightroom to your Plugin
Now you install the plugin just like any other: visit the plugin manager, use the “Add” button, and navigate to the “.lrplugin” folder you created in Step 1.
Now back in the Library Module, your new fields should appear in the Metatdata panel when you choose the “All Plugin Metadata” viewing preset:
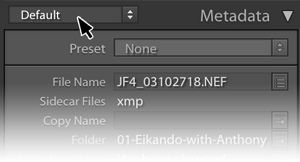
1) click here to select a new view
|
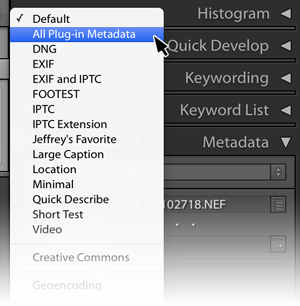
2) select “All Plugin Metadata”
|
And voilà, the three fields show up, empty and waiting to be filled in as appropriate for each photo:
Step 6: (Opgtional) Metadata Viewer Preset
The need to switch to the “All Plugin Metadata” view preset, as we did in the last step, can be inconvenient when you want access to both your new fields and other traditional metadata fields like capture date and photo title.
However, using my Metadata-Viewer Preset Editor plugin, you can create your own “view” of photo data, so that you see whatever fields you like (including the new ones you just added), in whatever order you like.
When using that plugin to create your own custom view, look for the “import fields from plugin” button at the bottom. That'll make your custom fields available in that plugin.
Accessing Your Custom Fields
The data you add to each photo in your custom fields is kept in your Lightroom catalog, and nowhere else. It's not saved in XMP sidecars, nor is it added to exported copies of photos.
However, you can have your custom data stuffed into certain standard metadata fields of exported copies, using my Metadata Wrangler plugin. It may seem a bit cryptic, especially if you're not used to the template tokens that many of my plugins understand, but here's an example showing the wardrobe-artist data being inserted into the caption of an exported image copy:
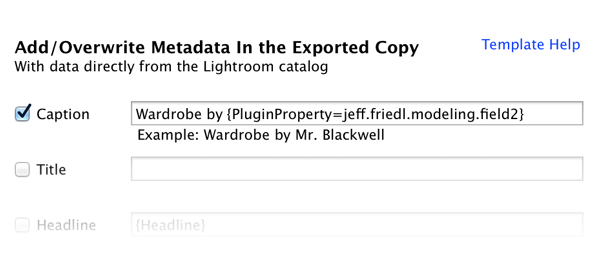
screenshot of the Metadata Wrangler as part of an export
Both the plugin id (from the Info.lua file) and the field id (from CustomMetadata.lua) are needed to reference the specific metadata field, tied together with an extra dot (period) character. Here's a breakdown on constructing a reference to a custom plugin field:
| {PluginProperty= | jeff.friedl.modeling plugin id |
. ↑ |
field2 field id |
} |
Notice the extra period (marked with a green arrow) tying together the plugin id and the field id? Don't forget that, and don't let any extra spaces creep in. Also don't forget to wrap the whole reference in curly brackets.
References from afar like this are one reason to choose a descriptive plugin id, and descriptive field ids. The “field2” field id seen in this example is a lot less enlightening than the “wardrobe” alternate suggestion.
You can also shuffle data around within the catalog with the “Write Data Field” feature of my Bag of Goodies plugin. Here's a screenshot showing Lightroom's “Caption” field about to be filled with text that includes data from a custom plugin field:
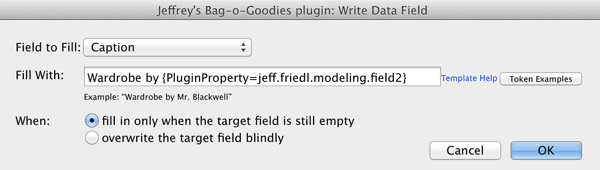
This might be useful in special cases, but I don't think it's all that useful for most workflows because the data movement happens only when you ask for it, as opposed to the Metadata-Wrangler example above that you can set up once (in a Publish Service or in an Export preset) to have happen automatically from then on.
Cleaning Custom Data from your Catalog
If you've been using a custom plugin to add custom fields that you no longer need, and you want to reclaim the space in your catalog database file, you can't just delete the plugin to have the plugin's data removed. This is a good thing, because you certainly don't want to lose valuable plugin data just because you accidentally deleted a plugin file.
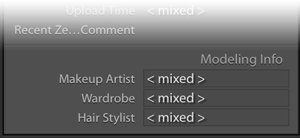
The only way I know to actually delete all the data from the catalog is to select all photos in Grid mode, then clear out the data by selecting and deleting the “< mixed >” value shown in the data field.
A few caveats:
After selecting “All Photographs” (as seen at right) while in Library Grid mode, merely selecting all images (Command/Control-A) isn't necessarily sufficient.
First of all, you have to make sure that the Grid Filters are turned off... tap Command/Control-L to toggle them off. (If they had been off, you'll see a brief “Library Filters On” message, in which case you'll want to re-tap Command/Control-L to turn them back off.)
You'll want to re-select all after turning off the filters, then to make sure that nothing is hidden within a closed stack, invoke “Photo > Stacking > Expand All Stacks”. Then again “select all” one last time.
Now, before selecting one of the fields to update, make sure that the spinning “metadata busy” icon is not present. It looks like this:

This is an area of Lightroom's UI that I think is horrible, so you've got to be careful. When that icon is spinning, Lightroom might ignore anything you type into a text-input field, or it might treat it as keyboard shortcuts instead of text to be entered. It's all too easy to destroy lots about your images when working with many of them and typing the wrong thing at what for parts of Lightroom is the wrong time.
So, wait until the spinning icon goes away. Then select the first data field and delete the “< mixed >” placeholder value. Then wait again until the spinning icon is no more. Repeat for all your fields.
Then you can remove the plugin from Lightroom.
 -- Grandma and Grandpa's -- Rootstown, Ohio, United States -- Copyright 2015 Jeffrey Friedl, https://regex.info/blog/ -- This photo is licensed to the public under the Creative Commons Attribution-NonCommercial 4.0 International License http://creativecommons.org/licenses/by-nc/4.0/ (non-commercial use is freely allowed if proper attribution is given, including a link back to this page on http://regex.info/ when used online)")
Nikon D4 + Nikkor 24-70mm f/2.8 @ 60mm — 1/20 sec, f/4.5, ISO 2000 — map & image data — nearby photos
Pain
( actually one of those “plasma orb light” toys )
I guess this gets chalked up in the “it sucks getting old” column. Last night while playing some light “livingroom soccer” with Anthony, during a minor little sideways move I heard a loud pop and sensed what felt like a slap to my left calf. Then pain.
息子と一緒に室内サッカーを遊ぶ途中にふくらはぎが肉離れを起こしました。あんまり激し運動の時ではないので、一寸不思議。年齢の事かな?嫌です。 しばらく自転車無し。
It seems that the soleus ripped. It's a big muscle in the calf next to the bone, under the bigger muscle that gives the calf its shape. It's sort of useful for tangential physical activities like “standing”, “walking”, and “bicycle riding”.
")
Nikon D700 + Voigtländer 125mm f/2.5 — 1/320 sec, f/2.5, ISO 720 — map & image data — nearby photos
None of This for Me
for a few weeks
The sound was eerily light and airy, just like the pop sound you'd make with your mouth when trying to imitate the sound of a champagne cork. The thought sends shivers up my spine.
The various calf muscles are generally used to extend the foot (e.g. to stand up on your tippy toes) and keep balance as you stand, but I don't feel pain in those situations. Rather, when returning back down after getting up on my toes, I get a sharp mother-of-all-muscle-cramp pains just before my heel hits the ground again. So, whatever muscle ripped seems to be involved in stabilizing the foot in that situation.

Nikon D4 + Voigtländer 125mm f/2.5 — 1/640 sec, f/8, ISO 5000 — map & image data — nearby photos
Business End of a Drill Bit
somehow this image seems appropriate
I'm really at a loss to understand how this happened... my movement at the time was mild compared to any number of movements encountered throughout any normal day, much less the intense stuff I often do at the gym or on the bicycle. It reminds me of the time decades ago when one of my teeth cracked in half while eating french fries. The doc said that when the tooth has a crack and is ready to go, it goes, and you could be eating pudding at the time.
I don't know whether this is a symptom of whatever caused the tear, or a result of the tear, but since the incident, all the muscles in the calf seem a bit unstable, with lots of involuntary twitching and the occasional sudden full-calf cramp that very much gets my full and immediate attention.
Very oddly (to me), the whole calf is swollen to 1½ times its normal size, which is large to begin with since I do a lot of cycling. There's no discoloration or general pain, but it's puffy like a balloon filled with water. Strange.
I just wish there were something I could learn from this (besides “it sucks getting old”) so that I could take steps so that it doesn't happen in the future, but at this point it feels totally random and unrelated to any action I have taken or should have taken.
")
Nikon D4 + Voigtländer 125mm f/2.5 — 1/400 sec, f/2.5, ISO 4000 — image data
This Gets a Few Week's Rest
The tear is high up, almost right behind the knee, but it's unrelated to the knee, so that's good. I've heard of too many folks my age hurting their ACL or have other knee issues. This injury doesn't preclude me from actually hurting my knee, but lowers the chance of it happening any time soon because I'm out of action for the next few weeks. Sigh.
I consulted with therapist Kentaro Kataoka (seen on my blog various times, most recently here), who kindly came over at 11pm(!) to check me out. He said it's a mild tear, and that if I were a college rugby player with an important game the next day, I'd play. Not being a rugby player, nor college aged, I'll rest. But hey, Anthony and I called off our “livingroom soccer” game with me leading 2-1, so I've got that going for me.
")
Panasonic LX100 at an effective 24mm — 1/30 sec, f/1.7, ISO 3200 — map & image data — nearby photos
The Future
always seems to be somewhere ahead
 -- Uji, Kyoto, Japan -- Copyright 2010 Jeffrey Friedl, https://regex.info/blog/ -- This photo is licensed to the public under the Creative Commons Attribution-NonCommercial 4.0 International License http://creativecommons.org/licenses/by-nc/4.0/ (non-commercial use is freely allowed if proper attribution is given, including a link back to this page on http://regex.info/ when used online)")
Nikon D700 + Nikkor 24mm f/1.4 — 1/8000 sec, f/1.4, ISO 200 — map & image data — nearby photos
Cassiopeia Riding Park
with an old thatched-roof restaurant in the background, on the left
(photo from six years ago)
Six years ago, while on an exploratory scooter trip into the mountains (the kind of trip I now do by bicycle), I came across an abandoned restaurant next to the entrance of an equestrian park.
")
Nikon D700 + Nikkor 50mm f/1.4 — 1/250 sec, f/11, ISO 1800 — map & image data — nearby photos
Looks Inviting
This abandoned building did appear on my blog once, five and a half years ago in “My Faux-Mat Photoshop Script is Out”, but while other photos from that photogenic outing made it to my blog (here, here, and here), and on that trip I “discovered” the “Middle-of-Nowhere Sokushouji Temple”, posting about this abandoned restaurant has remained on my to-do list.
It came to my mind last week while on a bicycle ride, I came around a curve expecting to find it, but instead I found this:
")
Panasonic LX100 at an effective 24mm — 1/800 sec, f/5.6, ISO 200 — map & image data — nearby photos
The Same Location
last week
I shouldn't be surprised, considering the shape of the place six years ago. Let's take a look...
")
")
Nikon D700 + Nikkor 24mm f/1.4 — 1/400 sec, f/5, ISO 400 — map & image data — nearby photos
Front Door is Open
")
Nikon D700 + Nikkor 50mm f/1.4 — 1/400 sec, f/3.2, ISO 560 — map & image data — nearby photos
“Welcome”
")
Nikon D700 + Nikkor 24mm f/1.4 — 1/400 sec, f/1.4, ISO 5600 — map & image data — nearby photos
Spacious Interior
")
Nikon D700 + Nikkor 24mm f/1.4 — 1/400 sec, f/2, ISO 320 — map & image data — nearby photos
Wall Art
")
Nikon D700 + Nikkor 24mm f/1.4 — 1/160 sec, f/2, ISO 1800 — map & image data — nearby photos
All the Trimmings
")
Nikon D700 + Nikkor 24mm f/1.4 — 1/160 sec, f/2.8, ISO 5000 — map & image data — nearby photos
September 1999
")
Nikon D700 + Nikkor 24mm f/1.4 — 1/160 sec, f/1.4, ISO 6400 — map & image data — nearby photos
Nice Ceiling
")
Nikon D700 + Nikkor 24mm f/1.4 — 1/320 sec, f/4.5, ISO 200 — map & image data — nearby photos
Overgrown in the Back
")
")
Nikon D700 + Nikkor 50mm f/1.4 — 1/500 sec, f/1.8, ISO 200 — map & image data — nearby photos
Little Guy Near the Road
 -- Uji, Kyoto, Japan -- Copyright 2010 Jeffrey Friedl, https://regex.info/blog/ -- This photo is licensed to the public under the Creative Commons Attribution-NonCommercial 4.0 International License http://creativecommons.org/licenses/by-nc/4.0/ (non-commercial use is freely allowed if proper attribution is given, including a link back to this page on http://regex.info/ when used online)")
Nikon D700 + Nikkor 50mm f/1.4 — 1/250 sec, f/3.2, ISO 640 — map & image data — nearby photos
Holding an Ice-Cream Cone?
I'd love this for my garden (if I had a garden)
")
Nikon D700 + Nikkor 50mm f/1.4 — 1/250 sec, f/3.2, ISO 360 — map & image data — nearby photos
Restaurant's Sign
or what was left of it
The problem with the cycling I'm doing now is that it both adds to my “want to post about” workload, but takes away from the time to do it. For the time being, cycling often is winning over posting often. Maybe in the winter it'll flip and I'll get caught up more.
")
Nikon D700 + Nikkor 24-70mm f/2.8 @ 38mm — 1/200 sec, f/6.3, ISO 1800 — map & image data — nearby photos
| “ |
If the intercom doesn't seem to be working
please push the bell |
” |
| — detail of the front wall of this house in Kyoto, Japan— | ||
I've recently started futzing with video on my bike rides, having posted a few on “Lovely Bicycle Ride Revisiting Uji Countryside Photographed Five Years Ago” the other day, including this fast descent down some twisty mountains and into the flats.
I had some trouble getting Garmin software (VIRB Edit, Garmin BaseCamp, and Garmin Connect) to work with my GPX files, or as Garmin has lately taken to re-brand in their own silly name, “G-Metrix” data files.
When trying to import GPX files, I'd get a terse, frustrating “Failed to read file” or “... is not a valid GPX file and could not be opened” message. After much experimenting I found that in each <trkpt> element, Garmin requires the <ele> to come before the <time>. Get anything out of order and it bails.
I ran a little script to ensure <ele> came first, and they were imported without complaint.
What's most shocking to me about this is that Garmin isn't wrong. I've been working with GPX files for more than a decade, and it never even occurred to me that the various order-can't-possibly-matter sup-parts of a <trkpt> might actually be required in a specific order, but inexplicably, that's how the GPX standard was written:
<xsd:sequence>
  <-- elements must appear in this order -->
  <xsd:element name="ele" type="xsd:decimal" minOccurs="0"/>
  <xsd:element name="time" type="xsd:dateTime" minOccurs="0"/>
</xsd:sequence>
This restriction on ordering seems utterly nonsensical... I'd guess it's because whoever created the standard was simply lazy as a software engineer. In any case, the standard is the standard.
It turns out that other artificial orders are mandated, such as the metadata summary requiring the author (if there is one) before the copyright (if there is one). I always thought that the GPX standard was a bit wonky as far as XML standards go, but this puts it into the decidedly “bizarre” category.
Anyway, as much as Garmin continues to deserve the world's ire for design in both hardware and software that pushes new limits in just how poor a user experience one can endure, in this issue they are technically not “wrong”. Yes, it'd be nice if they were generous in what they read, but I'm sure their own “G-Matrix” files are standard conforming, and considering that their software is free, working with their own stuff seems to be a reasonable lower bar.