Nikon D700 + Nikkor 24-70mm f/2.8 @ 31 mm — 1/50 sec, f/7.1, ISO 200 — full exif
Snow 'n' Blossoms
Kyoto's cold and damp spring 2010
A few days ago in “Kyoto Cherry Blossoms Off to a Cold, Wet Start” I lamented that it was still cold and wet and windy, even though the cherry trees had started to blossom early, and speculated that it might even snow the next day. It didn't, but it's snowing right now, fully doubling the number of days I've seen snow in this part of Kyoto this year.
[Update] A few hours later and the snow has really picked up, falling in big fluffy clumps. It's nothing on the order of magnitude of the snow we saw in Shirakawago in January, but the mountains surrounding Kyoto now have a heavy white frosting, something I don't think I've seen for a couple of years.
Gettin' Freaky Wid'it
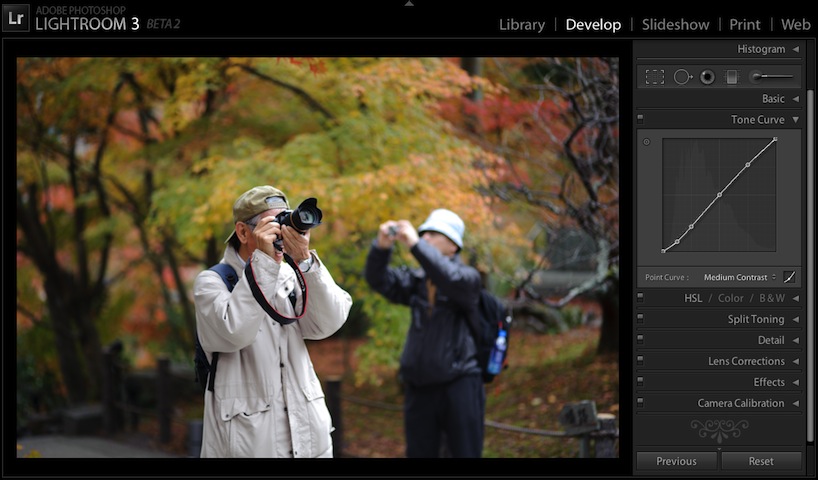
So, in my previous post, “Stupid Tone-Curve Tricks”, I presented a few odd tone-curve presets for Lightroom that were of marginal utility. In this post, I present additional presets that are even more useless, if that's at all possible. (If you're not familiar with tone curves in Lightroom 3 beta 2, the aforementioned previous post has an introduction and useful links.)
Two separate downloadable ZIPs of presets are available at the end of this post, one for “Process Version 2012”, the standard develop engine to use for photos newly imported into Lightroom 4, and a ZIP of presets for “Process Version 2010”, which was the standard for Lightroom 3 (and remains the develop engine for those photos even in Lr4 and later, unless you explicitly change the process version in the Develop Module).
Be sure to use the preset appropriate for the photo's process version; otherwise, the preset appears to do nothing.
For more on Lightroom's “Process Versions”, see Laura Shoe's article: “What is that Exclamation Mark Below My Photo in Lightroom 4? If, When, and How to Upgrade to the New Process Version.”
In the presentations below, mouseover the little tone-curve squares under each screenshot to bring up an example of the preset to the screenshot. All the screenshots for a particular section are loaded upon first mouseover in that section, so there may be some initial delay with each if you're on a slow connection.
Like all “wild” tone curves that target specific parts of the histogram, the result for each is highly dependent on the specific photo and its current develop settings — tiny adjustments to a slider can have sweeping, dramatic impact — so the screenshots below show just one view that's likely not at all representative of what you'll see with your photos and settings.
Also, these kind of tone curves are probably more appropriate for black & white images (press “v” while in Lightroom's Develop Module to toggle the color treatment), but I show them here in color because they look more flashy and wild in color. (Hey, if you're going to waste time on something useless, may as well have some fun!)
Wave
These tone curves look sort of like a waves...
(They actually look more to me like hacksaw blades, but we won't go there.)
Normal
 Normal |
 Wave 3A |
 Wave 4A |
 Wave 5A |
 Wave 6A |
 Wave 7A |
 Wave 8A |
 Wave 3B |
 Wave 4B |
 Wave 5B |
 Wave 6B |
 Wave 7B |
 Wave 8B |
Zebra
Zebra stripes...

Normal
 Normal |
 Zebra 2 |
 Zebra 3 |
 Zebra 4 |
 Zebra 5 |
 Zebra 6 |
 Zebra 7 |
 Zebra 8 |
Tiger
Tiger stripes...

Normal
 Normal |
 Tiger 2 |
 Tiger 3 |
 Tiger 4 |
 Tiger 5 |
 Tiger 6 |
 Tiger 7 |
 Tiger 8 |
 Tiger 9 |
 Tiger 10 |
 Tiger 11 |
 Tiger 12 |
 Tiger 13 |
 Tiger 14 |
 Tiger 15 |
Cliff
Sort-of cliff shaped curves. These are the most likely to be the least useless...

Normal
 Normal |
 Cliff highlights 1 |
 Cliff highlights 2 |
 Cliff lowlights 1 |
 Cliff lowlights 2 |
 Cliff lowlights 3 |
EKG
Monitoring the heart of your photos...

Normal
 Normal |
 EKG1 curve |
 EKG1 square |
 EKG2 curve |
 EKG2 square |
 EKG3 curve |
 EKG3 square |
 EKG4 curve |
 EKG4 square |
 EKG1 curve inverse |
 EKG1 square inverse |
 EKG2 curve inverse |
 EKG2 square inverse |
 EKG3 curve inverse |
 EKG3 square inverse |
 EKG4 curve inverse |
 EKG4 square inverse |
Notch
Filters to let in only a slice of a certain brightness...

Normal
 |
 |
 |
 |
 |
 |
 |
 |
 |
 |
 |
 |
 |
 |
 |
 |
 |
 |
 |
 |
 |
 |
 |
 |
 |
 |
 |
 Normal |
Sliver
Like “notch”, but as absolutely thin as possible...

Normal
 Sliver 1 |
 Sliver 2 |
 Sliver 3 |
 Sliver 4 |
 Sliver 5 |
 Sliver 6 |
 Sliver 7 |
 Sliver 8 |
 Sliver 9 |
 Normal |
By the way, the photo is from my autumn “Teeming Throngs Enjoying the Colors at Kyoto's Eikando Temple” post.
Here are zips with all these presets, one for Process Version 2012 (Lr4 and later), and another for Process Version 2010 (Lr3 and later):
FunkyToneCurvePresets-2012.zip
FunkyToneCurvePresets-2010.zip
Install instructions are in my previous post.
In coming up with these presets, I tried not to be limited by what might be useful, though I did draw the line at a set of randomly-generated curves (after giving it a few trys 🙂 ). This was all a monumental waste of time to build and writeup, but it was fun. On the odd chance that you find any of them to be actually useful, leave a comment with a link so everyone can see.
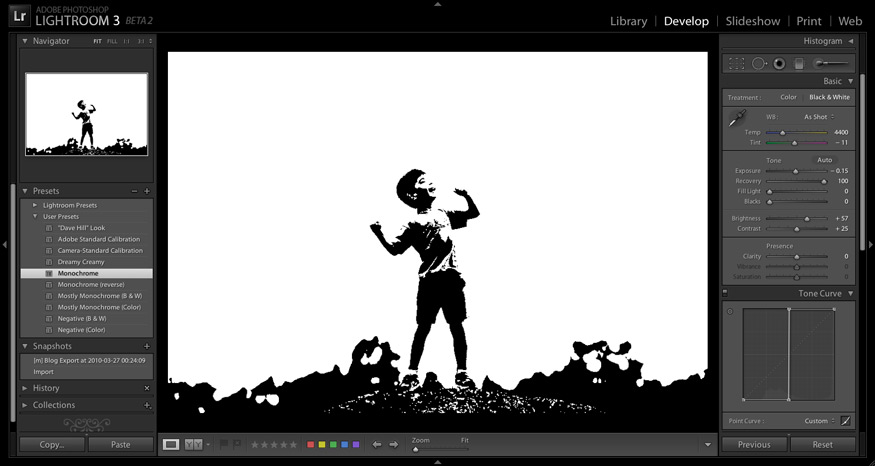
Photo being processed: D200 + 70-200mm f/2.8 @ 200 mm — 1/100 sec, f/4.5, ISO 320 — map & image data — nearby photos
On Top of the (Monochromatic) World
via the “Monochrome” preset discussed below
The tone curve is one of the ways that Adobe Lightroom offers to adjust an image. It's basically a “brightness map” that normally indicates "dim parts of the image are shown as black, bright parts are show as white, and things in between are shown proportionally somewhere along the line between the two". The screenshot below highlights Lightroom's default tone curve, which is mostly a straight line (that is, “proportional”) from dark to bright...
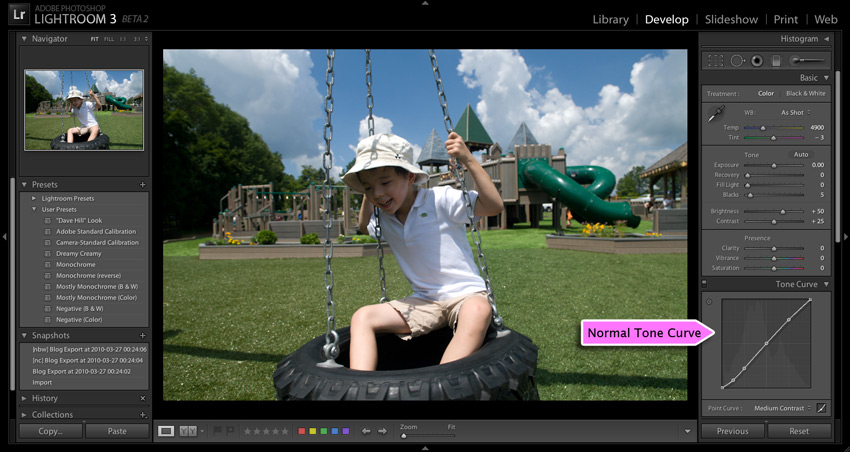
Photo being processed: D200 + 17-55mm f/2.8 @ 17 mm — 1/500 sec, f/5, ISO 250 — map & image data — nearby photos
Adobe Lightroom Develop Module
in the second LR3 public beta
The idea of a tone curve is general to photo-editing applications; if you're not sure of what one is, you might take a look at this or this.
Prior to the release of the second LR3 beta earlier in the week, Lightroom users could tweak the tone curve slightly to try to bring out or suppress detail in tonal areas of an image (e.g. “bring up the shadows”, “compress the highlights”, etc.), but now with we have much more control.
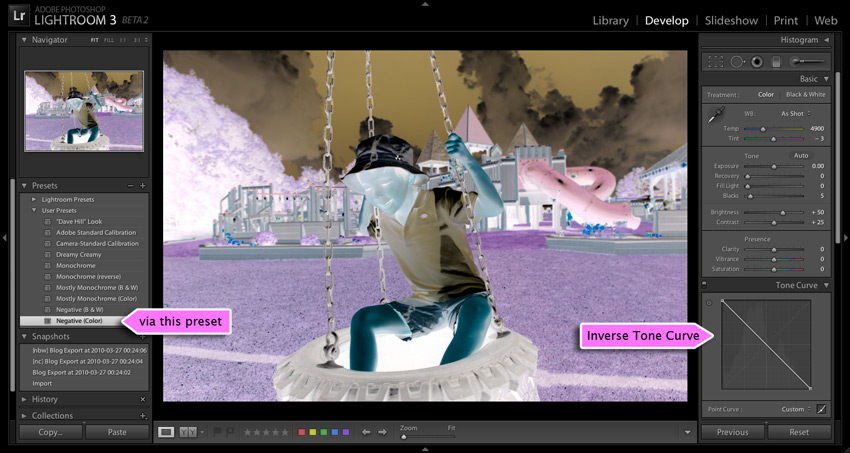
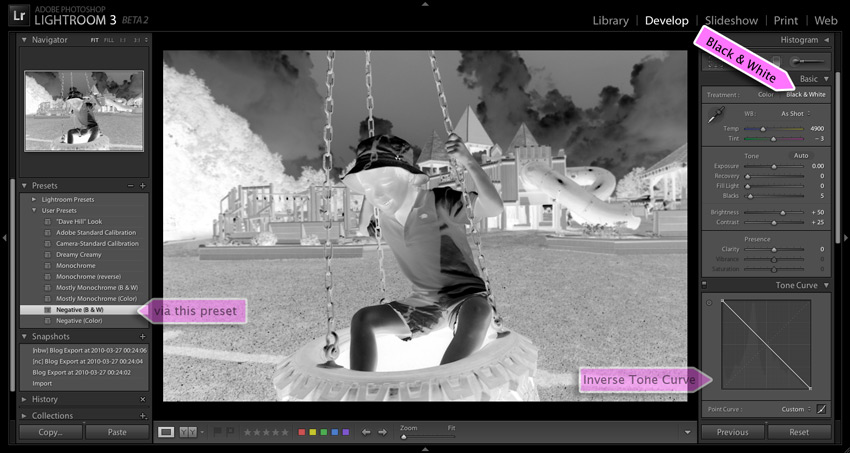
For example, those old enough to remember the real meaning of a “film negative” from personal experience will appreciate the look one achieves when using a tone curve that's been inverted — one that maps bright to dark and vice-versa — as illustrated in the next two screenshots...
(You might find the photo familiar if you saw my “Funky Joy with Adobe Lightroom” post a couple of years ago, about “negative clarity”.)
I've created a half dozen Develop Presets that allow you to do this and more; there's a download link at the bottom of the page. Once you install the presets on your system, they'll be listed in the aptly-named “Presets” section on the left side of the Develop Module, as illustrated by the “via this preset” highlights in the two screenshots above.
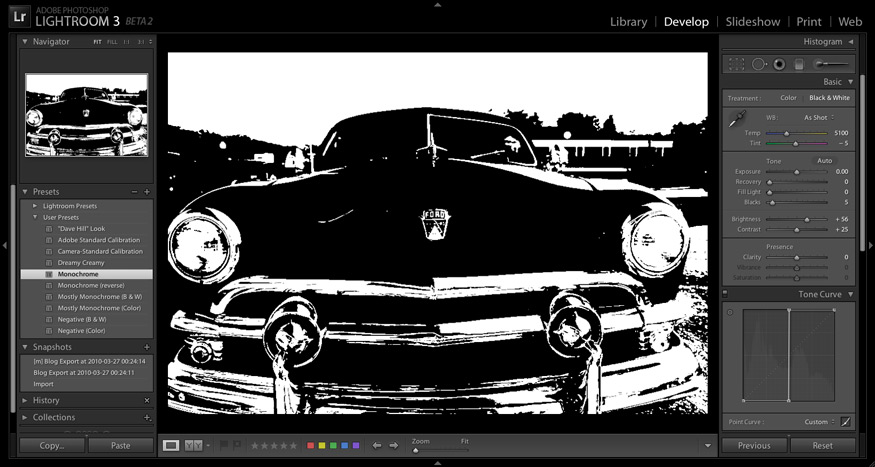
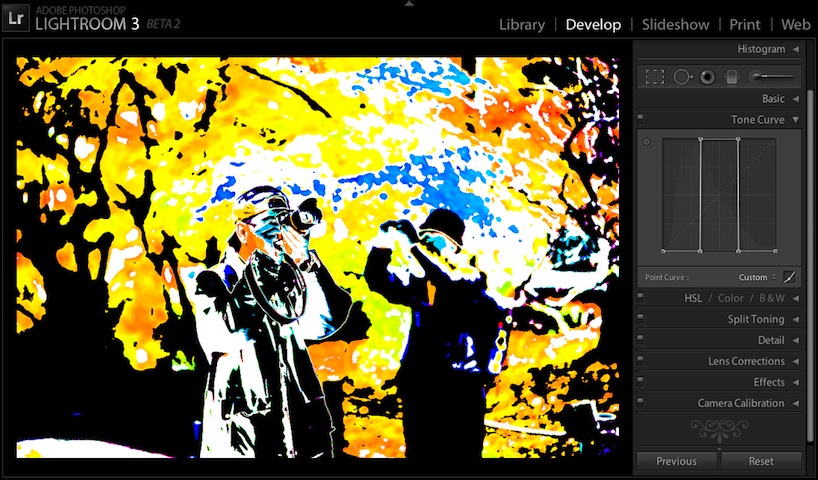
You can do some crazy things with custom tone curves, as the lead photo of my LR3b2 post shows. Less haphazard, but almost as crazy, is a pure monochrome treatment — just black and white; no gray — as illustrated with the following before/after screenshots...
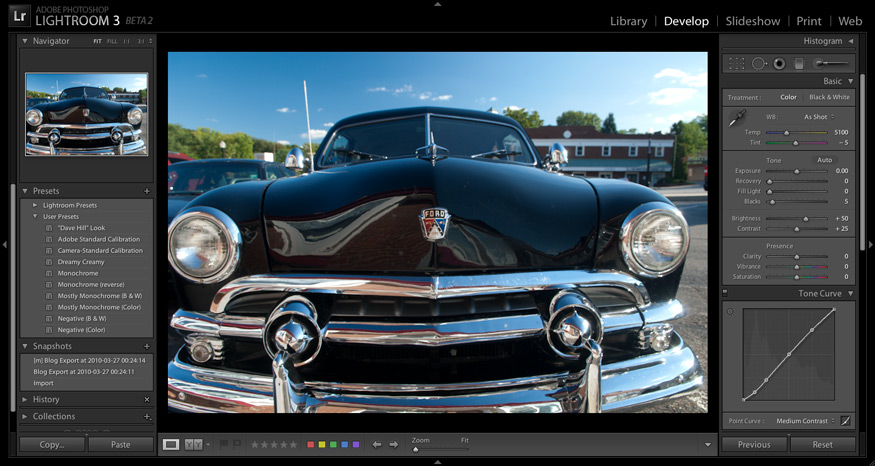
Photo being processed: D200 + 17-55mm f/2.8 @ 17 mm — 1/45 sec, f/6.3, ISO 100 — map & image data — nearby photos
Before
As you can see, the tone “curve” above is a vertical line at the halfway-brightness mark: anything that's supposed to be more than halfway bright is made perfectly white, and anything that's less bright is made perfectly black.
To be clear, I'm not touting this as a “good” effect; it's fun to experiment and play, but whether it's good or useful is very much up to the specific situation and, like all artistic endeavors, the eye of the beholder.
But it is fun to play, especially with this monochromatic idea, because it has such a dramatic effect on the photograph. But “play” is important, because develop changes that make parts of the photo brighter or darker can move those parts across the vertical cliff of our tone curve, so even subtle adjustments can have sweeping, dramatic effects on the final image.
The screenshot that leads this post is another example. It's a photo from the same outing as this one, but it was way overexposed and I really should have just deleted it, but it turns out to make a great example here. I used a lot of the “Recovery” develop adjustment to bring some of the features of his face “below the cliff” (so to speak), so his face wasn't just a white blob on the side of a larger black blob.
It's similar to what I did with last photo in yesterday's post in that it rescues something of at least mild interest from an overexposed shot. I'm not sure what I'd ever really do with something like this, but like I said, it's fun to play.
But with the “subtle adjustments can have sweeping, dramatic effects” bit in mind, one can often get something interesting from regular shots. Here's a version of this photo from 2008 of Anthony with his friend Gen...
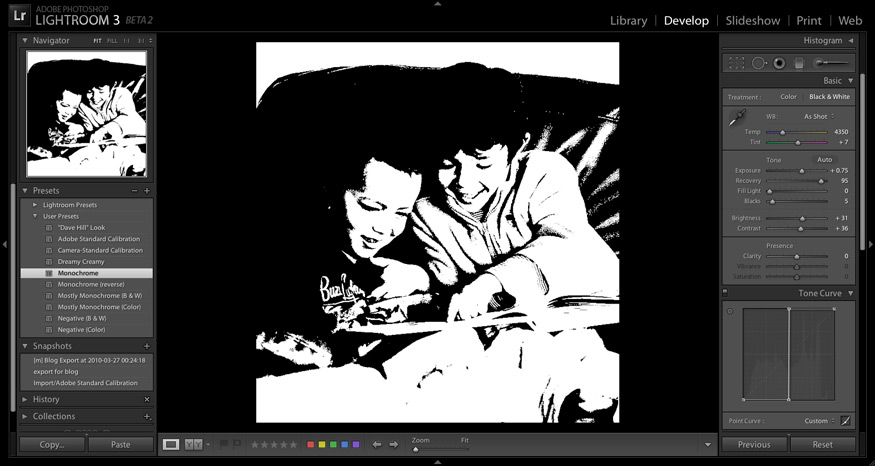
Photo being processed: D700 + 70-200mm f/2.8 @ 210 mm — 1/640 sec, f/4.8, ISO 6400 — map & image data — nearby photos
Via the “Monochrome” Preset
I've also included a “Monochrome (inverted)” preset that's the same as Monochrome, except it's upside-down, so the sense of black and white are flipped.
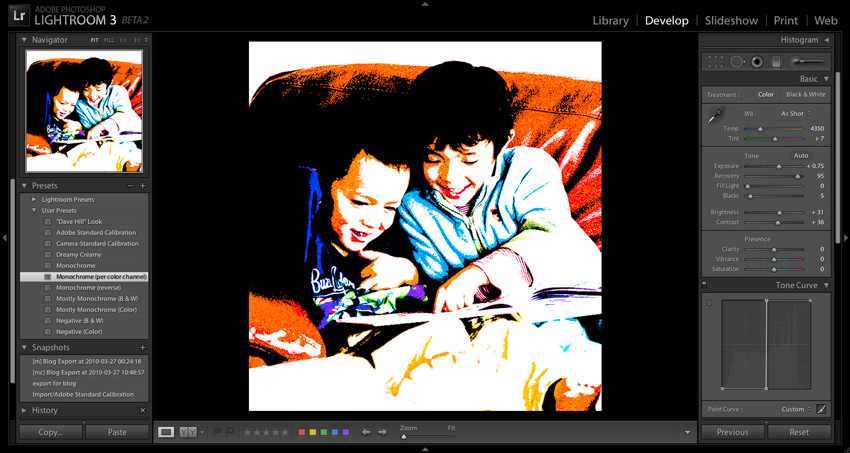
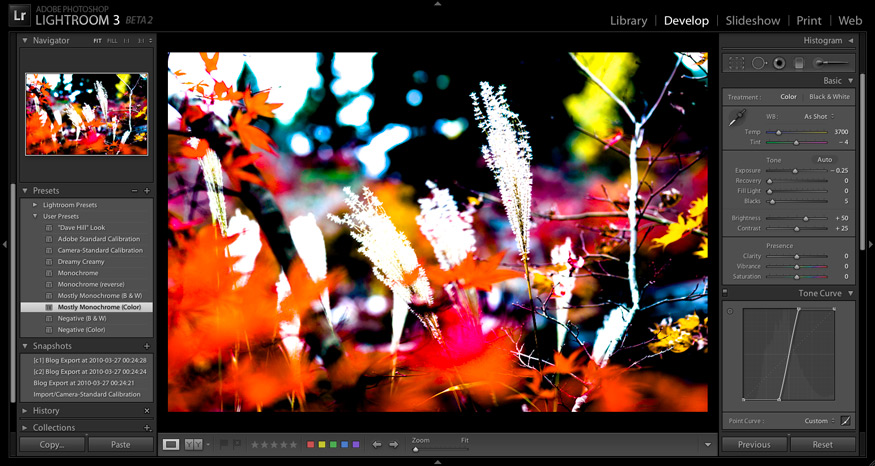
The monochrome effect can be fun, but as you can see, it's really stark. One step back is the “Monochrome (per color channel)” preset, which is the same as the “Monochrome” preset except that it keeps the treatment as color instead of B&W, so you get a strong posterization effect among the primary and secondary colors (as modified by other develop adjustments, such as white balance)...
Subtle changes to the white-balance setting cause all kinds of freaky, dramatic changes.
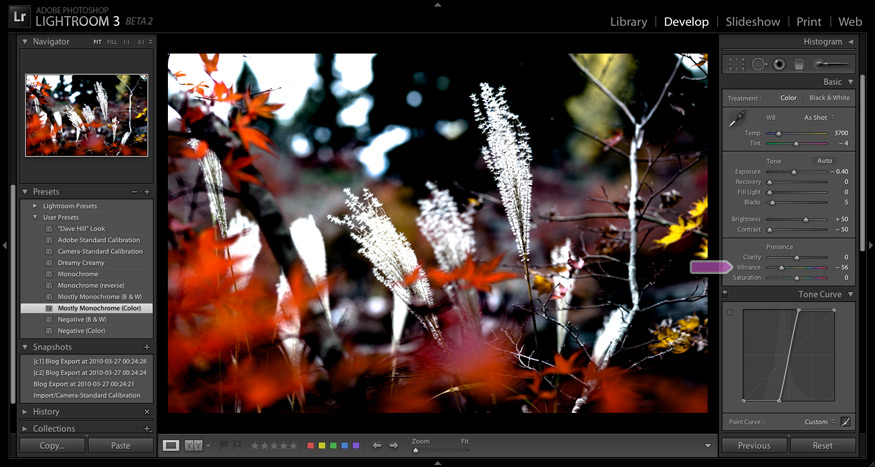
Going even further is to make it less stark by converting the vertical cliff of “monochrome” into merely a steep hill, thereby making the transition from black to white a touch more gradual. Compare the before/after of the next two screenshots...
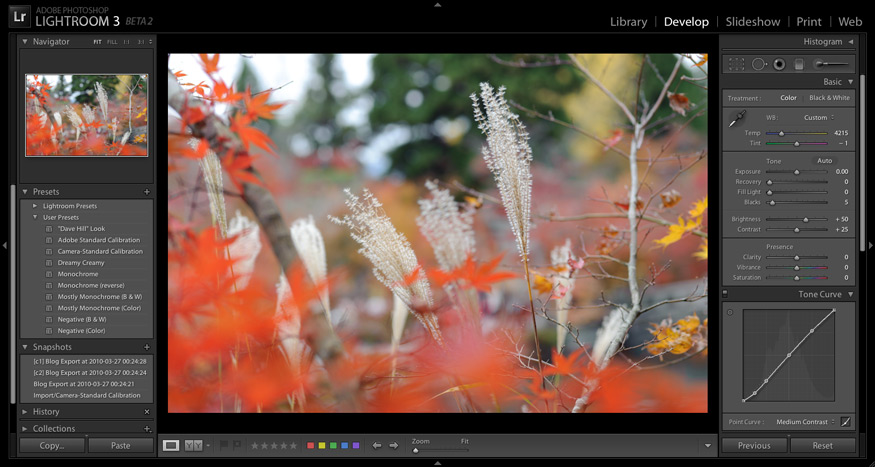
Photo being processed: D700 + Zeiss 100mm f/2 — 1/320 sec, f/4, ISO 320 — map & image data — nearby photos
Normal
The effect here, of some nature at Kyoto's spectacular-in-autumn Eikando Temple, is really interesting to me. Some of the colors are a bit too overwhelming, though, but backing off on a few adjustments, notably Vibrance, makes a real mood-setter:
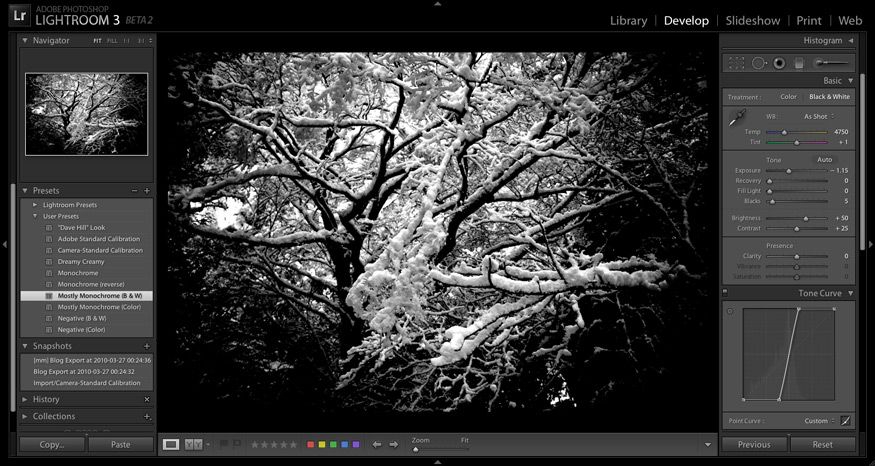
There's a “Mostly Monochrome (B&W)” preset as well... compare these before-and-afters...
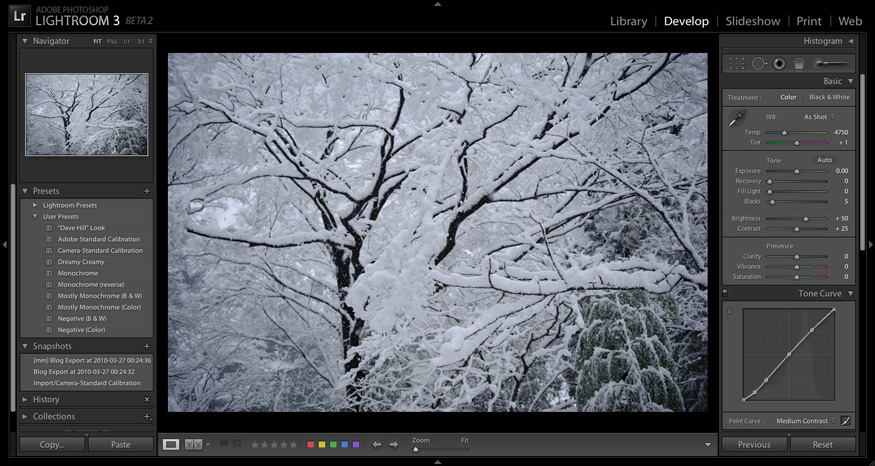
Photo being processed: D700 + 24-70mm f/2.8 @ 35 mm — 1/800 sec, f/2.8, ISO 200 — map & image data — nearby photos
Boring
The key to these monochrome / mostly-monochrome presets is to play with the develop settings — especially Exposure, Recovery, and Fill Light — to adjust what parts of the photo fall across the cliff or steep hill.
Download and Install
First let me say that it's easy enough to create these tone curves and presets yourself. You can create the tone curves by clicking the “point-curve” icon in the lower-right corner of the “Tone Curve” section, then dragging the points around. The points can be a bit temperamental at first, until you get the hang of it; or better yet, check out this great LR point-curve tutorial. Once you've made a tone curve whose effect you like, you can save it to a Develop Preset (instructions).
But, since I've done it already, it's easy enough to share, so here's a zip with all the presets mentioned:
Negative-and-Monochrome-LR-Develop-Presets.zip
[ Lightroom 4 and later: see this warning ]
I also threw in a “Dave Hill” Look preset, and the “Dreamy Creamy” preset I used on this photo last fall. That's pretty much the extent of my preset use, except for some calibration presets I use during import.
After downloading and unzipping, right-click on “User Presets” in the “Presets” panel of Lightroom's Develop Module, choose “Import...”, and navigate to the .lrtemplate files left by unzipping.
Play. Experiment. Have fun.
For even more fun, check out the followup: Gettin' Freaky With Lightroom Tone-Curve Presets.

Nikon D700 + Nikkor 70-200mm f/2.8 @ 150 mm — 1/250 sec, f/2.8, ISO 1100 — map & image data — nearby photos
Cherry-Blossom Season 2010 Just Starting
Kyoto, Japan
The weather has been miserable lately — cold and rainy, with possible snow tomorrow — but the cherry blossoms have started blooming already, a week earlier than normal. You can see the normal season for the trees near my place in the month-long cherry-blossom time-lapse from a few years ago. It stopped drizzling for a bit late this afternoon, so I went out for a picture.
My main intent this afternoon was to try to get something that highlighted that one tree had absolutely no blossoms yet, while the trees next to it were well on their way. (You can see in the timelapse that the leftmost tree lags the others by a few days, though this year the contrast seems much more stark.)

Nikon D700 + Nikkor 70-200mm f/2.8 @ 200 mm — 1/250 sec, f/2.8, ISO 450 — map & image data — nearby photos
Blooming Backdrop Behind Budding Branch
The shot above is at f/2.8, and is fairly boring, but it's better than the same shot at f/22....

Nikon D700 + Nikkor 70-200mm f/2.8 @ 200 mm — 1/80 sec, f/22, ISO 6400 — map & image data — nearby photos
Knowing that none of those would be interesting, I tried looking straight up....

Nikon D700 + Nikkor 70-200mm f/2.8 @ 70 mm — 1/250 sec, f/5, ISO 200 — map & image data — nearby photos
Buds, but Feeling Barren
And playing around with the new point-curve feature of Lightroom 3 Beta 2, I gave the monochrome stark look a try...

Nikon D700 + Nikkor 70-200mm f/2.8 @ 70 mm — 1/640 sec, f/2.8, ISO 200 — map & image data — nearby photos
post processing done completely in Lightroom
It's not quite my cup of tea, but it's fun to experiment.
Would be cool, literally and figuratively, if it were to actually snow tomorrow... I can imagine snow-laden cherry blossoms might be pretty.....
So in the post a week ago about our visit to the palm reserve on the last day of our short trip to the southern-Japan island of Ishigaki last May, I ended up with a photo of a small tree-climbing lizard.
Here's a slightly larger tree-climbing lizard...

Nikon D700 + Nikkor 24-70mm f/2.8 @ 24 mm — 1/160 sec, f/3.2, ISO 200 — map & image data — nearby photos
Big Lizard, Strange Tree
Even stranger was the location, a long series of underground limestone caves whose only representation above ground was a set of covered stairs descending down from a small parking lot. (There's an entertainment complex some distance away where you buy tickets.)

Nikon D700 + Nikkor 24-70mm f/2.8 @ 38 mm — 1/1600 sec, f/2.8, ISO 200 — map & image data — nearby photos
Entrance to the Caves

Nikon D700 + Nikkor 24-70mm f/2.8 @ 24 mm — 1/15 sec, f/2.8, ISO 6400 — map & image data — nearby photos
Rock. Lights. Path
and the ever-present echo of dripping water

Nikon D700 + Nikkor 24-70mm f/2.8 @ 70 mm — 1/50 sec, f/6.3, ISO 6400 — map & image data — nearby photos
Filling In the Cave
drop by drop, millennium by millennium

Nikon D700 + Nikkor 24-70mm f/2.8 @ 55 mm — 1/15 sec handheld, f/2.8, ISO 6400 — map & image data — nearby photos
Splash Patterns

Nikon D700 + Nikkor 24-70mm f/2.8 @ 35 mm — 1/20 sec handheld, f/2.8, ISO 6400 — map & image data — nearby photos
“Watch Your Head”

Nikon D700 + Nikkor 24-70mm f/2.8 @ 32 mm — 1/50 sec, f/2.8, ISO 6400 — map & image data — nearby photos
Let there be Light
The area you could walk ended under a gaping hole in the ground (the ceiling to us). The cave continued for miles, a sign said, but it was likely unsafe and was closed off to the public.

Nikon D700 + Nikkor 24-70mm f/2.8 @ 42 mm — 1/100 sec, f/2.8, ISO 560 — map & image data — nearby photos
Skylight

Nikon D700 + Nikkor 24-70mm f/2.8 @ 24 mm — 1/100 sec, f/2.8, ISO 1400 — map & image data — nearby photos
Under the Skylight

Nikon D700 + Nikkor 24-70mm f/2.8 @ 24 mm — 1/100 sec, f/2.8, ISO 1600 — map & image data — nearby photos
Under the Skylight
with Anthony adding a bit of context for scale
( For some reason this pair of photos sort of startles me )

Nikon D700 + Nikkor 24-70mm f/2.8 @ 70 mm — 1/50 sec, f/3.5, ISO 6400 — map & image data — nearby photos
Sort of Creepy

Nikon D700 + Nikkor 24-70mm f/2.8 @ 70 mm — 1/10 sec handheld, f/2.8, ISO 6400 — map & image data — nearby photos
Caught in the Act

Nikon D700 + Nikkor 24-70mm f/2.8 @ 34 mm — 1/15 sec, f/2.8, ISO 6400 — map & image data — nearby photos
Hall of Daggers
(I'm giving it a creepy name, but it was not creepy at all to be there... just interesting)

Nikon D700 + Nikkor 24-70mm f/2.8 @ 24 mm — 1/13 sec, f/2.8, ISO 6400 — map & image data — nearby photos
Natural Mesh
wall with a freaky pattern of erosion
A bare bulb was unceremoniously shoved into the recess behind this wildly-eroded rock. I'd love to know how this erosion pattern could have come about.
The caves were cool, making the early-summer heat all the more hot, so when we returned to the surface world, Anthony decided to cool off by taking his shirt of.... and running around like crazy.

Nikon D700 + Nikkor 24-70mm f/2.8 @ 70 mm — 1/2000 sec, f/2.8, ISO 200 — map & image data — nearby photos
Cooling Off
via questionably-effective methods
And so ended our short four-day fairly-photogenic trip to the small far-southern-Japan island of Ishigaki. Here are all the posts from the trip:
- Back from Ishigaki
- On The Road to Ishigakijima
- Linguistic Quiz: Japanese-to-English Translation Gone Bad
- Ishigaki: Sunset from the Oganzaki Lighthouse
- Big Ferns on Ishigaki Island
- Rough Teas Ahead: Answer to the Linguistic Quiz
- First Dinner on Ishigaki: Ishigaki Steak Over Hot Coals
- Pitch-Black Photography: Moon over the East China Sea
- Life is Tenacious: Tiny Ocean Flowers
- Ishigaki Day 2, Morning: Pineapples and the Tamatorisaki Lookout
- Secluded Beach on Ishigaki Island, Part I
- A Better Center-Crosshair Target for Google Earth
- Secluded Beach on Ishigaki Island, Part II
- Ishigaki Day 2: Dynamic Weather at the Hirakubo Lighthouse
- Ishigaki Day 2: Mild Sunset
- Ishigaki Day 2: Winding Down with a Sunset Swim
- Ishigaki Day 2: A Lively Dinner
- Ishigaki Day 2: Through Anthony's Eyes
- Ishigaki Day 3: Floral Quiz on Taketomi Island
- Ishigaki Day 3: Coral Beds Near Taketomi Island
- Zany Roof Guardians on Taketomi Island, in the Far South of Japan
- Taketomi Island Roundup
- Anthony Gets Crabby at the Shore
- A Visit to the Yaeyama Palm Reserve on Ishigaki Island
- The Limestone Caves of Ishigaki Island
One final picture, from the airport on the way home...

Nikon D700 + Nikkor 24-70mm f/2.8 @ 56 mm — 1/100 sec, f/2.8, ISO 250 — map & image data — nearby photos
The Lighter is not left
The sign on the right says to not ask them to store extra lighters that you're not allowed to bring through. I wonder what events led them to feel the need to remind travelers that airport security is not a storage service...
