")
Nikon D200 + Nikkor 17-55 f/2.8 @ 24mm — 1/100 sec, f/7.1, ISO 640 — map & image data — nearby photos
Light Breakfast at “Horizon Club”
Our New-Year's trip to the Amami Islands in southern Japan consisted of two nights on the main Amami-Ooshima island, followed by two nights on the much smaller, much more sparsely-populated next island south, Kakeroma-jima (カケロマ島, the island outlined in blue on the second map of my initial post). The land area covers the size of a large city, but it has a population of only about 1,000.
We stayed at Horizon Club, a “pension” (bed and breakfast) near the eastern ferry port. (Horizon Club – ホライゾンクラブ: web site · blog)
")
Nikon D200 + Nikkor 17-55 f/2.8 @ 17mm — 1/125 sec, f/11, ISO 250 — map & image data — nearby photos
View From The Road
The location consists of a small two-room lodge, and three little cottages, one of which was ours. There's nothing to do anywhere nearby except relax, and perhaps go fishing or scuba diving (the latter being a popular reason for people to visit the island).
")
Nikon D200 + Nikkor 17-55 f/2.8 @ 17mm — 1/25 sec, f/2.8, ISO 2000 — map & image data — nearby photos
Our Cottage
")
Nikon D200 + Nikkor 17-55 f/2.8 @ 17mm — 1/40 sec, f/2.8, ISO 2000 — map & image data — nearby photos
")
Nikon D200 + Nikkor 17-55 f/2.8 @ 38mm — 1/40 sec, f/2.8, ISO 1250 — map & image data — nearby photos
Quaint Little Vanity Area
(horribly out of focus, sorry)
Dinner and breakfast come with the room.
The dinners were extravagant... exceptional.... just amazing in every dimension: presentation, variety, volume, and taste, all prepared by the proprietress who had no formal cooking training before she decided to leave the rat race and start the pension on this remote island six years ago. She does more than just the cooking: she and her husband built the place themselves.
I neglected to take any photos of the dinners (what was I thinking!?) but they easily surpassed those of our previous New-Year's trip (see Food at a Japanese Seaside Ryokan). The only negative I can say about Horizon Club's dinner is that the variety and volume were so great that I'm certain it would be physically impossible for someone to actually eat everything provided.
One evening, we were even treated to an impromptu shamisen performance by the nine-year-old daughter of the cook's helper (seen in the orange vest in these year-old pictures.)
Breakfasts were less elaborate, but still wonderful presentations.
")
Nikon D200 + Nikkor 17-55 f/2.8 @ 17mm — 1/60 sec, f/6.3, ISO 640 — map & image data — nearby photos
Dining Room Ready for Breakfast
")
Nikon D200 + Nikkor 17-55 f/2.8 @ 26mm — 1/30 sec, f/6.3, ISO 640 — map & image data — nearby photos
Looking Toward the Front Room of the Lodge
, Kagoshima, Japan -- Copyright 2008 Jeffrey Eric Francis Friedl, https://regex.info/blog/")
Nikon D200 + Nikkor 17-55 f/2.8 @ 17mm — 1/60 sec, f/7.1, ISO 640 — map & image data — nearby photos
Breakfast, Morning #1
, Kagoshima, Japan -- Copyright 2008 Jeffrey Eric Francis Friedl, https://regex.info/blog/")
Nikon D200 + Nikkor 17-55 f/2.8 @ 17mm — 1/60 sec, f/7.1, ISO 400 — map & image data — nearby photos
Waiting for Mommy, Morning #2
The most amazing thing about these meals, besides that they're provided in the middle of nowhere, is that they are essentially free. The same meals most anywhere else in Japan would cost more than the entire $80-per-person room and board fee charged by Horizon Club. Most Excellent.

Nikon D200 + Nikkor 17-55 f/2.8 @ 44mm — 1/250 sec, f/6.3, ISO 250 — map & image data — nearby photos
Looking for Shells
As you can see from the satellite view, there's not a whole lot around the place (or anywhere on the entire island, for that matter). Stepping across the road from the driveway, you can look out across the water to the bigger island directly to the north.
")
Nikon D200 + Nikkor 17-55 f/2.8 @ 17mm — 1/250 sec, f/11, ISO 250 — map & image data — nearby photos
View from the Driveway
toward Amami-Ooshima

Nikon D200 + Nikkor 17-55 f/2.8 @ 17mm — 1/500 sec, f/9, ISO 250 — map & image data — nearby photos
“Bathroom Closed In Spring”
(and fall and winter)
As I mentioned yesterday, Kyoto city proper doesn't normally get much snow, but today we had occasion to be in the mountains a bit and Anthony got a few moments to play in some snow that hadn't melted yet.
That's not what these pictures are from. 🙂
I thought to use the occasion to post some pictures from last Spring – April 30th – when we found more than a bit of snow on top of a mountain in Kitafurano (Hokkaido, in northern Japan), where the snow doesn't melt away until July.

Nikon D200 + Nikkor 17-55 f/2.8 @ 30mm — 1/640 sec, f/9, ISO 250 — map & image data — nearby photos
Following a Bad Example
It's hard to see, but there's a flying snowball en route between him and the camera.
The “bad example” referenced in the caption above was from an outing the previous month (March 2007) when Fumie got plastered in the face by a snowball.
This “throwing snowballs at Daddy while he takes pictures” idea seems to have been a common theme of our trip to Hokkaido, because I notice now that the first picture of my Snow in May post leads with a similar shot we took the day after these.

Nikon D200 + Nikkor 17-55 f/2.8 @ 55mm — 1/250 sec, f/9, ISO 100 — map & image data — nearby photos
Chunks of Snow Are Made To Be Stomped On

Nikon D200 + Nikkor 17-55 f/2.8 @ 20mm — 1/320 sec, f/9, ISO 100 — map & image data — nearby photos
When I was a kid in Ohio, two bucks would have hired me to clear this entire building

Nikon D200 + Nikkor 17-55 f/2.8 @ 31mm — 1/500 sec, f/8, ISO 160 — map & image data — nearby photos
Helping Hand
Although it was overcast during much of our trip to Hokkaido last spring, we were able to visit many beautiful places, as the pretty scenes that fill my Furano & Biei post category attest to.
I particularly like.... well, all of them, but I “extra particularly” like the pictures and stories in the Pretty Fields / Stinky Feet pair of posts.
 straw mats for the winter")
Nikon D200 + Nikkor 17-55 f/2.8 @ 38mm — 1/125 sec, f/5.6, ISO 400 — map & image data — nearby photos
Tree Snuggies
Today we had a few flakes of snow, which is all the main part of Kyoto normally gets. The outlying areas, especially up in the mountains, can get heavy amounts – one of Anthony's school friends couldn't make it to school today because of the snow in the mountains. A couple of years ago, we did get several inches of accumulation, which made the Heian Shrine quite pretty.
One sure sign of winter in Japan are the snuggies that you see appear on trees in the late fall. These komomaki straw mats – wrapped around the trunks of pines and cedars – are meant to provide the larvae of pine caterpillars an attractive place to nest for the winter. The point is not to provide cushy accommodation for the young bugs, but to kill them: in the spring, the mats are removed and incinerated, relieving the tree of a major pest.
Update: perhaps not that effective... see this Japan Times article.
 straw mats for the winter")
 straw mat for the winter")
Nikon D200 + Nikkor 70-200mm f/2.8 @ 135mm — 1/750 sec, f/5.6, ISO 200 — map & image data — nearby photos
If you've never seen them before, they seem really, really odd. (Actually, they seem pretty odd even if you have seen them before.)
I took these pictures in late November, the sunnier ones on the same outing as those in my Making the Best of Bright Light in Fall-Color Photography post.
 straw mats for the winter")
Nikon D200 + Nikkor 18-200mm f/3.5-5.6 VR @ 105mm — 1/90 sec, f/5.3, ISO 400 — map & image data — nearby photos
 straw mats for the winter")
Nikon D200 + Nikkor 70-200mm f/2.8 @ 200mm — 1/2000 sec, f/3.2, ISO 200 — map & image data — nearby photos
Straw mats can also be used for more serious, all-encompassing protection:

That's a closeup of the freaky “cat in the hat” display I ran into at the Kyoto Botanical Gardens a year ago.
On a wholly unrelated note that somehow seems to be related (huh?), here are some trees being protected from the winter wind by huge walls of twig bundles.

Nikon D200 + Nikkor 17-55 f/2.8 @ 38mm — 1/320 sec, f/4.5, ISO 320 — map & image data — nearby photos
Standing Against The Wind
The trees perhaps look like little bonsai, but they're more than twice my height. I took these pictures just after sunrise in Takamatsu, Japan, last month.

Nikon D200 + Nikkor 17-55 f/2.8 @ 17mm — 1/160 sec, f/2.8, ISO 320 — map & image data — nearby photos
There's a Tree Behind There, Somewhere

Nikon D200 + Nikkor 17-55 f/2.8 @ 18mm — 1/200 sec, f/2.8, ISO 320 — map & image data — nearby photos

Nikon D200 + Nikkor 17-55 f/2.8 @ 17mm — 1/350 sec, f/4.5, ISO 320 — map & image data — nearby photos
In areas of heavy snow requiring more extreme measures, yukitsuri is used, which is best described as tree bondage. (That link is to a Japan Times article by Alice Gordenker. It's one of her well-researched and entertaining What the heck is that? columns that I look forward to each month.)
Back to our thatched wall, I'm not sure what exactly it's made of, but I've seen the same techniques used in walls at various shrines and temples (such as Kyoto's Hougon'in and Giouji Temples), and as a decorative veneer of an outside wall of a private residence.
のあぶり餅")
Nikon D200 + Nikkor 17-55 f/2.8 @ 55mm — 1/50 sec, f/3.5, ISO 500 — map & image data — nearby photos
Mochi, Kinako, and Bamboo Skewers
Dipping into my photo archives back to last February, I've been wanting to write about our visit to Ichiwa in north-western Kyoto, a thousand-year-old family-run purveyor of aburi-mochi (あぶり餅 – “lightly grilled mochi”): grilled kinako mochi on skewers.
Mochi is basically cooked sweet rice that's been pulverized into a sticky, gooey paste. Kinako is flour made from roasted soybeans.
")
Nikon D200 + Nikkor 17-55 f/2.8 @ 24mm — 1/200 sec, f/7.1, ISO 200 — map & image data — nearby photos
Unassuming Shop
The family started business in the second year of the reign of the emperor Chouhou (長保2年), which would place it square on Year 1000 of the western calendar. 1,008 years and 24 generations of history later, it's currently run by Mieko Hasegawa.
I'm not sure how much stock to place in this talk of 1,000 years of history, because if you count two more generations for her current kids and grandkids, that's still more than 37 years/generation. That seems to be a bit much — I'd expect closer to 20 years/generation over the long haul, which would be about 50 generations total.
In any case, the shop is right next to Kyoto's Imamiya Shrine (which has been around since 994, six years longer than the shop). On the same day we visited last February, I photographed some very early plum blossoms at the shrine. Blossoms before Valentine's Day!.
I didn't have time to post much about it at the time because it was just a few days before Lightroom 1.0 was released and I was working like a madman on my Lightroom custom metadata-viewer preset builder (coincidentally, the picture of Anthony on that post was taken just in front of the mochi shop).
Almost a year delayed, I'm finally getting around to posting about the mochi experience.

Nikon D200 + Nikkor 17-55 f/2.8 @ 17mm — 1/45 sec, f/3.5, ISO 500 — map & image data — nearby photos
It's Time To Make The Aburi-Mochi
In the view inside the shop shown above, I assume that the lady sitting at center with the blue apron is the current 24th-generation proprietress, with her daughter standing in the red check apron, and her granddaughters sitting at the table with her. She'd been the head of the shop since her mother passed away the previous year, at 90.
They take a handfuls of bamboo skewers, roll grape-sized bits of sticky mochi in the kinako powder that covers the tatami-mat table. Besides imparting taste, the kinako powder serves the same “destickify” purpose as the flour did for the guy making udon noodles I posted about the other day.

Nikon D200 + Nikkor 17-55 f/2.8 @ 52mm — 1/30 sec, f/2.8, ISO 500 — map & image data — nearby photos

Nikon D200 + Nikkor 17-55 f/2.8 @ 55mm — 1/125 sec, f/2.8, ISO 500 — map & image data — nearby photos
Once they have enough for your order prepared, they bring them outside to the front of the shop where they have open hot coals, and grill them for a few minutes. I neglected to get a picture of that, but there's a nice one on this page.
Once they're done, they cover them in a sweet kinako-based sauce, and bring them to you along with a cup of tea.

Nikon D200 + Nikkor 17-55 f/2.8 @ 38mm — 1/90 sec, f/5, ISO 500 — map & image data — nearby photos
Small, but Filling
You get 15 skewers for 500 yen (about five bucks).
This is the shop that invented this dish, but immediately across the street is another, although be warned that the other shop has been around only a short time (not much more than 400 years).
At the time, I was still getting used to my Nikkor 17-55/2.8 lens, playing with its relatively shallow depth of focus...

Nikon D200 + Nikkor 17-55 f/2.8 @ 55mm — 1/180 sec, f/2.8, ISO 500 — map & image data — nearby photos
Playing With Shallow Depth of Focus
If I had the chance to do that shot again, I'd stop the lens down just a bit. Hmmmm, I often find myself in its general area, so I should just stop in again for a snack...
Piglets are for Lightroom 1.x plugins only, and are not needed in Lightroom 2 or later.
The four export plugins for Adobe Lightroom that I've written – for uploading to Zenfolio, SmugMug, Flickr, and Picasa Web – are useful, I hope, and offer lots of options and ways for the user to configure how their images are processed. If I had more time and more skill, though, the plugins could do more. So much more.
For example, Tim Armes' LR/Mogrify Lightroom Export Plugin offers a lot of nice features that I wish my plugins offered, including:
- the ability to add watermark overlays (both text and images)
- the ability to add borders around images
- the ability to apply output sharpening of various types
- the ability to and convert the image to any color space you happen to have on hand.
- the ability to do anything that ImageMagick's “mogrify” command allows, which is a lot
The Problem
Many of these are features that Lightroom should really be providing itself, and I have no doubt some far-off version of Lightroom will provide them, but just as Photoshop Version 1.3 did not have all the features offered in the current version of Photoshop (Version 10 or something like that), I can understand Lightroom's current situation.
So, anyway, Tim made a plugin that does all these nice things, but these features are not really destination-specific features: one should be able to invoke them with any export, including exports via my plugins.
The Solution
With Tim's permission, I could have hacked out the juicy parts of his plugin and grafted them to mine, which would have taken only a few minutes because he's already done the hard work of developing it. But that would have been too easy, so instead, I created the infrastructure for normal plugins like mine to use fourth-party “plugin plugins” developed by others.
Put another way, I built the mechanics for Tim or anyone else to offer their own image-processing components as a sub-plugin to any of my plugins. Furthermore, this “sub-plugin infrastructure” is reusable by other full-fledged plugins – not just my own – so other plugin developers can easily expose their plugins to the benefits of the universe of “sub plugins” that will hopefully emerge.
“Piglets”
The previous two paragraphs don't flow very well because the phrases “plugin plugins” and “sub plugins” are just too awkward. I came up with a new name to label this new technology, by following this stream of thought:
Okay, so I think it's cute, but you'll be forgiven if you think it's corny. Nevertheless, that's the name, and so a piglet is a plugin for one of my Lightroom export plugins, or for any plugin that uses my piglet infrastructure.
I developed this infrastructure in consultation with Tim, and he worked in tandem to provide his LR/Mogrify plugin as a piglet as well.
Just to give you an idea of what this can mean, here's a look the export dialog from my Flickr plugin, with Tim's piglet installed and enabled. In it, notice all the new sections with “PIGLET:” titles....
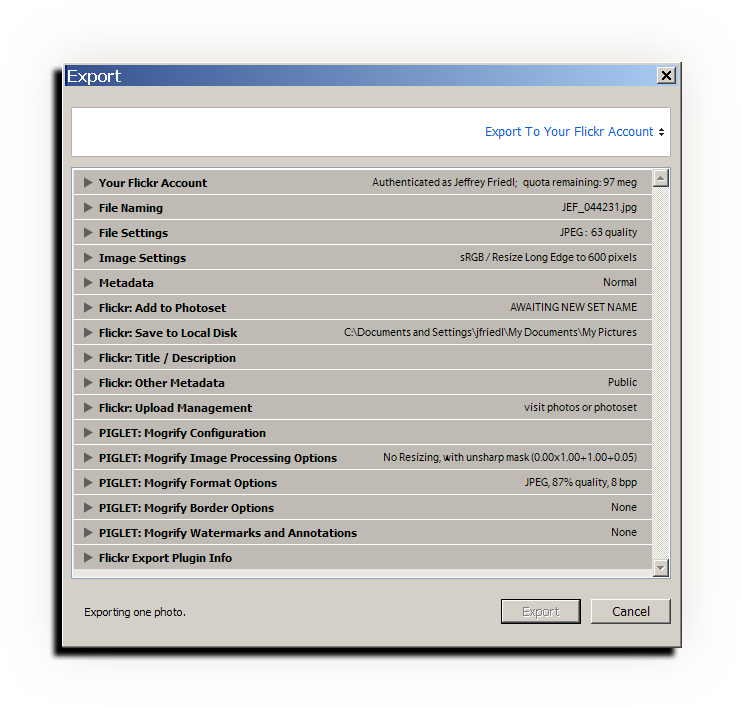
Now, to give a further feel for the power here, here's the same dialog (with just the one piglet enabled, mind you) with all the sections opened up. The new sections that come from the LR/Mogrify piglet are outlined in green:

Wow, that is, by far, the largest image I've ever used in a post! For comparison, see the relatively-tiny dialog on the announcement for Version 1 of my Flickr plugin.
The piglet (or piglets) insert their own sections into the dialog between the main plugin sections, and the final plugin-info section.
Notice at the very bottom of the full dialog, in the middle of the “Flickr Export Plugin Info” section, there's a “Manage plugin additions (“piglets”)” button. Clicking on that brings up the Piglet Manager:
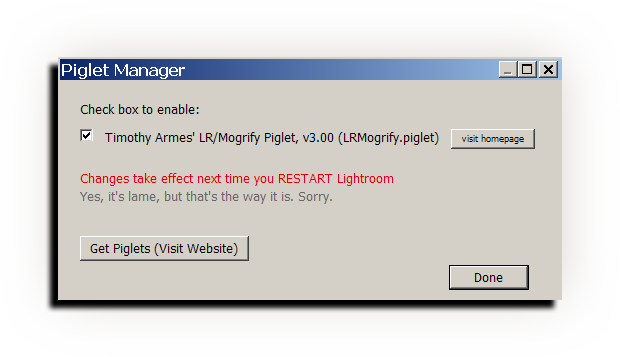
Each piglet available to the plugin is listed – just one in this example – and each can be enabled or disabled by checking or clearing the checkbox.
Piglets that are not enabled do not show up at all in the plugin export dialog, as if they did not exist. To enable a piglet, check its box, then restart Lightroom.
By the way, and wholly unrelated to this enabling/disabling of piglets at the main plugin level, note that a piglet can contain a “disable me” feature, such as LR/Mogrify does (as seen in the first checkbox in the green-highlighted section of the full dialog screenshot shown above). This is simply a convenient way for a piglet to let you turn its features on and off for a specific export.
The Down Side: Piglet Maintenance
It's been a daunting task to get all this to work with the limited features provided by the initial beta release of the API found in Lightroom 1.3, and one result is that installing piglets is not as smooth as I'd like.
A piglet can be as simple as a single *.piglet file, or more complex. Tim's LR/Mogrify piglet is delivered as three files (one *.piglet file, and two images used in the UI). In any case, installing a piglet is as simple as copying the file or files to the plugin folder, but there are caveats:
If you use multiple plugins (say, both my Flickr and Zenfolio plugins), you need to copy a piglet's files to both if you want to use a piglet in both.
If you're not sure where to find a plugin's folder, revisit the plugin install instructions for a list of likely locations to find the per-plugin *.lrplugin or *.lrdevplugin folders.
On a Mac, if the plugin is named with *.lrplugin, before you can copy files into it with Finder, you must Ctrl-Click on it and choose “Show package contents”. (This is not required to copy files from within Terminal.)
After installing a piglet by copying files, you can then invoke the piglet manager to enable the piglet. You'll have to restart Lightroom for it to take effect. Sorry.
If you upgrade the plugin, replacing it with a new version, you must remember to re-copy your piglet file(s) to the new plugin folder.
Each. Time. You. Upgrade.
Ugh. At least, you don't have to revisit the piglet manager to enable the plugin; that's required only the first time, or if you want to re-enable a piglet after having disabled it.
BE SURE TO KEEP A COPY OF YOUR PIGLETS SO THAT YOU CAN REPOPULATE YOUR PLUGINS WHEN YOU UPGRADE THEM. This is perhaps not so vital for a free piglet that you can always go and re-download, but it's vital for any piglet that you've paid for.
This may be starting to sound like a hassle, because it is. Luckily, this hassle comes into play only when upgrading.
My Tech-Related Photography Posts
- My Lightroom-to-iPad Workflow
- Lightroom Goodies (lots of plugins)
- Digital Image Color Spaces
- Online Exif (Image Data) Viewer
- Jeffrey's Autofocus Test Chart
- Photoshop Calendar-Template-Building Script
- How to Prepare Photos for an iPad
- A Qualitative Analysis of NEF Compression
- Tripod Stability Tests
more...
Getting Piglets
See my Piglets Page for a list of piglets that I know about, and how to get them.
Thanks
Building all this was a fairly lengthy process, made longer by the new-year's break and my having caught a cold (that I still have... ugh). Throughout, Tim Armes and Gilles Theophile worked patiently and tirelessly with me to get everything working and all the pieces into place.
I should also thank Gilles for his work in providing the French translations for all my plugins (and for Tim's plugins and piglets as well). Even if you don't read French, users of Lightroom will appreciate the design of Gilles' Lightroom site.
I'd also like to thank Andrei Zmievski and Brien Wankel for debugging assistance.