
Nikon D700 + Nikkor 24-70mm f/2.8 @ 62 mm — 1/640 sec, f/2.8, ISO 1000 — map & image data — nearby photos
Well-Isolated Offering Statuette
Sanzen-in Temple, Kyoto Japan
On our visit to the Sanzen-in Temple in the mountains north of Kyoto a couple of weeks ago, at the highest area that we ventured to (where Anthony got his prize for doing the “sticker rally”), there were racks and racks of little “offering” statues, each representing a donation to the temple.....

Nikon D700 + Nikkor 24-70mm f/2.8 @ 24 mm — 1/320 sec, f/9, ISO 1000 — map & image data — nearby photos
Offerings
lots and lots and lots of offerings
Each face of each “wall” has 1,500 statuettes, so there are 12,000 statuettes in these four walls, with more in the background. These were the only “offering” things I noticed, which makes a stark comparison to the Fushimi Inari Shrine, in Kyoto's southern mountains, where everything not nailed down is an offering, and everything nailed down is, too (see here, here, and here).
Of course, row after row after row of little statues is photographically inviting, but my long-suffering family had already started back down the mountain, so I had only a few moments to try to satisfy my artistic curiosity. When I got home, I was surprised by two things. First, at how perfectly isolated the focus status is in the f/2.8 shot above. That's what I was going for, of course, but I didn't think it would actually work out so well.
Then, in this f/16 shot, where more statuettes are in focus, it seems somehow that each statue is unique (and not just weathered differently), but I can't absolutely identify what's different among them....

Nikon D700 + Nikkor 24-70mm f/2.8 @ 62 mm — 1/125 sec, f/16, ISO 6400 — map & image data — nearby photos
Uniquely the Same?
The lips are almost completely worn from the main-focus statue (the 3rd from the left), especially compared with the one to the left (2nd from the left). But his eyebrows seem bolder, not more worn, so perhaps they're just different generations of the same kind of mold? But in looking down the line, there's a not-so subtle irregularity that disappears upon close inspection, like those gray dots in the corners among black squares.
If I ever go back, it's on my list to investigate them more, both photographically and otherwise.
Update: I did go back, so the story is continued there.
This post follows from Secluded Beach on Ishigaki Island, Part I, about our trip to the beach on our second day of a short trip to Ishigaki Island in the far south of Japan. Part I included this picture looking north from our spot on the beach....

Nikon D700 + Nikkor 24-70mm f/2.8 @ 24 mm — 1/500 sec, f/22, ISO 2500 — map & image data — nearby photos
We saw only a few people the whole time we were there, including one guy who walked up the beach toward the outcropping seen above, and just disappeared. I wondered what was over there, so I took a stroll.
When we'd first arrived, I'd seen someone way down the beach playing with some dogs. The someone had long gone, but it turns out that the dogs were still there...

Nikon D700 + Nikkor 24-70mm f/2.8 @ 28 mm — 1/500 sec, f/5.6, ISO 800 — map & image data — nearby photos
Footprints and Some Feral Dogs
Further along, still...

Nikon D700 + Nikkor 24-70mm f/2.8 @ 70 mm — 1/500 sec, f/5.6, ISO 1800 — map & image data — nearby photos
Cave and.... Gravestone?
I don't know what the thing in the cave is, but it looked to be poured concrete, and vaguely in the shape of Okinawan grave markers (like this). Not very high status, but a nice location, I guess.
A bit further, and you ran out of land....

Nikon D700 + Nikkor 24-70mm f/2.8 @ 24 mm — 1/500 sec, f/11, ISO 900 — map & image data — nearby photos
Time to Get Wet

Nikon D700 + Nikkor 24-70mm f/2.8 @ 24 mm — 1/500 sec, f/11, ISO 900 — map & image data — nearby photos

Nikon D700 + Nikkor 24-70mm f/2.8 @ 24 mm — 1/500 sec, f/11, ISO 640 — map & image data — nearby photos
View Around the Corner
I continued walking in the shallow ocean along the coast, now out of sight from our spot on the beach where I'd left Fumie and Anthony. The coast here was dotted with little short stretches of isolated beach, and in one such area I found three guys having a little barbecue. Looking back after I'd passed them....

Nikon D700 + Nikkor 24-70mm f/2.8 @ 66 mm — 1/500 sec, f/3.2, ISO 200 — map & image data — nearby photos
Private Party

Nikon D700 + Nikkor 24-70mm f/2.8 @ 24 mm — 1/500 sec, f/11, ISO 800 — map & image data — nearby photos
Another Private Beach
The one above seemed to have a cave, which I found too hard to pass up, so I headed landward and pushed inland, following in the footsteps (so to speak) of Cook, Drake, Columbus, Cartier, and other famous explorers...

Nikon D700 + Nikkor 24-70mm f/2.8 @ 24 mm — 1/160 sec, f/6.3, ISO 1800 — map & image data — nearby photos
Antechamber to the Cave
with all kinds of weird, freaky roots and vines and creepy stuff

Nikon D700 + Nikkor 24-70mm f/2.8 @ 24 mm — 1/160 sec, f/6.3, ISO 1800 — map & image data — nearby photos
Check Out This Freaky Tree

Nikon D700 + Nikkor 24-70mm f/2.8 @ 50 mm — 1/160 sec, f/6.3, ISO 3200 — map & image data — nearby photos
Close-Up
Talk about persistence!

Nikon D700 + Nikkor 24-70mm f/2.8 @ 24 mm — 1/60 sec, f/5, ISO 6400 — map & image data — nearby photos
Looking Into The Cave
Looks small, but it was the size of a convenience store inside

Nikon D700 + Nikkor 24-70mm f/2.8 @ 70 mm — 1/3200 sec, f/2.8, ISO 200 — map & image data — nearby photos
View from the Cave
I'd left Fumie and Anthony for too long as it was, so after the cave I headed back. It was quite pretty.

Nikon D700 + Nikkor 24-70mm f/2.8 @ 48 mm — 1/1250 sec, f/2.8, ISO 200 — map & image data — nearby photos
Wild Iris
they grew in small batches from barren rock all over

“The MILK as milked”
Anthony noticed a crown-shaped image on a carton of milk (seen at right), and asked what it was. I explained that it was what happens when a drop of milk splashes, and he was quite interested, though somewhat skeptical.
I promised to show him, explaining that it was too fast for the eye to notice, but that we could use a camera to stop the action. His interest was piqued.
I set the camera up on a tripod, got a black dish and put some milk in it, set my SB-800 flash as a slave on 1/64 manual power and pointed it at the dish, dipped a thin straw into a glass of milk to get some, and let a drop fall into the dish. Timing and aim were a bit tricky, but in short order we had a good shot...

As we checked the image on the screen on the back of the camera, Anthony was positively amazed and very excited.
The flash was very close (you can see it a bit in the lower-left of the frame above), and eventually I thought to move it further away, to make the shadows more harsh, which I thought might add some drama. I also added more milk, to create a deeper pool...

Small drops produced dainty splashes...

I also wanted to show what happens when the crown collapses on itself, slamming together in the center and, with no where else to go, shoots straight back up like Old Faithful. I knew this would be more pronounced with a deeper pool, so I switched containers...

I tried some more with a dark tray under the dish, but after a few minutes he had had enough, so I took the camera off the tripod to get a shot showing the setup...

I then brought the camera back to my office to clean the milk-splattered lens.
This all reminded me of the science-fair project I did for my high-school physics class. I got a high-speed scientific strobe from the teacher, Mr. Killius (whom we all called “Dr. K”) and set up a trigger made from wire and barely-separated aluminum foil, on top of which I put a plate filled with water. When the a drop hit the plate, the strobe was triggered. The strobe had a delay timer, so I could dial in delay to catch later parts of the splash, and took a bazillion pictures on old B&W film that I then developed myself in the high-school darkroom. (This was probably my last serious use of a camera until 20+ years later I fell back into photography when I bought a Nikon D200.)
Based on all these photos, I postulated how the various forces in physics worked together to explain what I saw, from the crown, the “jewels” on the crown, the “old faithful” appearing later, etc. Now that I think about it, I should have been able to find all this in the library, but at the time it apparently didn't occur to me, and I derived it all myself.
At the science fair, some officials would come around and ask questions, and one guy in particular really gave me the third degree, especially about the force interactions toward the end of the splash. I though it was a bit weird that he was so interested, but I was able to answer all his questions.... until he asked “where else in nature do you see this?”. Huh? What kind of question is that? In a rainshower, I guess. I dunno. I had no idea what he was after, and probing on my part didn't reveal a clue, so in the most literal sense, I was totally clueless.
And with that, I found out later, I missed Best of Show, and it was granted to someone else. In retrospect, I find it hard to believe that a bunch of photos of water splashes could even be considered interesting, so maybe I'm misremembering the details. I do remember, vaguely, seeing the exhibit that did win and thought that it was a heck of a lot better than mine.
Anyway, I also found out that the answer the guy wanted was the little mountain found in the center of impact craters on the moon. The forces of impact reverberate throughout the body of the moon, then reflect right back to the point of impact, giving the presumably molten rock a bit of a push upward, sort of like the “old faithful” above. Or something like that.
By the way, about the milk carton, the “Milk as Milked” refers to the fact that the percent of fat is not controlled, but natural (as opposed to “lowfat” or “2% milk” common in The States). Japanese milk generally is left like this. Americans, used to watered-down milk, sometimes think that Japanese milk has had sugar added. But it hasn't.... it's milk as milked (assuming, of course, that the cow udder has a pasteurizer built in. 🙂 .)
Just to continue on the string of tech/geek posts I've had lately, a quick addendum to yesterday's “Programming in the Stone Age: SHA-1 and HMAC-SHA1 in Pure Lua”, I've also published my Twitter OAuth Authentication Routines in Lua, for Lightroom Plugins in case anyone has use for it.

Over the last month or so I've added a bunch of new Google Earth interaction to my Geoencoding Support Plugin for Adobe Lightroom. Especially interesting for those without a GPS unit or geoencoding old photos without a tracklog is the ability to navigate to a location in Google Earth, then import that location directly to a photo.
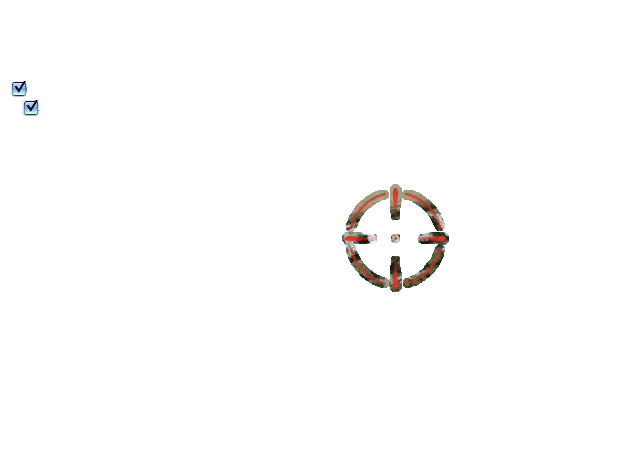
However, part of the problem is understanding exactly the location that will be imported. It's the center of the view screen in Google Earth, but unless you zoom way up, it's hard to visualize the exact spot that will be used. I've seen crosshairs for Google Earth out on the web, but didn't like any of them for choosing locations, so I built my own and include it with the plugin. (That's it in the upper-right corner.)
Its main features are that it leaves the central area mostly unobscured, but the very center has a red dot, to leave that central location absolutely unambiguous. This all might sound like a trivial thing, but I can't tell you how much of a difference it makes. (But I'll try: a lot.)
Here's a photo of Anthony during our recent trip to Ishigaki Island in the far south of Japan, after our Day 2 visit to the beach...

Nikon D700 + Nikkor 70-200mm f/2.8 @ 70 mm — 1/500 sec, f/9, ISO 800 — map & image data — nearby photos
Braving the Winds
If I were to navigate to the location on Google Earth to geoencode the photo, I might end up with a view like this:
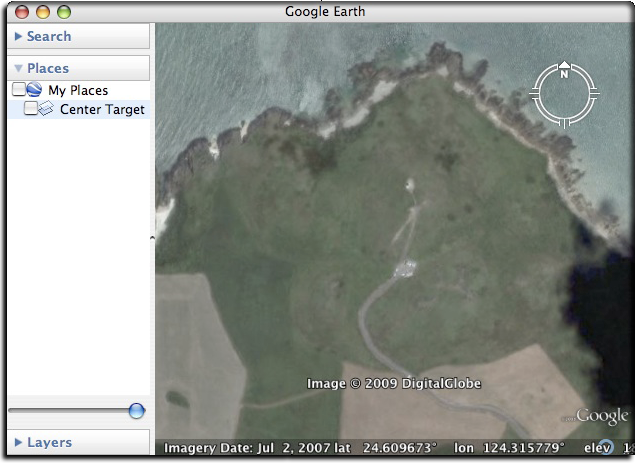

To be as accurate as I want to be, I'd have to take the time to zoom much closer to get a better feel for the location that was in the center, but turning on the target makes it much easer. Click the “Center Target” checkbox in the photo above, or here, to toggle the target on and off.
Unambiguous.
Here's another example, trying to pinpoint an apartment in Paris (a location I picked only because the photo-realistic Eiffel Tower is cool)...
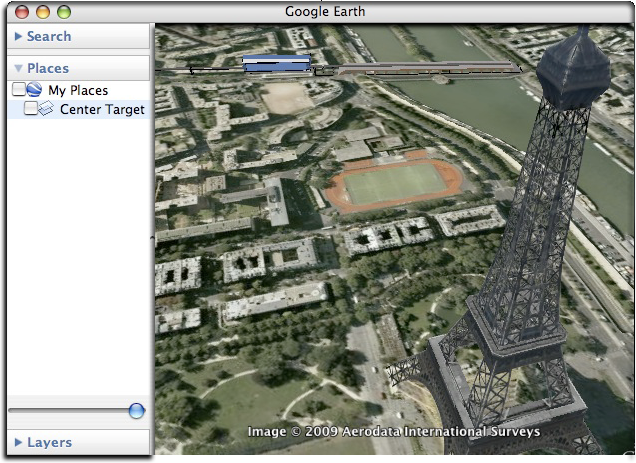
To get that specific corner of that specific building would normally require zooming way up, which is fine if it's just one photo, but it gets old quickly if you have a bunch.
Anyway, the target is included with my plugin, but I thought I'd post it here for all to enjoy.