 -- Copyright 2010 Jeffrey Friedl, https://regex.info/blog/")
Nikon D700 + Nikkor 24mm f/1.4 @ 24 mm — 1/50 sec, f/1.4, ISO 1100 — map & image data — nearby photos
Me With Sergey Kolychev
Last night at the Eikando Temple, Kyoto Japan
An old friend from my days toiling in the bit mines at Yahoo! Finance in California was passing through Kyoto on a tour of Japan, and we met up last night for a few hours.
We took a walk over to the Eikando temple to see their evening lightup. I was astounded to find that it wasn't jammed packed... I guess it's still early in the season. I've written about it before (here) from having visited just the outside — you can enjoy quite a bit of the lightup from near the entrance without having to pay — but last night I actually went in for the first time.
 -- Kyoto, Japan -- Copyright 2010 Jeffrey Friedl, https://regex.info/blog/")
Nikon D700 + Nikkor 50mm f/1.4 @ 50 mm — 1/40 sec, f/1.4, ISO 4500 — map & image data — nearby photos
Early In The Season
still lots of green; not yet a big crowd
 -- Eikando Temple (永観堂) -- Kyoto, Japan -- Copyright 2010 Jeffrey Friedl, https://regex.info/blog/")
Nikon D700 + Nikkor 50mm f/1.4 @ 50 mm — 1/50 sec, f/1.4, ISO 4500 — map & image data — nearby photos
But Many Splashes of Color
( in autumn, “green” does not seem to be considered a color )
 -- Kyoto, Japan -- Copyright 2010 Jeffrey Friedl, https://regex.info/blog/")
Nikon D700 + Nikkor 50mm f/1.4 @ 50 mm — 1/50 sec, f/1.4, ISO 1600 — map & image data — nearby photos
Generic Path
the same as this one photographed on a gloomy day last year
 -- Kyoto, Japan -- Copyright 2010 Jeffrey Friedl, https://regex.info/blog/")
Nikon D700 + Nikkor 50mm f/1.4 @ 50 mm — 1/50 sec, f/1.4, ISO 1000 — map & image data — nearby photos
Vivid
but difficult to photograph without blowing out the colors toward white
I've gone ahead and added desktop-background links under some of the nicer photos on this post.
 -- Kyoto, Japan -- Copyright 2010 Jeffrey Friedl, https://regex.info/blog/")
Nikon D700 + Nikkor 50mm f/1.4 @ 50 mm — 1/80 sec, f/1.4, ISO 2200 — map & image data — nearby photos
Another Path
less colorful than the first
 -- Kyoto, Japan -- Copyright 2010 Jeffrey Friedl, https://regex.info/blog/")
Nikon D700 + Nikkor 50mm f/1.4 @ 50 mm — 1/80 sec, f/1.4, ISO 900 — map & image data — nearby photos
Subdued
These mild colors can be some of the most pretty in person, but most difficult to capture
 -- Copyright 2010 Jeffrey Friedl, https://regex.info/blog/")
Nikon D700 + Nikkor 50mm f/1.4 @ 50 mm — 1/40 sec, f/1.4, ISO 6400 — map & image data — nearby photos
Bridge and Lake
behind an out-of-focus foreground of wispy white grass
 -- Kyoto, Japan -- Copyright 2010 Jeffrey Friedl, https://regex.info/blog/")
Nikon D700 + Nikkor 50mm f/1.4 @ 50 mm — 1/80 sec, f/1.4, ISO 6400 — map & image data — nearby photos
Wispy White Grass
That's the same grass in the lead shot of last year's “Holy Cow, the Gardens at Kyoto's Eikando Temple are Gorgeous!”
Also, it's the same kind of grass seen in last week's “Temple Hopping in the Mountains of South-Western Kyoto”. I really like it.
I was at f/1.4 for all the photos above, which was still very much pushing the limits in the general darkness of the gardens and without a tripod, but I went ahead and tried a shot with the Voigtländer which opens up only to f/2.5. You can't expect much with a free-standing 1/20th of a second at 125mm, but the biggest problem with the result is that while I was switching lenses, some ducks decided to swim across the lake, turning the glass-smooth surface into a bunch of ripples...
 -- Kyoto, Japan -- Copyright 2010 Jeffrey Friedl, https://regex.info/blog/")
Nikon D700 + Voigtländer 125mm f/2.5 — 1/20 sec freestanding, f/2.5, ISO 6400 — map & image data — nearby photos
Ripply
 -- Kyoto, Japan -- Copyright 2010 Jeffrey Friedl, https://regex.info/blog/")
Nikon D700 + Nikkor 50mm f/1.4 @ 50 mm — 1/160 sec, f/1.4, ISO 4000 — map & image data — nearby photos
Rest Area
ready for next-week's crowds
 at the Eikando Temple, Kyoto Japan -- Powerful, But Somehow Soft -- Eikando Temple (永観堂) -- Copyright 2010 Jeffrey Friedl, https://regex.info/blog/")
Nikon D700 + Nikkor 50mm f/1.4 @ 50 mm — 1/160 sec, f/1.4, ISO 1100 — map & image data — nearby photos
Powerful, But Somehow Soft
 -- Kyoto, Japan -- Copyright 2010 Jeffrey Friedl, https://regex.info/blog/")
Nikon D700 + Nikkor 50mm f/1.4 @ 50 mm — 1/60 sec, f/1.4, ISO 640 — map & image data — nearby photos
Due Diligence
 -- Kyoto, Japan -- Copyright 2010 Jeffrey Friedl, https://regex.info/blog/")
Nikon D700 + Nikkor 50mm f/1.4 @ 50 mm — 1/60 sec, f/1.4, ISO 1250 — map & image data — nearby photos
Artsy Fartsy Bonsai
the angle makes the branch look a bit like a bonsai
 -- Kyoto, Japan -- Copyright 2010 Jeffrey Friedl, https://regex.info/blog/")
Nikon D700 + Nikkor 50mm f/1.4 @ 50 mm — 1/60 sec, f/1.4, ISO 2500 — map & image data — nearby photos
Reverse-Angle Bridge Reflection
As nice as the Eikando gardens are during the night lightup, I've got to say that I prefer them during the day, even if the day is overcast and the gardens are crowded with people, as evidenced here and here.
 -- Kyoto, Japan -- Copyright 2010 Jeffrey Friedl, https://regex.info/blog/")
Nikon D700 + Nikkor 50mm f/1.4 @ 50 mm — 1/60 sec, f/1.4, ISO 3200 — map & image data — nearby photos
Sergey in Kyoto
Behind him to camera right up in the mountain is a lit-up pagoda (seen here) that he wanted in the photo, but it's too out of focus to really tell what it is.
Sergey is pretty much a quintessential “American Dream” story. Ten years ago he was living in Ukraine with his wife and a couple of toddlers. He replied to a job-wanted posting I'd placed on behalf of Yahoo!, and so I interviewed him from California over ICQ (the one and only time I've ever used it).
It was difficult to find good engineers at the time, and Sergey distinguished himself by clearly having a clue. We hired him, brought him and his family over to America, and he became an important part of the Yahoo! Finance family where he remains today. He's since become and American citizen (and with great efforts of his wife Tanya, his kids are fully bilingual in English and Russian) and for some reason a few years ago he picked up an interest in Japan and began studying Japanese at home. This is his first visit to Japan, but he can speak Japanese quite adequately, and it seems that he can read much better than I. Wow.
Today his plan was to meet his Japanese teacher for the first time (he'd been taking lessons over Skype for a while), and tomorrow his tour moves on to Nara.
It was fun to visit with him again.
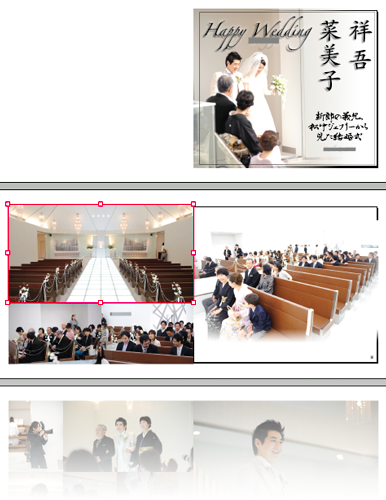
Pages Being Laid Out in Adobe InDesign
In my “Namiko Candid Bride Portrait” post the other day, I mentioned that I'd made a photo book for my brother-in-law Shogo's wedding, and showed a two-page spread of a photo of his bride that I was proud of. You can see in the last photo of that post a bit of the 80-page book I created. In this post, I'll talk about the workflow I use to create photo books with Lightroom, InDesign, and Blurb.
This workflow requires Lightroom 3. As for InDesign, I use CS5, but the same workflow should work with older versions of InDesign (at least back to CS3 when I created this workflow).
Before I go into the details, I must give some disclaimers:
I'm no expert in this, so this is what I happen to do, but I don't claim that it's the best method. I'll describe why I've made some decisions, which may help you evaluate it for yourself. This workflow does not, for example, incorporate soft proofing because it would add a great deal of complexity to an already kludgy workflow, and my monitor's not calibrated at the moment anyway (because my monitor-calibration tool suffered an ill-timed breakdown).
My photo books tend to be complex, with each page laid out specifically for the photos. Sometimes I'll have one photo across a two-page spread, one photo per page, or a mix of a bunch of different sizes all on the same page. I tend to be guided by an idea of the story I want to tell, hemmed in by the reality of what photos I have available, and what photos visually “fit” the space constraints of the page and each other. If you do a simple one-picture-per-page book, you might not even need InDesign.
As much as I love Adobe Lightroom, I hate Adobe InDesign. It's a poorly-thought-out kludgy inefficient troublesome bundle of frustration wrapped in a bad user interface. Maybe it's just not meant for building photo books and I'm using the wrong tool for the job. I hate it, but I have learned how, with great effort and much grinding of teeth, to use it to get the job done.
Books printed with Blurb can be very nice, and the experience can be very smooth. However, if the experience is not smooth for whatever reason, woe be to you, because Blurb is a horrible company that just doesn't get the concept of customer service, and they proactively find ways to screw their customers. When things go well, the quality/cost ratio is very good, which is why I use them, but it's also why they can afford to be so atrociously arrogant. Before embarking on a project with them, realize that you are rolling the dice and that much pain may await you.
Overall Workflow
My Tech-Related Photography Posts
- My Lightroom-to-iPad Workflow
- Lightroom Goodies (lots of plugins)
- Digital Image Color Spaces
- Online Exif (Image Data) Viewer
- Jeffrey's Autofocus Test Chart
- Photoshop Calendar-Template-Building Script
- How to Prepare Photos for an iPad
- A Qualitative Analysis of NEF Compression
- Tripod Stability Tests
more...
The whole reason that a post like this is necessary is because there is absolutely no integration between Adobe Lightroom and Adobe InDesign, so we have to figure something that sort of halfway maybe hopefully works.
The overall workflow is to select / prepare photos in Lightroom, export them as developed images to new files on disk via a publish service, then link to those images from InDesign. Because you're using a Lightroom publish service, you can continue to tweak the photos in Lightroom as you craft your book, republishing them from Lightroom and having InDesign pick up the changes automatically.
Once you've crafted your book and exported the PDF files for the cover and pages from InDesign, you upload them to Blurb, order your book, and pray. And wait.
Lightroom Setup
My setup in Lightroom is more complex than it may seem to require, but you'll see why below.
First, I create a normal (non-publish) collection of the photos I want to consider for the book. This can be a regular collection into which photos are dragged, or a smart collection based upon keywords, star ratings, color labels, etc. Do whatever works best for you to identify photos that you might use in the book. Name it something along the lines of “PICS FOR BOOK MASTER LIST”.
Then, create a publish service via Lightroom's built in “Hard Drive” publish service. Some of the important publish-service settings are highlighted here:
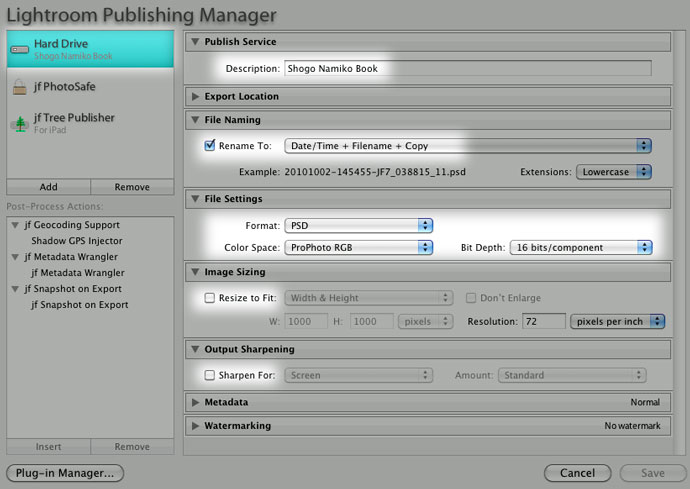
The name you choose in the top section of the dialog is the name for your publish service, so pick something descriptive.
Export Location
Pick any folder on disk that you can also reach from InDesign. Personally, I create one base folder for the book (e.g. “Shogo and Namiko Wedding Book”) and within it I create the InDesign files, and a “Pics” sub-folder for the intermediate Photoshop files Lightroom will create. It's that “Pics” sub-folder that I specify as the export location.
File Naming
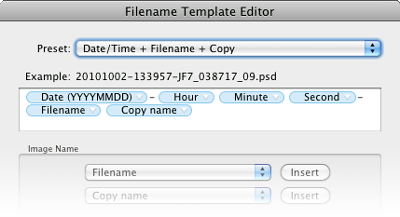
For the file-naming template, I use one that preserves the chronological order of the images because that's how I tend to work with images in Lightroom, and the books I create tend to be stories about some event for which photos are best presented in a generally-chronological order. Thus, I find it convenient to ensure that the files created by Lightroom, which I'll then drag into InDesign, are presented in chronological order by Finder/Explorer.
If I were doing a one-time export, I could simply use a filename template with a sequence number, but the publish collection creates an ongoing relationship between Lightroom and the folder collecting the Photoshop files, and I'll add and remove photos over time, and will re-export photos as I tweak develop settings, so this export churn makes any kind of sequence number unworkable.
What I do use involves creating filenames that incorporate the image date and time, the image filename, and the copy name (because I may use multiple virtual copies of the same image with different develop settings, such as color vs. B&W renditions).
File Settings
I've chosen to create Photoshop files in the past, but in writing this post I tested creating ZIP-compressed TIFF files, and found that they're about 20% smaller, so I may choose TIFF files next time (assuming that InDesign can handle them, which I would expect). In either case, I choose ProPhoto RGB as the color space, which is the closest standard color space to what Lightroom uses internally, and I choose 16 bits/component. These choices conspire to preserve as much image quality as possible during the transfer to InDesign.
The resulting files are big... the 200 temporary files for the images I used in the wedding book take 14 gigabytes of disk space. But it's temporary; now that the book is done, I can delete them. The master image files (the out-of-camera raw files) and the Lightroom catalog can be used to recreate the temporary files any time, so they'll be archived along with the InDesign files.
Resizing and Output Sharpening
You'll note that both resizing and sharpening are disabled, because I want to limit that kind of processing until the image is fixed within InDesign. InDesign will re-render and resize images anyway, so no need to do in Lightroom what will eventually be negated anyway.
Metadata and Watermarking
You won't use any of the image metadata (Shutter speed, caption, etc.) in the temporary files, so it doesn't hurt to minimize metadata. You'll save a tiny bit on disk space, but not enough that I bothered to even think about it when doing my most-recent book. Doesn't matter one way or the other.
Of course, you don't want to watermark photos being prepared for the book; if you want to add annotations or watermarks to the in-book result, you can do the watermarking within InDesign once you know exactly how the image will appear in the layout.
Once the Hard Disk publish service has been created, we then create a smart collection within it via the context menu's “Create Published Smart Folder” item. Define it with one rule, “Collection contains all PICS FOR BOOK MASTER LIST”, where the italicized portion reflects the name of the non-Publish collection you created earlier. This will cause the new Hard Disk publish collection to mimic the non-Publish collection. (Note: don't use “... contains words...” when defining the smart-publish-collection rule because it doesn't work in this situation; either it's a bug in Lightroom, or I don't understand what “contains words” is supposed to mean.)
When interacting with the book-related photos in Lightroom, use only the non-Publish collection... add photos to it, subtract photos from it, tweak develop settings, etc. Only when you're ready to have those changes reflected to the Photoshop files available to InDesign do you need to visit the Hard Disk publish collection and “Publish” it.
It first glance it may seem silly to use this two-collection approach, as opposed to just creating a publish collection and dragging photos into it, but Lightroom's segmented grid in a publish service — the partitioning of photos into separate grids for new photos, modified photos, unchanged photos, and to-be-deleted photos — makes an interactive back and forth among images really painful. For example, you might be in the “Published Photos” grid comparing three similar shots being considered for a spot in the book, and decide that one will stand a better chance with a bit of extra brightness, but after returning from develop where you made that change, the image is no longer in the “Publish Photos” grid with its compatriots; it's been changed, so now it appears all alone in “Modified Photos to Republish”. This will drive you crazy, so it's easiest to do all the real work in the non-Publish collection, publishing as needed from a publish collection whose rules cause it to mimic the non-Publish collection.
InDesign Setup
Download the color profile for the printers that Blurb uses, Blurb_ICC_Profile.icc, and install it on your system. See “Installing the Blurb ICC Profile” on Blurb's color-managed workflow page. Restart InDesign if it had been running.
Then visit Blurb's inadequately-complete “Using Adobe® InDesign® to Make a Book” page and download and install the “Blurb PDF/X-3 Export Preset”. Also download the appropriate InDesign templates you'll use for your book pages and book cover.
InDesign Color-Management Setup

Within InDesign, bring up the Edit > Color Settings dialog, and set options as shown at right. Blurb can handle two common approaches to color data, the RGB model that camera hardware and Lightroom use, and the CMYK model often used by printers (including Blurb's).
The general goal when converting between these models, or among different profiles within a model, is to convert as few times as possible because quality is lost with each conversion. In the end, everything will have to be converted to Blurb's CMYK profile because that represents the final result: ink on paper.
The “Working Spaces” settings define what specific profile InDesign should use for each color model while you build the book. I chose ProPhoto RGB for the RGB working space because that's the same space that Lightroom uses, and the space I chose for the temporary image files created by Lightroom. This means that the color data won't have to be converted between or among spaces while it's being worked on in InDesign. No extra conversions means no extra loss of quality.
For the CMYK working space, I choose the actual space that will be used for printing, the “Blurb_ICC_Profile” that I'd installed above. This means that color-related items that I create within InDesign (page backgrounds, text, etc.) won't need color conversion when being prepared for shipment to the printer.
The “Color Management Policies” section defines what should be done when an image is imported into InDesign with color data that doesn't match the working space chosen above. I won't have any such files (all my image files are being created by Lightroom with the specific intent to match my working spaces perfectly), but if I were to import some random JPEG image that wasn't already in my RGB working space, I wouldn't want it converted to some intermediate RGB space (my RGB working space) because it'll have to be converted later to the output CMYK space for printing, so by having its profile preserved, it'll get converted directly to the output space when the book is exported for print. That's one less conversion, so less loss of quality.
On the other hand, if I were to import a CMYK image, I'd want it converted directly to the output color space. There's no problem of the intermediate “RGB working space” as in the previous paragraph, so if I have it converted right away, it'll then be at the final output color space and it won't need further conversion.
InDesign Export-Template Setup
Blurb provides the export preset we installed above, but it requires some changes to be useful. Invoke “File > Adobe PDF Presets”, select Define, then select “Blurb PDF X-3 Export Preset”, and then press “Edit”. Then select the “Output” tab, and you'll be presented with this dialog:
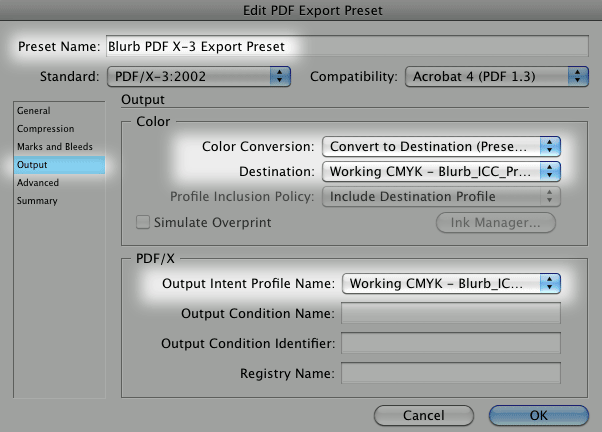
Ensure that Color Conversion is set to “Convert to Destination (Preserve Numbers)” and that Destination is the Blurb ICC profile (which because of our earlier settings is also our working space, so the selection is “Working CMYK - Blurb_ICC_Profile.icc”).
Also be sure that the “PDF/X Output Intent Profile Name” is the same “Working CMYK - Blurb_ICC_Profile.icc”.
Perhaps update the Preset Name to indicate that you've made changes (e.g. “My Useful Blurb PDF X-3 Export Preset”) and press OK to save your changes.
InDesign Output Preflight Setup
InDesign has a “preflight” feature such that it'll check for common problems before you generate and upload your multi-gigabyte PDF to be printed. The default preflight profile is mostly fine, but I make a few changes. Open “Window > Output > Preflight” and create a new profile, “Blurb Book”, and make changes as you feel appropriate. I tend to enable:
| LINKS | — | Links Missing or Modified |
| IMAGES AND OBJECTS | — | Color Image Minimum Resolution: 150
Non-Proportional Scaling of Placed Object |
| TEXT | — | Font Missing
Glyph Missing |
I've printed huge two-page spreads at 90DPI and had it come out just great, but 150 DPI seems to be a good general-purpose lower bound. If an image ends up being scaled in the final output to 149 DPI or worse , Blurb will issue a scary-sounding warning, but will let you print anyway. So, having the preflight check let you know before Blurb tells you at least prepares you for the scary warning.
Build Your Book
Now that things are set up, I publish the Photoshop files from Lightroom for images I might use in the book. I then look at the thumbnails in Finder (“Explorer” on Windows) and drag images to InDesign and see how they work at that point in my book. I won't use every image that I include in the Lightroom collection for the book, but every image I want to use finds its way to the book via the collection. When preparing the wedding book, I'd started with 700 images in the book-related collection, but only 200 ended up actually being used in the book.
The InDesign templates from Blurb contain “page bleed” areas a smidgen beyond the edge of the page so that there's no chance of having a sliver of white paper show through after the paper is cut where you intended to have an image run to the edge of the page. Thus, a little bit of these images is necessarily lost, and for that reason I prefer to leave all images uncropped and unrotated in Lightroom, cropping and rotating within InDesign in a way that suits the specific photo's specific placement on the specific page. Because of this, I end up making a lot of virtual copies for the book-related collection, because photos I've also used elsewhere (e.g. published on my blog) may have display-ready crops already applied.
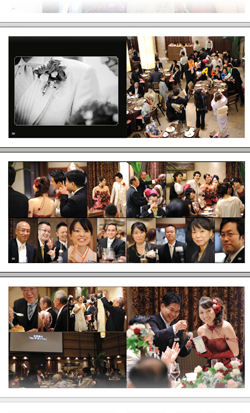
Designing the pages is the most time-consuming part for me. Again, if you do a simple and elegant “one photo per page” layout, as is common with photo books, this'll be the easy part for you. My books are visually complex. (“Noisy” some might say, but they're my books, not yours. ;-)) They're also big... so far I've always made Blurb's 13”×11” Large Landscape books, which means that the screenshot at right represents more than two feet of printed width: each of the three two-page spreads shown in the screenshot represents two printed pages totaling 26” (66cm) in width.
So far, I've always gone with premium paper, and with ImageWrap hard-cover binding. I've been very happy with the quality of Blurb's printing and binding.
(Blurb offers three types of paper to choose from, but offers only one printer color profile. You don't need to know much about color management to know that this indicates that they have no clue about it, or that they have a clue and just don't care. But hey, they're printing your books, not theirs, so why should they care?)
Be sure to keep in mind that except for the first and last page, every page is part of a two-page spread, and so design each page realizing what else will and won't be visible when the reader is viewing the page. For someone like me who lays out each spread depending on what story and images are in play at that point in the book, I try to have natural breaks in the story happen at a page turn, not between two pages that are visible at the same time. In the wedding book, transitions between events of the day — the chapel ceremony, the outside flower-petal toss and photo op, the small welcome reception, the start of the banquet, the cutting of the cake, etc. — all happen at the turn of a page.
And because I really do like the bride portrait that I posed the other day, I'll show again here how it appeared as a two-page spread in the book...

... and in the InDesign page-layout window, as the last full two-page spread:
(For the final page of the book, I threw in a picture of Fumie and me that we had enlisted a passer-by to take as we returned to our hotel after the wedding. Not being in any of my own photos that I took at the wedding, I wanted to appear in the book at least once.)
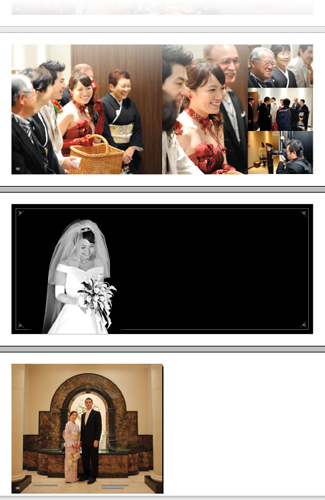
Build Your Cover
One thing I've learned when creating the PDF for the cover is that the marks for the spine are fairly vague. Unlike the edge of the paper, which is a clean crisp well-defined cut, the spine-to-cover transition is a general curve over a couple of millimeters on either side. Furthermore, the part of the cover right next to the spine can have a centimeter-wide concave indent running down the height of the cover... it's hard to describe, but I suppose it's part of the binding, and it lends a nice “real book” feeling to the result, but you've got to be prepared for it and not put the title text or anything else important there.
Here's what the cover design for the wedding book looks like in InDesign:

The front cover is on the right, of course, with the back cover on the left. The outer-most red box is the edge of the page-bleed area, and represents the edge of the information sent to the printer. The black box just inside represents about where the paper will be cut (I've found this to be very accurate with Blurb), while the pinkish inner lines represent “safe text” areas that absolutely won't get lopped off during page cutting. All of these guide lines are within InDesign, and won't actually be sent to the printer, of course.
Because there are no specific borders that clearly separate the front cover from the spine from the back cover during actual printing, I have the front-cover image overlap to the back cover, and then blend into a second back-cover image. Or, I use one large image that spans the whole thing in such a way that it also looks good as just the front cover. Either method ensures that the front cover, when viewed by itself, is whole and complete, and doesn't have a sliver of some separate spline image on it.
Just for a change of pace, here's an example of a cover that uses one image to span both front and back, from a book I made last year to commemorate the first-time gathering of all my folks' grandkids (which, to my boy Anthony, means all his cousins, at least until Shogo and Namiko get busy).
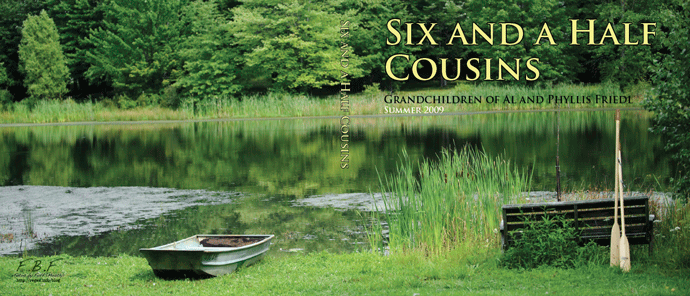
The “half” in the title refers to my brother's wife being pregnant at the time with their #3, who turned out three months later to be Claire. The lake is behind my folks' place, where the kids spent much time throwing rocks, and occasionally going for boat rides.
When you first pick up the book, you see only the front cover with the bench and the oars, but when you eventually notice the back cover, you realize that you can open it wide and view the whole thing. It's a nice effect if you can find an image that works.
Export, Upload, and Order Your Book
Once you've got things squared away in InDesign, you'll export the cover to one PDF file, and the pages collectively to another. These can be very large... I was pushing the two-gigabyte PDF file-size limit with the 600 images in the 160-page “cousins” book.
Once you order your book from Blurb, the order sits in a queue doing nothing until your turn comes around for the printing to happen, and in my experience that queue-sitting lasts about a week. Blurb gives you an estimate before you finalize your order.
Blurb makes it very clear that once the order has been submitted, nothing short of the heat death of the universe can cause any change to be made. Make sure you understand this before placing your order. It's just one example of Blurb's arrogance... the order is just sitting in a queue and one would surmise that, say, updating the ship-to address would not be a difficult enterprise. I would have liked to have had that option: when I ordered the “cousins” book last year, Blurb missed the expected-print date by a couple of days, and in the end it arrived at my folks' place a few hours after I had left to return to Japan.
Or, perhaps, a reasonable company would allow you to cancel an order (even if only for future credit)... doing so would mean that everyone behind you in the queue gets bumped up a notch, so everyone would be pleased, but Blurb doesn't allow it. They don't allow you to replace a PDF file to correct a misspelling you notice a bit too late, even if the page-count remains unchanged. Once an order has been placed, you have absolutely no further control until the book arrives in your hands.
[ Update Jan 7, 2011: Blurb's director of customer service let me know that they actually have a one-hour window in which the order can be canceled. I would be curious to know why the order can be canceled during just that first hour (because they hold it back for an hour?) and not right up to the moment when it's loaded into the print queue.. ]
Again, they make this clear ahead of time, so you can decide to take your business elsewhere if you don't like it. No one likes it, of course — Blurb has absolutely no clue about good customer service — but there aren't many other options for a large portion of their product selection.
Receive Your Book
So, the angels have finally sung and the book is in your hands. Depending on which back-end printer Blurb used, the book might come with a bar-code sticker on the back cover and shrink wrapping all around, or not.
The wedding books I ordered last month had the bar-code sticker and the shrink wrap. The shrink wrap is sort of nice for something you'll be presenting as a gift... it really makes it feel new and special... but the bar-code sticker is inside the shrink wrap, stuck to the newly-printed image-wrap cover of your book.
You're supposed to lift up the corner with your fingernail to remove it, but the mere act of trying to get under the corner of the sticker can ruin the cover. This comment from a couple of years ago pretty much sums it up:
But it's not an “oversight”... Blurb has been doing this for years, and their own forums are filled with customers blowing gaskets over this mind-numbingly stupid move. Blurb doesn't warn you ahead of time about the potential for a cover-ruining sticker, and since not all their printers put the stickers, you never know whether your order will be cursed with them. It's like a top-level chef preparing a fine meal for you, right at your table, but then sneezing on it with a smile while presenting it to you.
When I first got the wedding books, I was surprised by the stickers because they were my first order to have them, but I wasn't fazed by them until I realized that they were under the shrink wrapping. I didn't want to give the books as gifts with the sticker (and hence the potential for damage) still attached, but I also didn't want to remove the shrink wrapping because I felt it added a nice touch as a gift.
So here's what I did: I made a small hole in the shrink wrap and used a sharp box cutter to very carefully grab the edge of the sticker — never touching the book cover — lifting it up and very carefully drawing it away from the cover and through the hole, like a surgeon removing a gall bladder.
I'd ordered six copies, one for myself and five as gifts, so I had to repeat that procedure for five copies. Thankfully, it came out okay for each one.

Nikon D700 + Nikkor 24-70mm f/2.8 @ 36 mm — 1/125 sec, f/5, ISO 2000 — map & image data — nearby photos
Checking Out Their Own Wedding
So, for better or for worse, this is how I currently produce photo books. I hope this explanation is useful to someone.

FYI, I've updated my Photoshop Calendar-Template-Building Script page with pre-built calendar Photoshop files for 2011, for those who can't (or don't want to) run the script to build custom calendars. If you can run the script (should work in Photoshop CS2 or later), you can run it to build customized calendar pages that you can then drop your own photos into before printing.
(I built the calendar page show above just for this post... the image has been washed out a bit for the calendar page, but I'd probably wash it out even more for a real calendar, because I tend to want to write on my calendars. The image is from last week's visit to the Kongourinji Temple in Shiga, Japan.)

Nikon D700 + Voigtländer 125mm f/2.5 — 1/400 sec, f/2.5, ISO 1250 — map & image data — nearby photos
Cliché
but with good reason
Today started off cold and rainy, forcing me to actually get some development done on my plugins, but it cleared up in the afternoon. I'd been out on a photographic fall-color central-Japan adventure every day so far this week (Mon, Tue, Wed, Thu), and wanted to make it a full week-long marathon, so I headed out for a few hours in the afternoon.
These are two of the 426 photos I took today. The one above speaks for itself, but what's going on in the photo below?
 -- Kyoto, Japan -- Copyright 2010 Jeffrey Friedl, https://regex.info/blog/")
Nikon D700 + Voigtländer 125mm f/2.5 — 1/320 sec, f/2.5, ISO 900 — map & image data — nearby photos
What am I?
Anyone who has taken Internet 101 or has the equivalent in real-life experience (that is, anyone over about 18 months old) has enough information above to figure it out.
As usual, I'll hold back answer comments in moderation for a few days before making them all public on the site....
 -- Copyright 2010 Jeffrey Friedl, https://regex.info/blog/")
Nikon D700 + Voigtländer 125mm f/2.5 — 1/320 sec, f/4, ISO 3200 — map & image data — nearby photos
Exiting the Koutou-in Temple
Kyoto, Japan
Two weeks ago, in “Around the Kyoto's Daitokuji Temple Complex”, I mentioned that Stéphane had introduced me to a temple I really liked (something he's done two more times since, the Kongourinji Temple a couple of days ago, and the Yoshiminedera Temple yesterday). The temple two weeks ago was the Koutou-in Temple, one of the many in the Daitokuji Temple complex.
The entrance from the road is simple but tasteful...
 -- Kyoto, Japan -- Copyright 2010 Jeffrey Friedl, https://regex.info/blog/")
Nikon D700 + Nikkor 24-70mm f/2.8 @ 24 mm — 1/400 sec, f/3.2, ISO 1250 — map & image data — nearby photos
Outer Entrance
The short path turns to the left, under the roof you can see at the left side of the frame.
That's the main entrance gate, which is fairly small and simple by many standards...
 -- Kyoto, Japan -- Copyright 2010 Jeffrey Friedl, https://regex.info/blog/")
Nikon D700 + Nikkor 24-70mm f/2.8 @ 31 mm — 1/80 sec, f/3.2, ISO 1250 — map & image data — nearby photos
At the Main Gate
Through the gate, the path turns again, this time to the right, and you're greeted by...
 -- Kyoto, Japan -- Copyright 2010 Jeffrey Friedl, https://regex.info/blog/")
Nikon D700 + Nikkor 24mm f/1.4 @ 24 mm — 1/100 sec, f/6.3, ISO 1250 — map & image data — nearby photos
This long path in a small but densely wooded area, and is engulfed from above by a canopy of maples. It's jaw-dropping pretty, and will be even more so when the leaves turn color.
I tried a wide-angle shot to try to capture a sense of the canopy of leaves, but the extreme dynamic range (very bright brights in the leaves, and very dark shadows at ground level) made it difficult. I don't really care for the result, but this highly-processed picture perhaps gives a sense of things...
 -- Kyoto, Japan -- Copyright 2010 Jeffrey Friedl, https://regex.info/blog/")
Nikon D700 + Nikkor 24mm f/1.4 @ 24 mm — 1/400 sec, f/13, ISO 1250 — map & image data — nearby photos
Canopy
There were so many ways to view the simple path and entrance, it was a bit of a creative-possibilities overload...
 -- Kyoto, Japan -- Copyright 2010 Jeffrey Friedl, https://regex.info/blog/")
Nikon D700 + Voigtländer 125mm f/2.5 — 1/400 sec, f/2.5, ISO 1250 — map & image data — nearby photos
The main building seems to resemble a house more than a temple. It has a wide moss garden and a long veranda from which you can enjoy it...
 -- Kyoto, Japan -- Copyright 2010 Jeffrey Friedl, https://regex.info/blog/")
Nikon D700 + Nikkor 24-70mm f/2.8 @ 38 mm — 1/320 sec, f/5, ISO 4000 — map & image data — nearby photos
Enjoying the Moss Garden
Inside is very dark, with only minimal electric lighting added in modern times. One such light was over the tokonoma, in which a simple scroll and flower arrangement are displayed. It was very dark, so I had to really up the camera sensitivity to get this...
 -- Kyoto, Japan -- Copyright 2010 Jeffrey Friedl, https://regex.info/blog/")
Nikon D700 + Voigtländer 125mm f/2.5 — 1/200 sec, f/2.5, ISO 6400 — map & image data — nearby photos
Simple Tokonoma
 -- Kyoto, Japan -- Copyright 2010 Jeffrey Friedl, https://regex.info/blog/")
Nikon D700 + Nikkor 24-70mm f/2.8 @ 38 mm — 1/60 sec, f/4.5, ISO 6400 — map & image data — nearby photos
Perimeter Hallway
Very dark in the shadows, very bright where open to the garden
In addition to the moss garden, there's a more traditional garden in the back...
 -- Kyoto, Japan -- Copyright 2010 Jeffrey Friedl, https://regex.info/blog/")
Nikon D700 + Nikkor 24-70mm f/2.8 @ 24 mm — 1/320 sec, f/5, ISO 3600 — map & image data — nearby photos
Part of the Traditional Garden
 -- Kyoto, Japan -- Copyright 2010 Jeffrey Friedl, https://regex.info/blog/")
Nikon D700 + Nikkor 24-70mm f/2.8 @ 24 mm — 1/320 sec, f/4.5, ISO 1600 — map & image data — nearby photos
Garden and Tea House
 -- Kyoto, Japan -- Copyright 2010 Jeffrey Friedl, https://regex.info/blog/")
Nikon D700 + Nikkor 24-70mm f/2.8 @ 32 mm — 1/320 sec, f/4.5, ISO 2800 — map & image data — nearby photos
Garden Gate
 -- Koutou-in Temple (高桐院) -- Kyoto, Japan -- Copyright 2010 Jeffrey Friedl, https://regex.info/blog/")
Nikon D700 + Nikkor 24-70mm f/2.8 @ 32 mm — 1/320 sec, f/2.8, ISO 4500 — map & image data — nearby photos
Large Wash Basin
built from a stone plundered from the Imperial Palace in Korea, in the late 1500s
( which bothers me; I'd think it should be returned )
The temple was founded in 1601 by the great warrior Tadaoki Hosokawa, and behind the traditional garden is a grave area for him and his wife, and for 12 subsequent generations of his family.
His wife, Gracia Hosokawa, was killed the year before Hosokawa created the temple, during the politically turbulent era leading up to the establishment of the Tokugawa Shogunate and its 250 years of ensuing peace. She's noted also for being the most prominent Japanese Catholic of the era. (The character of “Mariko” in James Clavel's Shogun is based upon her.)
 -- Kyoto, Japan -- Copyright 2010 Jeffrey Friedl, https://regex.info/blog/")
Nikon D700 + Nikkor 24-70mm f/2.8 @ 24 mm — 1/320 sec, f/6.3, ISO 6400 — map & image data — nearby photos
Grave of Tadaoki and Gratia Hosokawa
 -- Kyoto, Japan -- Copyright 2010 Jeffrey Friedl, https://regex.info/blog/")
Nikon D700 + Nikkor 24-70mm f/2.8 @ 24 mm — 1/320 sec, f/5, ISO 5600 — map & image data — nearby photos
Returning from the Traditional Garden
with the moss garden visible in the background through the open partitions
I don't know the lady in kimono (who graces the lead photo as well), but she was a lot more photogenic than Stéphane, so I was happy to have her in my shots.
On the way out I noticed a few leaves had actually started turning...
 -- Kyoto, Japan -- Copyright 2010 Jeffrey Friedl, https://regex.info/blog/")
Nikon D700 + Nikkor 24-70mm f/2.8 @ 70 mm — 1/320 sec, f/2.8, ISO 320 — map & image data — nearby photos
First Taste of Autumn
in Kyoto's late October
 -- Kyoto, Japan -- Copyright 2010 Jeffrey Friedl, https://regex.info/blog/")
Nikon D700 + Voigtländer 125mm f/2.5 — 1/200 sec, f/5.6, ISO 6400 — map & image data — nearby photos
Exit Path and Maples
this will be stunning in mid November
I didn't post these photos at the time because I wanted to surprise Fumie with this discovery first, and today we could finally enjoy a date there. The colors indeed were more advanced, but still nowhere near peak. The same could be said for the crowds... it was much more crowded than two weeks ago, but still not too bad, but it will certainly be oppressively crowded next week. I'm sure I'll be drawn there to find out...