As mentioned in my previous post, Adobe has just released Lightroom 1.1, a free upgrade to their wonderful photo-workflow application. Correspondingly, I have upgraded my Custom Metadata Viewer Preset Builder, a web application that allows you to create custom metadata display configuration templates for use within Lightroom.
This web-based tool is now superseded by my Metadata-Viewer Preset Builder plugin for Lightroom 2 and above.
This description is presented with Lightroom 1.1 as an example, although the config files should work in any version of Lightroom 1.x, including 1.3.1.

This post is the introduction and documentation for my template-builder application. If you have used the previous version, you'll find lots of new things here, including new metadata items, new display options, and even the ability to set label text.
- Introduction
- Viewer Presets vs. Data Presets
- Obligatory Disclaimer
- Quick Overview
- Using the Application
- Menu Buttons
- Display Options
- Overriding Label Text
- Wide, No Label, Empty Label
- Installation
- General Notes
- Colophon
An example of Lightroom 1.1's metadata display panel is shown at right. The panel is capable of showing much more information about an image than anyone's likely to want to see at one time — over 100 items, such as the image filename, the latitude/longitude where it was taken, the shutter speed, a caption, etc.— the volume of which can quickly overwhelm.
To whittle down the display to a smaller set of items, Lightroom comes with a number of built-in display presets (Default, All, EXIF, IPTC, Large Caption, Location, Minimal, and Quick Describe), each showing a different subset of the possible items. But because there are so many items that might be shown, chances are small that a built-in presets shows just the items you wish to see.
This is where my web application comes in: with it, you can create your own display-configuration presets. The one shown at right is the one I made for my own daily use.
Viewer Presets vs. Data Presets
I must be clear up front that this post is about selecting which fields to display, in what order, and with what labels. It is not about “this field is assigned this value” Metadata Presets that Lightroom already allows you to create and edit. (For what it's worth, you can access those presets via the “Preset” selector seen just under the red-circled “Jeffrey's View” in the screen capture shown at right.
Custom metadata-viewer presets, from this or any source, are not supported by Adobe. There are no guarantees that the presets you build for Lightroom Version 1.1 will be at all useful with later versions of Lightroom. In fact, there are no guarantees that they'll be useful with any version of Lightroom.
“Use at your own risk.”
To build your own preset, use my web application to select the metadata items you want to see and arrange them in the order you prefer. You give your configuration a title (I used “Jeffrey's View”) and then a file is generated for you that you then download and install in one of Lightroom 1.1's system directories.
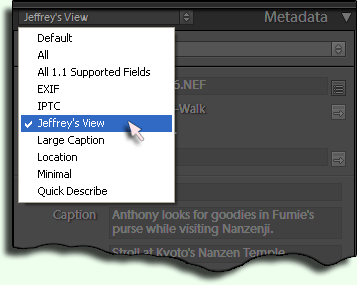
Your preset is available the next time you start Lightroom, in the Metadata Panel drop down box as shown at right.
When you visit Jeffrey's Lightroom Metadata-Viewer Preset Builder (finally, that's the link to the application!), you are presented with the view shown below.
(For a clear view, you can also remove the annotations.)


The Menu
Choose from over 100 items
To create your own presets....
Select one of Lightroom's built-in presets to use as a starting base, or choose from among one of the extras I've included (“None,” “All 1.1 Supported Fields,” and “Jeffrey's View,” my own daily-use preset).
Read the instructions, then press the “hide header” button to devote more of the screen to the preset builder itself.
Create your preset, adding and removing items by checking them in the menu (seen at right), adding headers and rules with the buttons at the top of the menu, and by adjusting item options.
An example view of your custom preset is shown in the lower-left of the application, with fake metadata filled in from one of my images, just to give a sense of how it'll look in actual use.
In the custom list, you can drag items to reorder them, and you can drag them to the trash (the pink stripe at far the left) to remove them. This goes for header and rule lines as well.
Once everything's as you like it, bring back the application's header by clicking the hide-header button again (which had become a show-header button) and enter a title for your preset. The title you choose here is what Lightroom shows in the drop-down list of presets (as shown earlier), so choose a short but descriptive title.
Finally, press the “Generate Preset File” button.
After pressing the generate-preset button, you're presented with a page from which you can download the template, as discussed a bit further down.

The top of the menu area contains six buttons grouped to provide three unrelated functions (placed together for convenience):
The “Expand/Collapse All” buttons work on the menu list itself, revealing or hiding the 100+ metadata items supported by Lightroom. You can, of course, expand and collapse individual subtrees with the boxed “+” by head menu header item.
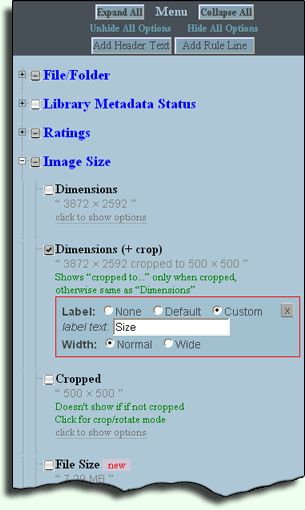
The “Unhide/Hide All Options” items are for revealing each item's option list (when the item itself is revealed, of course). The box of options (like the red-boxed controls for “Dimensions (+ crop)” in the menu image above right) can be long, and are not often needed for most items, so by default they appear first as a “click to show options” placeholder.
The “Add Header Text” button inserts a new header line into the template, which you can then click on to edit. “Add Rule Line,” unsurprisingly, adds a new rule line.
Some items in the menu have more details than others. Here's an example that illustrates everything, with the display options showing (unhidden).

Each item has its own mix of display options, from among the following. My web application attempts to reflect the visual effects option, but the descriptions below are for how they affect the display once loaded into Lightroom...
Shown when not blank vs. Shown always — Some items, by default, are not shown by Lightroom when the item's underlying data is missing from the image. For example, even if a template includes the “Shutter Speed” item, Lightroom doesn't show it if the shutter-speed data is missing from the image. By selecting “shown always,” the label will be presented but the value area will be blank.
Readonly — when this is turned on, editable items become static display items. This might be helpful during client presentations, but is of limited usefulness because any “click to edit” icons remain.
Enter finalizes vs. Enter included — Normally while typing text into one of the metadata editable fields, hitting enter causes the input to be finalized, returning control from the field to the larger Lightroom application. When Enter included is selected, enter inserts a newline into the metadata value.
Lines — how many rows the item value should occupy in the display. This is the most useful for free-format editable fields (“Caption,” “Copyright,”, etc.) and is the minimum size: the field grows as needed for longer text. Most other fields (“Rating,” “Filename,” etc.) use only one row regardless of this setting, so adding further rows simply adds padding under the value.
Width Normal vs. Width Wide — the normal presentation is a two-column approach, with the label on the left and the value on the right. When choosing Width Wide, the value is presented with the whole width of both columns, and the label is presented above it. (An example is shown below.)
Label — Choosing None is similar to Width Wide in that the value is presented using the full width of both columns, but the label is not shown above the value. When Custom is selected, the label text input field appears, allowing you to override the label with your own choice. There are some cautions about doing this, discussed below.
The labels for metadata fields can be changed in three ways:
- By Adobe, when they put out a language/region-specific version of Lightroom
- With my Lightroom Configuration Manager (not yet upgraded with new items from 1.1)
- By entering label overrides in this metadata configuration manager.
The preset display shown at the top of this post is my personal “Jeffrey's View” preset, with many of the label text set with this application (method #3). Most changes were to make labels shorter (such as “Dimensions” → “Size” and “Capture Date” → “Date”) because the label column in Lightroom is only as wide as needed for the longest label, so making long labels shorter means more overall width is devoted to the values.
I also changed some labels to change their meaning. For example “Copy Name” became “View Name” for reasons I'll explain in another post. “Job Identifier” became “Blog URL,” because I use that field to record the URL of the blog post or posts that an image was part of.
I also used a blank custom label for a couple of items, so as to reduce visible clutter. One was the ridiculously verbose “ISO Speed Rating”, which I made blank because the value has “ISO” in it, and placed right below “Exposure,” it's certainly not ambiguous.

I did the same with “Capture Time,” since “8:312:17 AM” right below “Date” is pretty clear.
There's one concern you should be aware of if you intend to use multiple presets or share your presets with friends: labels changed with this application are seen only when the specific preset is selected, and override any changes made by the other methods. That means, for example, they override the language-specific labels found in localized versions of Lightroom.
If you want to change a label for all presets (including the original built-in presets), use my Lightroom Configuration Manager instead of overriding while making a preset.
As a convenience, the per-preset download page offers an extra “no label overrides” download if the preset contains label text overrides. That allows those who don't care for your label text (because, for example, they prefer labels in their native language) to use your preset without losing their labels.
The various permutations of Label and Width display options can be a bit confusing, so here are some examples (the first being the default):
 |
 |
 |
 |
 |
 |
 |
 |
 |
 |
 |
 |
After pressing the “Generate Preset File” button, you're taken to a page that offers a download for a “.lrtemplate” file. You can bookmark that page, and share its url with those you'd like to share your preset with; they can then download the same preset, or use yours as a basis from which to build their own. For example, here's the page for my main daily-use preset that's been the subject of these examples.
On the download page, click the link and save the preset file to disk.
Before installing your first preset, you must first create a “Metadata Field Lists” directory in Lightroom's application support folder. To find that folder, from within Lightroom invoke the Help > Go to Lightroom Presets Folder command to bring up the “Lightroom” folder, within which you should create the “Metadata Field Lists” folder that holds the “.lrtemplate” file downloaded.
For reference, the folder you create will likely be:
- Mac OS X:
- ~/Library/Application Support/Adobe/Lightroom/Metadata Field Lists/
- Windows XP:
- C:\Documents and Settings\username\Application Data\Adobe\Lightroom\Metadata Field Lists\
- Windows Vista:
- C:\Users\username\AppData\Roaming\Adobe\Lightroom\Metadata Field Lists\
or perhaps
C:\Users\username\Application Data\Adobe\Lightroom\Metadata Field Lists\

Preset drop-down where your
preset title appears in Lightroom
(On Windows, you may have to visit the Folder Options dialog to allow the normally-hidden Application Data folder to be seen.)
Finally, drop the .....lrtemplate file you downloaded into the directory you just created, and start (or restart) Lightroom.
The left side of the header in the Library Mode's Metadata Panel likely says “Default” — click it to see your preset among those in the drop-down list.
Here are some cautions about Lightroom's metadata viewer, whether with a custom preset or one of the standard ones:
All 100+ metadata items are new in this version in the sense that they all now have display options, but those items totally new in this version are marked in the menu with a bright “new” label. Click the [Expand All] button and scroll through the Menu to see them all.
The preset builder shows a very wide view of the Metadata viewer panel — perhaps wider than most people will want their Lightroom panels to be (since widening the panels takes away from the Grid/Loupe area). So, keep in mind that long data (e.g. lens information, camera make+model) may be too wide to actually fully appear in normal use. (Yet another reason to use shorter labels.)
Some items seem almost identical, but are really quite different. For example, both the “File Path” and the “Folder” items display the name of the folder that the file is in, but they differ in how they interact with the mouse: clicking on one brings up the file in Explorer/Finder, while the other switches Lightroom to viewing the images in that same folder (something I find much more useful).
The similarity among some of the items is one reason that the standard “All” preset really doesn't have all the items. It's also one reason that you'll want to take care when building your presets, so you'll get what you think you're getting.
As you move from image to image in your library, the metadata items missing from an image are not shown in the metadata panel unless they're editable, or have the “Shown always” option selected.
Click on an item in the metadata field list to automatically bring up the corresponding controls in the menu.
The metadata viewer simply reports metadata in the file (or in Lightroom's database about the file). For example, Lightroom could potentially compute a value for “Focal Length 35mm” (full-frame-35mm-camera effective focal length), but it reports it only if that Exif field is actually present in the image metadata.
(Actually, Lightroom doesn't display this particular field even if it is present in the image; I've submitted this bug to Adobe.)
Lightroom does not generally show metadata from the “Maker's Notes” section of metadata placed by many cameras. For example, Nikon cameras place the distance to the subject, if known, into the Exif “Subject Distance” field of JPG images it creates, but for NEF (raw) images, Nikon puts that data only into the Maker's Notes. Thus, Lightroom does show the subject-distance field for Nikon JPGs that have it, but not for Nikon NEFs that have it.
My Tech-Related Photography Posts
- My Lightroom-to-iPad Workflow
- Lightroom Goodies (lots of plugins)
- Digital Image Color Spaces
- Online Exif (Image Data) Viewer
- Jeffrey's Autofocus Test Chart
- Photoshop Calendar-Template-Building Script
- How to Prepare Photos for an iPad
- A Qualitative Analysis of NEF Compression
- Tripod Stability Tests
more...
(On an odd but encouraging note, Lightroom does pick up the Lens information from Nikon raw files.)
The colophon for the first version tells how this project came about.
This project was made much easier to develop by the Yahoo! User Interface Library, and two Firefox extensions: the most excellent Aardvark and mind-blowingly-supreme Firebug.
It was a lot of work just to get this application working in a first-class browser like Firefox, not to mention then getting it to work in IE. I hope you'll find that it was worth it.
Adobe Lightroom Version 1.1
Adobe has officially announced the highly anticipated “Version 1.1” upgrade to their Lightroom photo-workflow application, four months after Version 1.0 was released. Lightroom creates a whole new world of organization and expression for photographers, one that fulfills many needs the user might not have even realized where there.
Yet, once the user settles in, they find themselves invigorated into wanting even more organizational and creative functionality, and this free upgrade is a step in that direction.
There are many new features in 1.1, some of which have been previewed already (including the new sharpening controls released in Adobe Camera Raw 4.1.).
I'm sure there will be many “What's new in 1.1” lists out there (here's a rather comprehensive-looking list from Victoria Bampton), so I'll just list some of the things that I particularly appreciate. I use primarily the Library and Develop modules, only rarely touching the Slideshow, Web, and Print modules, so nothing from those three are listed here. Also, I haven't even paid much attention to perhaps the biggest addition — the concept of “Catalogs” (replacing 1.0's idea of “Library”) and the ability to move them among machines — so that's not here either.
(And I should admit that because I've been using the 1.1 upgrade in some form or another for some months, I don't necessarily remember what was in 1.0, so may list some thing here that aren't actually new.)
My Favorite New Features in Lightroom 1.1
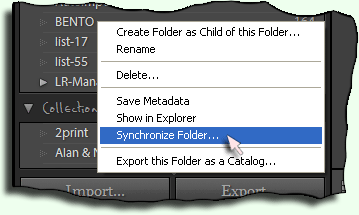
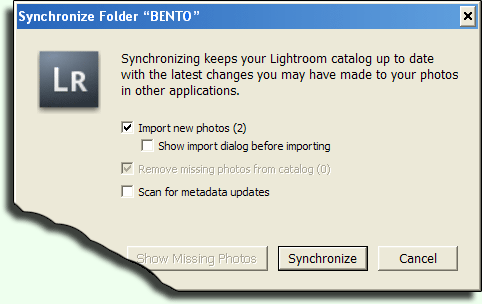
Synchronizing Folders
You can now “synchronize” a folder, comparing its contents against the current catalog, checking for newly-added or missing images.
It's a small thing, but very convenient for some workflows. Prior to this, I used a little script I wrote myself that attempted to report files on disk that weren't in Lightroom. This built-in synchronize control is so much better.
Some complain that this synchronization should be done automatically, but it can be time consuming (a minute or so) for huge folder trees, even on a fast computer like mine.
Synchronizing Exposure
In Develop, while multiple images are selected with the filmstrip, you can now choose Settings > Match Total Exposures to adjust the exposure of the other selected images to match that of the primary image. (I sort of think it should be called “Set Total Exposure,” but Adobe neglected to ask my opinion on the subject.)
This is convenient when you have many images of the same scene, taken with different shutter speeds, apertures, etc. (such as when trying different creative combinations, or when the camera's light meter registered something slightly differently from shot to shot). When you find one with an exposure you like, you can sync that to all the others. Now that each shot has the same exposure, you can more objectively judge them on their content.
(This feature owes its existence at least partially to persistent pestering by Lee Jay Fingersh, who finds it particularly useful for processing airshow photos.)
Mouseover Images
Here's one that probably doesn't seem particularly interesting at first, but it really grows on you.
Mouse-over Me















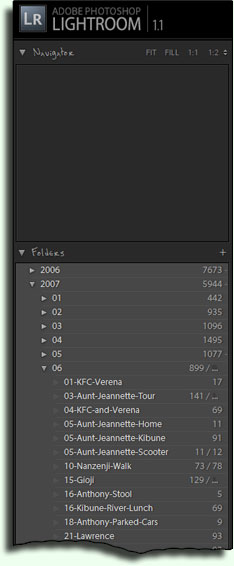
When the mouse goes over a name on the left side of the Library panel (a folder name, collection name, keyword, etc...), an image from that folder/collection/keyword/etc. is shown in the little upper-right navigator window.
I've simulated it for you at left, so give it a try by mousing over the folder names.
As far as I know, there's not currently a way to select which image is shown for any particular name. As best as I can tell, the one with the oldest capture date is shown, except for the somewhat unlikely case of a folder whose sort has been set to revers chronological, in which case the newest image is shown. Any other sort (user sort, sort by filename, etc.) has the image selection revert to oldest capture time.
Still, it's a very nice little touch.
Negative Color Filters
You can now set the filters to “all except images tagged with purple” or the like.
ESC Aborts a Crop/Rotate Operation
It used to be that hitting the ESC key while doing a crop/rotate caused the current crop and rotation to be committed. It now aborts the operation, returning the image to how it was before the crop/rotate tool was invoked. This is as God intended.
New Preferences
There are a number of new preferences. I'm not sure whether it first appeared in 1.1, but I've only recently noticed it, so I'll mention the ability to set the filename-creation template for those files created by a “Edit in Photoshop” operation. I never cared for the “-Edit” suffix, so have changed that.
Metadata-Panel Improvements
The Metadata panel in Library mode has received a number of enhancements. It includes new built-in presets that offer large boxes for the caption, and also a number of new metadata items.
There are several new date-related items that may be of interest to those who scan a lot of images, and also these new items:
- Original Filename — image's filename at the itme of import
- File Type — “Jpeg”, “Dng”, “Raw”, ...
- Copy Name — useful for virtual copies of a master
- Metadata Status — indicates whether metadata differs between library and disk
- Metadata Date — when metadata was last written to disk.
- Sidecar Files — types of sidecar files, e.g. “.xmp”, “.jpg”, ...
- Audio File — audio annotation file (but haven't gotten it to work yet)
- File Size — size on disk (e.g. in megabytes)
- Copyright Status — “Copyrighted”, “Public Domain”, or “Unknown”
Even better still, they've added a number of hooks that I've been able to exploit in my Lightroom Metadata-Viewer Preset Builder application (now updated for 1.1), allowing you to create custom viewer presets in which you have a fair amount of control over the layout. You can make input text boxes wide and/or tall, you can change or remove labels, mark some items as read-only (sort of), and more. Very sweet.
Clarity
The new Develop “Clarity” control (grouped with Vibrance and Saturation) increases local contrast throught the picture. Take a few random images and try it.... neat!
So, yesterday's post left off with a photo from the stairs looking at the dining platforms over the upper river. The stairs were those going down to the lower “noodle platforms” (where the noodle part of the lunch is to be eaten), and so here's a view from the same position, looking down at them.

Nikon D200 + Nikkor 17-55 f/2.8 @ 17mm — 1/320 sec, f/4, ISO 250 — map & image data — nearby photos
The “Noodle Platforms” at Hirobun, in Kibune
Kyoto, Japan
Here's more of a zoom. Notice the trough-like thing in front of the counter Aunt Jeannette is sitting on?

Nikon D200 + Nikkor 17-55 f/2.8 @ 55mm — 1/180 sec, f/2.8, ISO 250 — map & image data — nearby photos
That trough-like thing is really a flume in which water — and occasionally soumen noodles — flow. You sit in front of the flume, watching for noodles that you pluck out and eat. The flume is really supposed to be made of bamboo trunks cut in half, but in this respect the restaurant opted for something easier (and perhaps more sanitary).

Nikon D200 + Nikkor 17-55 f/2.8 @ 34mm — 1/60 sec, f/4, ISO 250 — full exif & map — nearby photos
Going For Noodles

Nikon D200 + Nikkor 17-55 f/2.8 @ 17mm — 1/60 sec, f/4, ISO 250 — map & image data — nearby photos
Got'em!

Nikon D200 + Nikkor 17-55 f/2.8 @ 17mm — 1/90 sec, f/4, ISO 250, — map & image data — nearby photos
Satisfaction Earned, Giving them to Daddy
while Aunt Jeannette maintains a vigilant watch for further noodles
I've got to apologize for the lack of photographic quality with these shots. I was leaning way over the edge trying to get the picture, yet at the same time I was the final line of defense for escaping noodles. Once they passed me, they went down a drain to Lord knows where, but as the waitress said, “they won't come back.” So, I had to remain on my toes to quickly replace the camera with my chopsticks and perform an emergency noodle rescue operation from time to time.

Nikon D200 + Nikkor 17-55 f/2.8 @ 24mm — 1/60 sec, f/4, ISO 250 — map & image data — nearby photos
Aunt Jeannette Strikes

Nikon D200 + Nikkor 17-55 f/2.8 @ 17mm — 1/45 sec, f/4, ISO 250, — map & image data — nearby photos
Remaining Purposeful in Victory

Nikon D200 + Nikkor 17-55 f/2.8 @ 32mm — 1/80 sec, f/4, ISO 250, — map & image data — nearby photos
Looks Like These Might Get Away

Nikon D200 + Nikkor 17-55 f/2.8 @ 17mm — 1/250 sec, f/4, ISO 250, — map & image data — nearby photos
Well, Got a Few...
After a while, three bunches of pink, plum-flavored noodles came, indicating that our meal was complete.
I don't know what it is about plucking noodles from a stream, but it seems to cause the tongue to become firmly planted between clenched lips.... at least in those pictured in this post. 🙂
It also seems to cause an infectious outbreak of fun and smiles.
For reference, this is called nagashi soumen — 流しそうめん — “flowing noodles.”

Nikon D200 + Nikkor 17-55 f/2.8 @ 22mm — 1/80 sec, f/4, ISO 250, — map & image data — nearby photos
Little Japanese Boy with a Full Tummy
Sitting seiza style

Nikon D200 + Nikkor 17-55 f/2.8 @ 22mm — 1/160 sec, f/2.8, ISO 400 — map & image data — nearby photos
Lunch on the River at Hirobun, in Kibune
Kyoto, Japan
When Aunt Jeanette was in town two weeks ago, we headed up to Kibune to enjoy the drive, and to have lunch at Hirobun, an inn with a nice restaurant that overlooks the river. However, when we arrived, it turned out that the restaurant was serving lunch over the river.

Nikon D200 + Nikkor 17-55 f/2.8 @ 17mm — handheld, 1/20 sec, f/5, ISO 500 — map & image data — nearby photos
Hirobun's Uppermost Platform
As viewed from our table on the next platform down
We were on the middle of three straw-mat-covered platforms, at what would have to have been the best seats in the house (so to speak). Next to us was a six-foot waterfall just far enough away not to get us wet. As if the breeze from the river wasn't enough to create a pleasant, cool atmosphere in the summer heat, a bamboo framework supported straw mats above, as well.

Nikon D200 + Nikkor 17-55 f/2.8 @ 55mm — 1/160 sec, f/2.8, ISO 250 — map & image data — nearby photos
Waitress Tidies Up on the Lower Platform
The view above is aiming down-river from our seat, but the river can't be seen in this somewhat tight photo because the river falls away rapidly, with a taller waterfall (15 feet?) just past the edge of the platform.

Nikon D200 + Nikkor 17-55 f/2.8 @ 17mm — 1/100 sec, f/3.2, ISO 500 — map & image data — nearby photos
Another View From Our Seats
The orange gate in the photo above is part of the little shrine I wrote about earlier in the month.
All in all, it's really not possible to say enough how pleasant it was.
The main lunch was served at our table on one of the upper platforms, but there was additional food and additional platforms on which to eat it. Just past the third platform is the larger waterfall I mentioned above, after which there are two more platforms specifically for eating noodles. The shot below was taken from the stairs that head down to the lower “noodle platforms,” looking back at the three upper platforms.

Nikon D200 + Nikkor 17-55 f/2.8 @ 24mm — 1/125 sec, f/2.8, ISO 250 — map & image data — nearby photos
All Three Platforms
The table we sat at and had just left is in the center of the picture.
The whole noodle thing was an event that gets its own post.
It was a really fun and pleasant lunch, but I didn't blog about it until now because I wanted to take Fumie there and have it be a surprise. I've since been there twice (once with Fumie, and once with Lawrence), so can finally post about it.
Much of the river in the mile-long Kibune area are used for dining like this during the summer, so there are many places left for us to check out. Hirobun is the upper-most inn/restaurant of the bunch, so is the most upstream, and so perhaps the only one with an unspoiled upstream view. It's very nice.
(PS: my 500th post!)
Taking a pause from mossy temple pictures for a moment, I'll return to our trip to Hokkaido (northern-most island in Japan) last month, and the picturesque countryside of Biei. (Previous posts on Biei: one, two, three).
More random shots from the mostly-overcast days of our visit....

Nikon D200 + Nikkor 70-200mm f/2.8 @ 200mm — 1/640 sec, f/6.3, ISO 160 — map & image data — nearby photos
Shed

Nikon D200 + Nikkor 70-200mm f/2.8 @ 70mm — 1/180 sec, f/8, ISO 160 — map & image data — nearby photos
Drunk Farmer

Nikon D200 + Nikkor 70-200mm f/2.8 @ 82mm — 1/800 sec, f/6.3, ISO 250 — map & image data — nearby photos
Seedlings

Nikon D200 + Nikkor 17-55 f/2.8 @ 55mm — 1/1500 sec, f/2.8, ISO 200 — map & image data — nearby photos
Another view of the“Oyako no Ki” (親子の木)
that was seen in a previous post
The name means literally “Parents-and-child Trees”

Nikon D200 + Nikkor 70-200mm f/2.8 @ 120mm — 1/1500 sec, f/3.5, ISO 160 — map & image data — nearby photos
Sun Peaking Through
(that's a little wordplay there)
I wasn't the only one to enjoy the views...

Nikon D200 + Nikkor 70-200mm f/2.8 @ 70mm — 1/160 sec, f/4.5, ISO 160 — map & image data — nearby photos
Preparing For Blastoff

Nikon D200 + Nikkor 70-200mm f/2.8 @ 70mm — 1/320 sec, f/4.5, ISO 160 — map & image data — nearby photos
Together
