Adobe Lightroom Version 1.1
Adobe has officially announced the highly anticipated “Version 1.1” upgrade to their Lightroom photo-workflow application, four months after Version 1.0 was released. Lightroom creates a whole new world of organization and expression for photographers, one that fulfills many needs the user might not have even realized where there.
Yet, once the user settles in, they find themselves invigorated into wanting even more organizational and creative functionality, and this free upgrade is a step in that direction.
There are many new features in 1.1, some of which have been previewed already (including the new sharpening controls released in Adobe Camera Raw 4.1.).
I'm sure there will be many “What's new in 1.1” lists out there (here's a rather comprehensive-looking list from Victoria Bampton), so I'll just list some of the things that I particularly appreciate. I use primarily the Library and Develop modules, only rarely touching the Slideshow, Web, and Print modules, so nothing from those three are listed here. Also, I haven't even paid much attention to perhaps the biggest addition — the concept of “Catalogs” (replacing 1.0's idea of “Library”) and the ability to move them among machines — so that's not here either.
(And I should admit that because I've been using the 1.1 upgrade in some form or another for some months, I don't necessarily remember what was in 1.0, so may list some thing here that aren't actually new.)
My Favorite New Features in Lightroom 1.1
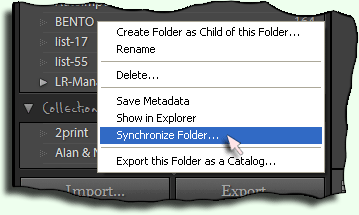
Synchronizing Folders
You can now “synchronize” a folder, comparing its contents against the current catalog, checking for newly-added or missing images.
It's a small thing, but very convenient for some workflows. Prior to this, I used a little script I wrote myself that attempted to report files on disk that weren't in Lightroom. This built-in synchronize control is so much better.
Some complain that this synchronization should be done automatically, but it can be time consuming (a minute or so) for huge folder trees, even on a fast computer like mine.
Synchronizing Exposure
In Develop, while multiple images are selected with the filmstrip, you can now choose Settings > Match Total Exposures to adjust the exposure of the other selected images to match that of the primary image. (I sort of think it should be called “Set Total Exposure,” but Adobe neglected to ask my opinion on the subject.)
This is convenient when you have many images of the same scene, taken with different shutter speeds, apertures, etc. (such as when trying different creative combinations, or when the camera's light meter registered something slightly differently from shot to shot). When you find one with an exposure you like, you can sync that to all the others. Now that each shot has the same exposure, you can more objectively judge them on their content.
(This feature owes its existence at least partially to persistent pestering by Lee Jay Fingersh, who finds it particularly useful for processing airshow photos.)
Mouseover Images
Here's one that probably doesn't seem particularly interesting at first, but it really grows on you.
Mouse-over Me
















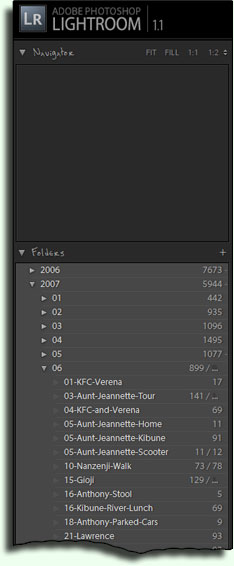
When the mouse goes over a name on the left side of the Library panel (a folder name, collection name, keyword, etc...), an image from that folder/collection/keyword/etc. is shown in the little upper-right navigator window.
I've simulated it for you at left, so give it a try by mousing over the folder names.
As far as I know, there's not currently a way to select which image is shown for any particular name. As best as I can tell, the one with the oldest capture date is shown, except for the somewhat unlikely case of a folder whose sort has been set to revers chronological, in which case the newest image is shown. Any other sort (user sort, sort by filename, etc.) has the image selection revert to oldest capture time.
Still, it's a very nice little touch.
Negative Color Filters
You can now set the filters to “all except images tagged with purple” or the like.
ESC Aborts a Crop/Rotate Operation
It used to be that hitting the ESC key while doing a crop/rotate caused the current crop and rotation to be committed. It now aborts the operation, returning the image to how it was before the crop/rotate tool was invoked. This is as God intended.
New Preferences
There are a number of new preferences. I'm not sure whether it first appeared in 1.1, but I've only recently noticed it, so I'll mention the ability to set the filename-creation template for those files created by a “Edit in Photoshop” operation. I never cared for the “-Edit” suffix, so have changed that.
Metadata-Panel Improvements
The Metadata panel in Library mode has received a number of enhancements. It includes new built-in presets that offer large boxes for the caption, and also a number of new metadata items.
There are several new date-related items that may be of interest to those who scan a lot of images, and also these new items:
- Original Filename — image's filename at the itme of import
- File Type — “Jpeg”, “Dng”, “Raw”, ...
- Copy Name — useful for virtual copies of a master
- Metadata Status — indicates whether metadata differs between library and disk
- Metadata Date — when metadata was last written to disk.
- Sidecar Files — types of sidecar files, e.g. “.xmp”, “.jpg”, ...
- Audio File — audio annotation file (but haven't gotten it to work yet)
- File Size — size on disk (e.g. in megabytes)
- Copyright Status — “Copyrighted”, “Public Domain”, or “Unknown”
My Tech-Related Photography Posts
- My Lightroom-to-iPad Workflow
- Lightroom Goodies (lots of plugins)
- Digital Image Color Spaces
- Online Exif (Image Data) Viewer
- Jeffrey's Autofocus Test Chart
- Photoshop Calendar-Template-Building Script
- How to Prepare Photos for an iPad
- A Qualitative Analysis of NEF Compression
- Tripod Stability Tests
more...
Even better still, they've added a number of hooks that I've been able to exploit in my Lightroom Metadata-Viewer Preset Builder application (now updated for 1.1), allowing you to create custom viewer presets in which you have a fair amount of control over the layout. You can make input text boxes wide and/or tall, you can change or remove labels, mark some items as read-only (sort of), and more. Very sweet.
Clarity
The new Develop “Clarity” control (grouped with Vibrance and Saturation) increases local contrast throught the picture. Take a few random images and try it.... neat!
Nice work Jeffrey !!
Thank you for all your work again. I just installed LR 1.1 and my Metadata Viewer Preset still works. I will have a look at your new builder later on to improve my preset.
Very usefull coments. Anyway your whole site is very interesting. I will be visiting often !
Nice work, thanks
Metadata Viewer: A genuinely helpful tool, showing just what you need — and no more — of the metadata; I found shortening/deleting captions especially worthwhile. Noticed in the Adobe Forum the huge number of weird problems with displaying proper capture date.
No more! Sure beats editing the arcane templates in the metadata folder.
BTW: Does one still need to create a new “Metadata Field List” subfolder, rather than placing the newly generated .lrtemplate preset in the existing (ver 1.1) “Metadata Presets” folder?
Yes, you still need the new folder. The Metadata Presets folder is for the assign-this-value-to-this-field presets that you can apply to images. —Jeffrey
Thanks, Jeffrey & Regards: -=Rudy=-
Hi Jeffrey,
Nice work here. I’ve just got LR1.1 and found a major problem. Pictures viwed in it look very much warmer than they do in Photoshop. I’m talking about the same pictures with the same settings. In LR they look as if the WB has been boosted but the figures show it’s exactly the same. One picture, a PSD, into which I pasted a white background looks quite yellow in LR. Any idea what’s happening?
Cheers
Laurie Strachan
(Laurie followed up later via email. The problem had been with her system’s monitor profile. —Jeffrey)