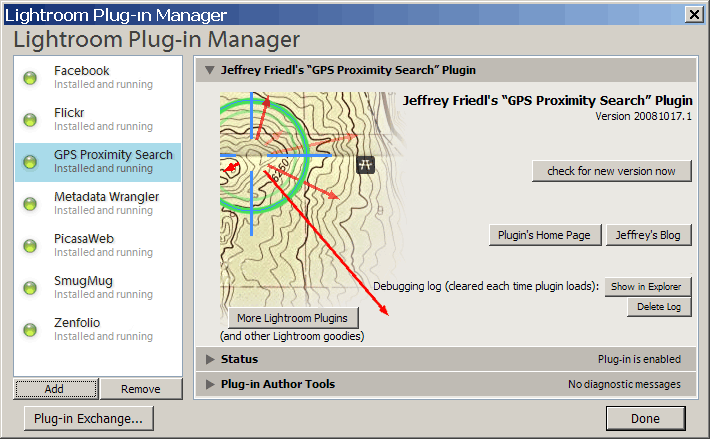
I'm releasing today a plugin for Adobe Lightroom 2.0 or later that allows you to perform a proximity search based on the locations geoencoded into your images. This adds to my stable of Lightroom plugins listed on my Lightroom Goodies page, and is the second that's not a vanilla “export to...” plugin (the other being my Metadata Wrangler).
I started writing this the other day after wanting to illustrate my Perfect Weather for a Snooze on a Park Bench post, but couldn't find among the 30,000 images in my library some of the Anthony-swinging pictures that I knew I had. Thinking about how to find them, I had an epiphany about how to get around a limitation of Lightroom's plugin infrastructure, thereby making a proximity-search plugin practical.
Geoencoding Your Images
To be clear up front: this plugin works only with images that are already geoencoded, and does not itself provide any way to geoencode images. If you'd like to add GPS data to images, see my geoencoding features in my GPS Support plugin.
Proximity-Search Results
Before getting into the details of how a search is performed, I'd like to quickly show the results of a search. As part of the search process, the plugin attaches some custom metadata to each image, so that once completed, you can view the results like any other image metadata.
Here's an example of the result metadata added for a single image that was subject to a search:
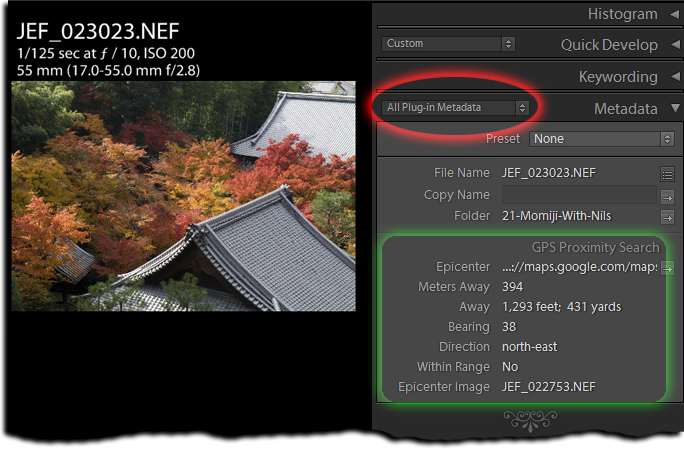
The metadata added by this plugin is highlighted in green above. To view it, you first have to switch to the “All Plugin Metadata” view in the Metadata Panel, as highlighted in red. (It's on my overwhelmingly long to-do list to update my Lightroom Metadata Viewer Preset Builder to allow for custom plugin metadata like this.)
As you can see above, the plugin indicates how far the image's geoencoded location is from the search location, what I've decided to call the “search epicenter”. The distance in meters is always listed, but I also try to write the appropriate feet/yards/miles as well.
The “Epicenter” item itself is a clickable link to a map showing the location used as the epicenter of the search (the location, in this example, 394 meters south-east from this image: according to the results shown above, this image is 394 meters at a bearing of 38° – that's north-east – from the search epicenter).
The “Within Range” item is perhaps the most important, and is explained later in this post.
Installation
You can download my GPS Proximity Search plugin from its home page, on which you'll also find the installation instructions.
This plugin supports one-click upgrading, as described on the install-instructions page.
(Each release also has an expiration, to encourage upgrades to pick up bug fixes. This is mostly for my own self preservation, because I get a lot of comments and email about bugs that have already been fixed in newer versions.)
Performing a Search
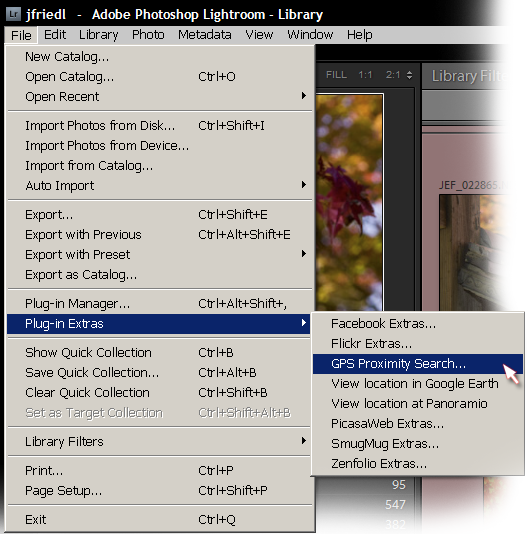
To begin a search, invoke the “GPS Proximity Search” item in the “Plugin Extras” File menu...
That in turn brings up the main search dialog...
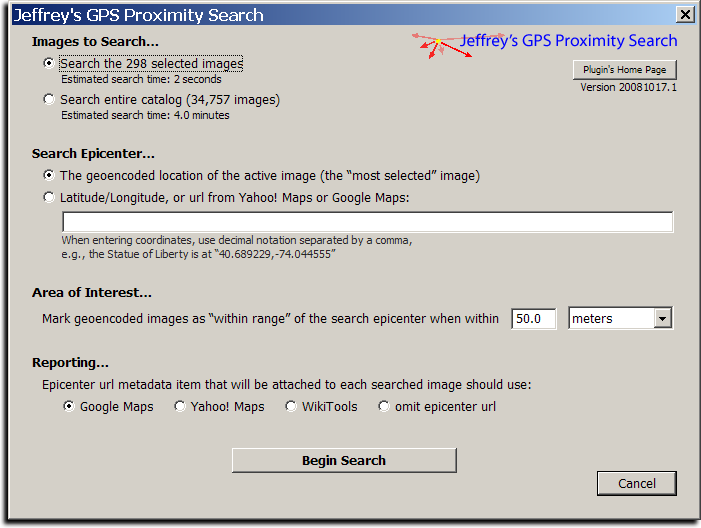
The dialog has four main sections:
Images to Search...
You can always search the entire catalog, but if you wish to narrow the search to a specific set of images, you can select them before invoking this dialog.
If you have previously run a search, the plugin will using the performance timing from that to estimate the time needed for this search.
Search Epicenter...
The “epicenter” is the location from which all distances and directions are measured. If an image had been selected when the search dialog was brought up (and if it is geoencoded), its location is the default epicenter. If multiple images are selected, the active image (the "most selected' image) is the default if it is geoencoded.
As options, you can always enter a latitude/longitude manually, or cut-and-paste a URL from Yahoo! Maps or Google Maps.
Area of Interest...
One's goal in doing a search is likely to find images that are close to the target epicenter location, so this section allows you to specify what “close” means for your needs. Images within that distance are marked “Within Range: Yes”, while others (including images that are not geoencoded) are marked “Within Range: No”.
After the search, you can filter on the “Within Range” item in Lightroom's Library Filter, thereby showing only the images that are, as far as you are concerned, “within range”. (I'd like to have the plugin switch to that view automatically, but alas, Lightroom's plugin infrastructure does not allow for that.)
Reporting...
You can select what kind of map url you want the “Epicenter” metadata item to be. This is to allow you to remember where the center of the search was after the fact, in case you're prone to “senior moments” like me.
When you actually launch a search by clicking on the Begin Search button, a progress bar will pop up and remain until the search is complete. Like my export plugins, it calculates and displays an ETA, which can be useful for long searches.
When the search is complete, a small dialog pops up with some summary results...
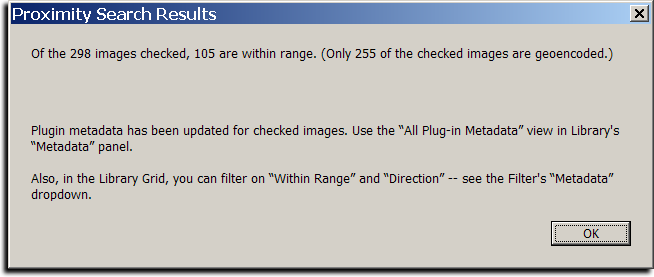
Note that as of Lightroom 2.1, you can't actually filter on “Direction” due to what I assume is a bug in Lightroom. If I find a workaround, I'll push a new version of my plugin.
Bonus Menu Items
As a bonus, I've thrown in two other Library Menu items (in “Plugin Extras”, alongside “GPS Proximity Search”, as seen in the menu screenshot above):
- View location in Google Earth
- View location at Panoramio
They can be invoked while a geoencoded image is selected, and they launch Google Earth (if you have it installed), or bring up Panoramio in your browser.
These have nothing to do with the proximity search, and I may pull them from this plugin if I ever make some other kind of “GPS Stuff” plugin.
Finally...
Enjoy.
You can download the plugin here: Jeffrey's GPS Proximity Lightroom Plugin.

Note from Anthony
I mentioned in Anthony's First All-by-Himself Letter a few days ago that while writing his first full-fledged note all by himself, he'd made a grammar mistake in writing the わ sound as わ when, due to its grammatical use in the sentence, it should have been written as は. The alphabet is remarkably regular, with only a few special rules like this. Few as they are, they need to be learned and absorbed, so we lightly mentioned it to him in passing.
I didn't expect it to be something that he really “got” for a while, but he wrote it properly in his note the next day, seen at right.
Actually, the situation came up twice in the note, and he wrote it properly only the first time, but still, it's fast approaching the “better than I could do” level. 🙂
The note at right says:
Mommy,
Your favorite kind of vehicle would be what?
I translated のりもの as “vehicle”, but there's got to be something better. Imagine a book for little boys named Cars, delivery trucks, rockets, busses, cranes, bulldozers, police cars, planes, motorcycles, dragsters, race cars, bicycles, and more!. In Japan, that would be titled “Vehicles” and every little boy hearing that title would grow wide-eyed in expectation.
Here's the note that Mommy had left him that morning...

Note from Mommy
Mommy's note reads:
Dear Anthony,
What kind of vehicle do you like the most?
Mommy.
Write right here...
to which Anthony's written reply is “Trucks and busses and cars and race cars.”
The old pictures of Anthony swinging in the park two years ago that I posted last week reminded me of some foliage photos I took on that same outing early in Kyoto's 2006 fall-foliage season. So, I thought I'd use them to kick off Part III of my Kyoto Fall Foliage Preview (prior installments: Part I · Part II).
 -- Kyoto, Japan -- Copyright 2006 Jeffrey Eric Francis Friedl, https://regex.info/blog/")
Nikon D200 + Nikkor 17-55mm f/2.8 @ 55 mm — 1/2000 sec, f/5, ISO 640 — map & image data — nearby photos
Yellow Grass
as seen on this post
( Hmmm, not really “foliage”, I guess... )

Nikon D200 + Nikkor 17-55mm f/2.8 @ 38 mm — 1/250 sec, f/11, ISO 320 — map & image data — nearby photos
Entrance to Someone's Property

Nikon D200 + Nikkor 17-55mm f/2.8 @ 55 mm — 1/1500 sec, f/2.8, ISO 100 — map & image data — nearby photos
Something's Lunch
I was sitting on my bicycle with the wind howling when I tried to get the shot of the leaf... very hard to get, much less hold, focus.

Nikon D200 + Nikkor 17-55mm f/2.8 @ 55 mm — 1/500 sec, f/10, ISO 640 — map & image data — nearby photos
Cameras Everywhere
at the Nanzen Temple
The “nearby photos” link under the picture above brings you to a lot of pretty shots at the Nanzen Temple, but not to the most popular ones here on my blog, because I haven't yet geoencoded the Photography of Katsunori Shimada. Must get around to doing that.
Switching gears to 2007, when it was mostly overcast, here are a few shots outside the Doshisha Law School, where Anthony had some event in their auditorium....

Nikon D200 + Nikkor 17-55mm f/2.8 @ 55 mm — 1/250 sec, f/3.5, ISO 250 — map & image data — nearby photos
Can't... Decide.... Color

Nikon D200 + Nikkor 17-55mm f/2.8 @ 55 mm — 1/80 sec, f/7.1, ISO 250 — map & image data — nearby photos
Still.... Can't.... Decide

Nikon D200 + Nikkor 17-55mm f/2.8 @ 55 mm — 1/60 sec, f/7.1, ISO 250 — map & image data — nearby photos
Okay, Let's Go With Yellow.... Mostly

Nikon D200 + Nikkor 17-55mm f/2.8 @ 17 mm — 1/80 sec, f/7.1, ISO 250 — map & image data — nearby photos
Wide View
with rainbow trichromatic tree