Lightroom allows for a variety of metadata for each photo or video... capture date, caption, keywords, etc., and plugins can add further, custom fields, but sometimes what's offered by Lightroom or existing plugins just doesn't fulfill one's own specific needs. Luckily, it's actually fairly easy to make your very own Lightroom plugin to add your own metadata fields. In this post, I'll show you how.
It's fairly quick and simple. It will take far longer to read this post about how to do it than it takes to actually do it.
The kind of fields we can add this way are simple text fields, where you can enter whatever text you like. The example we'll use throughout this article is adding these three fields to track co-artists of a modeling shoot:
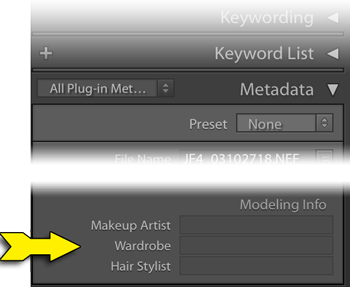
our example “Modeling Info” plugin
Your plugin can have more or fewer fields, and of course you can make different plugins for different sets of data.
As I said, it's fairly simple to set up, but since it does involve editing program files, some things must be done exactly as described, so take care to follow instructions.
The outline of the process:
- Create a folder (with a special name, as I'll describe) for the plugin.
- Add two starter files into the folder.
- Personalize the first file.
- Personalize the second file.
- Point Lightroom at your new plugin and start using it.
- (Optional) Create a metadata-view template to ease access your new data fields.
Again, the process is pretty quick once you're used to it, but we'll go over the steps in detail below.
Steps three and four involves editing program files, and in doing so you must not use a “document” editor (e.g. Microsoft Word). Rather, you must use a simple “text” editor that adds no formatting or “rich text”.
Under OSX you can use TextEdit, so long as you remain in “Plain Text” mode.
Under Windows you can use Notepad.
Step 1: Create the Plugin Folder
You can take care of both this step and the next by downloading the starter sample plugin this article describes, “modeling-info.lrplugin.zip”. After unzipping, you'll be left with a folder named “modeling-info.lrplugin”. Move it to wherever on your system you want your plugin to reside.
(Don't make the mistake to double-click on the folder, as it'll invoke some copy of Lightroom — on my system, it inexplicably brings up Lightroom 3! — after which it brings up the Import Dialog to try to bring non-existent photos from the plugin into Lightroom.)
Or, manually create a folder somewhere on your system where you want your plugin files to reside, naming the folder so that it ends with “.lrplugin”. The example plugin uses the name “modeling-info.lrplugin”, but other example names might include “My Archive Data.lrplugin” or “Extra Fields.lrplugin”.
Choose a name that means something to you and your use of the data; the name doesn't matter too much to Lightroom, so long as it ends with “.lrplugin”.
We'll refer to this as your “plugin folder”; as mentioned above, our example plugin folder is “modeling-info.lrplugin”.
Mac-Only Note:
OSX treats a folder with this kind of name specially, as a single “package” rather than a collection of files, but for the next couple of steps we'll want to get inside so we can edit individual files. To do this, in Finder we invoke the “Show Package Contents” menu item...
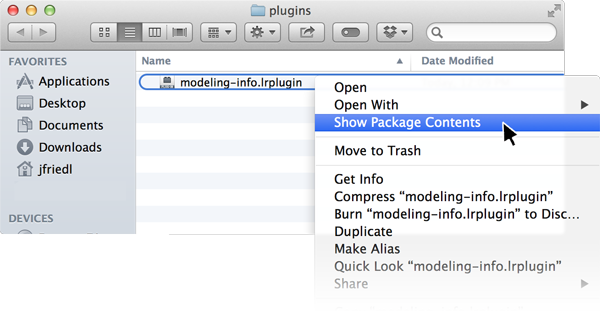
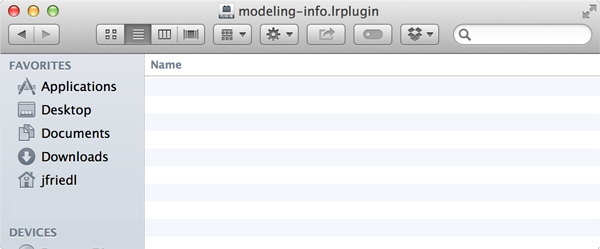
This puts us inside our plugin folder. It'll have two files in it already if this is the sample downloaded from my site, but if you created it manually you'll be presented with the empty folder:
Step 2: Copy In Starter Files
If you're not using the sample download, then you'll need to create two text files within your plugin folder, one named “Info.lua”, and the other named “CustomMetadata.lua”. You can copy them from the sample download or just copy/paste their contents from below.
Step 3: Personalize the “Info.lua” File
The starter “Info.lua” file looks something like this:
return {
   LrPluginName        = "Modeling Info",
   LrToolkitIdentifier = "jeff.friedl.modeling",
   LrSdkVersion        = 2,
   LrMetadataProvider  = 'CustomMetadata.lua',
}
The parts shown in red should be edited to your taste using a raw-text editor (like Notepad or TextEdit). Don't change anything else... these are program files, so every little bit of punctuation matters.
The first bit of text to change (“Modeling Info”) is the name Lightroom should display when referencing this plugin in its UI. It's primarly used in the plugin manager. Put something here that's meaningful for you. It's best if it's short enough to display without being truncated, so “Modeling Info” is better than, for example, “Extra metadata fields to help me track modeling sessions”.
Regardless of what name you choose now, you can always return to this file to update this name later, if you like. It's used only as a display label.
The second item that must be changed, the “plugin identifier” (shown above as “my.custom.modeling”), is extremly important: it's the key identifier used by Lightroom behind the scenes to tie your plugin to your catalog, and each photo to its extra data.
You must pick something that's unique to this plugin (that is, something not used by any other plugin that you might ever use), and once you pick it and start using the plugin, it can not be changed.
It's standard practice to combine something with your name (of yourself or your business) and something about this particular plugin. It's standard practice to use a period instead of spaces.
For example, if you're “Bob's Photo Studio” and you make one plugin to handle modeling data, and another plugin to handle archive data, you might use “bobs.photo.studio.modeling” for one plugin's identifier, and “bobs.photo.studio.archive.data” for the other's.
Remember that all editing must be done as plain, bland, un-rich raw text. In particular, make sure not to use “smart” quotes...
"Modeling Info" ← this is correct
Take a careful look at the punctuation above. See the difference?
Once you've picked the plugin label and internal identifier, save the file and move on to the other.
Step 4: Personalize the “CustomMetadata.lua” File
The other file contains your list of extra metadata fields that the plugin makes avaialble to each photo.
The starter file is the example defining our three modeling fields:
return {
 schemaVersion = 1, -- increment this value any time you make a change to the field definitions below

 metadataFieldsForPhotos = {
  -- You can have as many fields as you like (the example below shows three)... just make sure each 'id' and 'title' are unique.
  -- Set "searchable" to true to allow as a search criteria in smart collections.
  -- If both "searchable" and "browsable" are true, the field shows up under "Metadata" in Library's grid filter.
  { dataType="string", searchable=false, browsable=false, id="field1", title="Makeup Artist" },
  { dataType="string", searchable=false, browsable=false, id="field2", title="Wardrobe"      },
  { dataType="string", searchable=false, browsable=false, id="field3", title="Hair Stylist"  },
 }
}
This sample defines three data fields, so the first thing you'll want to do is update it to define the number of fields you actually want. If you need less than three, delete the extra “{ dataType...” lines. If you need more than three, replicate one of the lines until you have as many such lines as fields you want.
The “title” for each metadata field is the label that Lightroom uses when displaying the metadata field to the user. You can use most any descriptive text you like, though shorter values have a better chance of fitting within Lightroom's cramped UI.
The “id” is the internal key used by Lightroom to tie a photo to its data for this field. The “id” value must be unique for each field within this plugin (so take extra care if you replicated lines to fill out the number of fields you needed; in doing so you also replicated the title and id, and while you probably want to update the title, the id must be changed).
For the ids, you can simply use “field1”, “field2”, etc., as is shown above, or pick short descriptive words such as “makeup”, “wardrobe”, “hair”. It doesn't matter too much to Lightroom so long as there are no repeats, but as illustrated here, there's a benefit to using descriptive ids over a simple “field1” enumeration.
(Note: the plugin identifier in the Info.lua file that we edited first must be unique across all plugins, but the field ids in this file need be unique only within this particular plugin.)
You can turn on some options for how the fields work in Lightroom by updating the text shown in yellow above...
If you want a particular data field to be usable within smart-collection criteria, change the “false” after “searchable=” to “true”.
If you want the field to appear in the Library Grid Filter, change both “false” on the field's line to “true”.
If, after you've started to use the plugin, you need to return to this file to add or remove fields, or make any other change (e.g. toggling a “true” to “false” or vice-versa), increment (add one to) the “schemaVersion” value.
Step 5: Point Lightroom to your Plugin
Now you install the plugin just like any other: visit the plugin manager, use the “Add” button, and navigate to the “.lrplugin” folder you created in Step 1.
Now back in the Library Module, your new fields should appear in the Metatdata panel when you choose the “All Plugin Metadata” viewing preset:
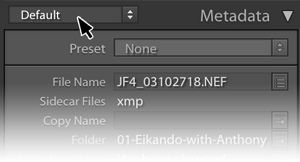
1) click here to select a new view
|
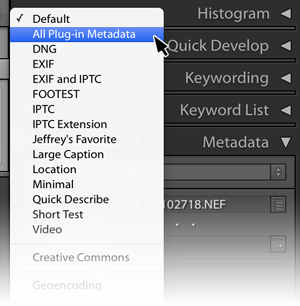
2) select “All Plugin Metadata”
|
And voilà, the three fields show up, empty and waiting to be filled in as appropriate for each photo:
Step 6: (Opgtional) Metadata Viewer Preset
The need to switch to the “All Plugin Metadata” view preset, as we did in the last step, can be inconvenient when you want access to both your new fields and other traditional metadata fields like capture date and photo title.
However, using my Metadata-Viewer Preset Editor plugin, you can create your own “view” of photo data, so that you see whatever fields you like (including the new ones you just added), in whatever order you like.
When using that plugin to create your own custom view, look for the “import fields from plugin” button at the bottom. That'll make your custom fields available in that plugin.
Accessing Your Custom Fields
The data you add to each photo in your custom fields is kept in your Lightroom catalog, and nowhere else. It's not saved in XMP sidecars, nor is it added to exported copies of photos.
However, you can have your custom data stuffed into certain standard metadata fields of exported copies, using my Metadata Wrangler plugin. It may seem a bit cryptic, especially if you're not used to the template tokens that many of my plugins understand, but here's an example showing the wardrobe-artist data being inserted into the caption of an exported image copy:
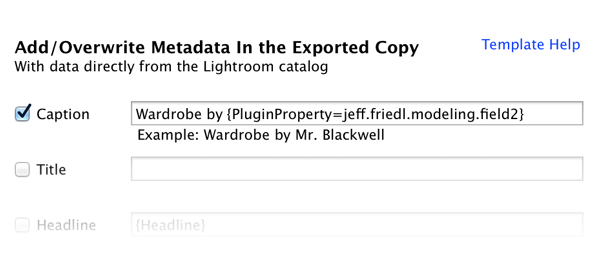
screenshot of the Metadata Wrangler as part of an export
Both the plugin id (from the Info.lua file) and the field id (from CustomMetadata.lua) are needed to reference the specific metadata field, tied together with an extra dot (period) character. Here's a breakdown on constructing a reference to a custom plugin field:
| {PluginProperty= | jeff.friedl.modeling plugin id |
. ↑ |
field2 field id |
} |
Notice the extra period (marked with a green arrow) tying together the plugin id and the field id? Don't forget that, and don't let any extra spaces creep in. Also don't forget to wrap the whole reference in curly brackets.
References from afar like this are one reason to choose a descriptive plugin id, and descriptive field ids. The “field2” field id seen in this example is a lot less enlightening than the “wardrobe” alternate suggestion.
You can also shuffle data around within the catalog with the “Write Data Field” feature of my Bag of Goodies plugin. Here's a screenshot showing Lightroom's “Caption” field about to be filled with text that includes data from a custom plugin field:
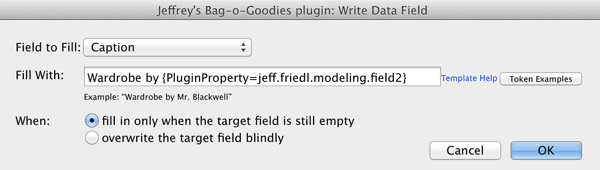
This might be useful in special cases, but I don't think it's all that useful for most workflows because the data movement happens only when you ask for it, as opposed to the Metadata-Wrangler example above that you can set up once (in a Publish Service or in an Export preset) to have happen automatically from then on.
Cleaning Custom Data from your Catalog
If you've been using a custom plugin to add custom fields that you no longer need, and you want to reclaim the space in your catalog database file, you can't just delete the plugin to have the plugin's data removed. This is a good thing, because you certainly don't want to lose valuable plugin data just because you accidentally deleted a plugin file.
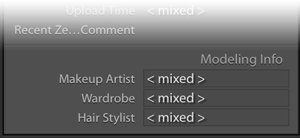
The only way I know to actually delete all the data from the catalog is to select all photos in Grid mode, then clear out the data by selecting and deleting the “< mixed >” value shown in the data field.
A few caveats:
After selecting “All Photographs” (as seen at right) while in Library Grid mode, merely selecting all images (Command/Control-A) isn't necessarily sufficient.
First of all, you have to make sure that the Grid Filters are turned off... tap Command/Control-L to toggle them off. (If they had been off, you'll see a brief “Library Filters On” message, in which case you'll want to re-tap Command/Control-L to turn them back off.)
You'll want to re-select all after turning off the filters, then to make sure that nothing is hidden within a closed stack, invoke “Photo > Stacking > Expand All Stacks”. Then again “select all” one last time.
Now, before selecting one of the fields to update, make sure that the spinning “metadata busy” icon is not present. It looks like this:
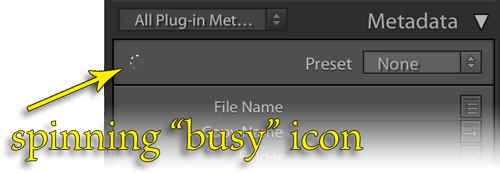
This is an area of Lightroom's UI that I think is horrible, so you've got to be careful. When that icon is spinning, Lightroom might ignore anything you type into a text-input field, or it might treat it as keyboard shortcuts instead of text to be entered. It's all too easy to destroy lots about your images when working with many of them and typing the wrong thing at what for parts of Lightroom is the wrong time.
So, wait until the spinning icon goes away. Then select the first data field and delete the “< mixed >” placeholder value. Then wait again until the spinning icon is no more. Repeat for all your fields.
Then you can remove the plugin from Lightroom.
Hi Jeffrey.
I am still using Rob Cole’s Custom Metadata plugin to manage custom metadata, but thanks for showing how it works under the hood.
Have you ever thought of adding Custom Metadata to your “Data Explorer” plugin? You do have Custom Metadata support in your “Metadata Presets” plugin, for which I thank you. But it would so great to, for instance, do searches on Beardy’s “Big Note” field (or any field with “browsable = false”) just like one can use your Data Explorer to explore Caption or Title. I have added a few free-form text fields like “Big Note”, and not being able to easily search them is an impediment to getting things done.
Alan in Oakland
I went ahead and added it (it’s been on my mind to add it for a while, and I’d already done most of the work), but I worry that it won’t be useful for Big Note and the like, because it doesn’t do a search inside the text, it just shows the text. —Jeffrey
Do you have a plugin that will allow me to be able to export / import the custom data that gets created using your Photo-Metadata Fields plugin .
i would like to have the option to work with the data in a excel spreadsheet
You can export metadata like this with Tim Armes’ Lr/Transporter plugin. See the “Metadata from 3rd party plugins” section on that page. In this case, you and your plugin (it’s not my plugin… I merely tell you how to make your own) are the “3rd party”. —Jeffrey
Wonderful, very helpful.
Thanks Jeffrey 🙂
Richard.
I love this article and have used it to create a custom plugin to help wrangle copyright status for my images. Your instructions are fairly simple and easy to use and I had no problems with following them.
Can I suggest 2 things?
1) Maybe you should like to this page from your main plugin page? If I didn’t know this page was here, finding it would be difficult.
2) One common thing that people would want to put into custom plugin fields would be a validated and properly formatted date. Maybe you could include or add on that as a second, more advanced, option.
Good idea for #1, I’ve added links, thanks. Unfortunately, Lightroom doesn’t support #2 )-: —Jeffrey
Hi Jeffrey
This is very useful, and as others have said the instructions are simple and easy to use.
I have one issue that I was wondering if you have encountered. I’ve added a couple of custom fields and everything is working as it is supposed to. The only issue is that when I add text in my custom field and create a virtual copy of the image, smart collections does not recognize the virtual copy if there is a criteria based on my custom fields. Not before I’ve removed the text and type it again on the virtual copies. This is unlike how the fixed fields behave, and even fields from your plugins. Have you encountered this or do you have any “under the hood” knowledge of what might cause this?
This is a bug in Lightroom. I’ve been able to reproduce it, so I reported the bug to Adobe. —Jeffrey
Hi Jeffrey, this is so helpful. Thank you for spending your time share your knowledge! I’m using the plugin really well but wondered if you had some suggestions to help me.
I’d like to be able to enter data into a field and then import data to other fields based on the data entered in the first field.
For example, field 1 contains a ‘reference number’. In excel, this reference number also has a ‘name’ and ‘ID’. Rather than typing them in for each photo, it would be perfect if this data could be imported into lightroom after entering the ‘reference number’.
Any ideas?
Luke
If you’re talking about data import, you’d probably need a custom plugin for that. Or, perhaps you could build something outside of Lightroom that creates a CSV of data that you could then import into Lightroom with the Lr/Transporter plugin. —Jeffrey
Thanks so much. I got this working and it was great for what I need, but then made a few tweaks to my custom metadata file and am now getting an error “The plugin-specific metadata in this catalog is newer than the what the installed version of this plugin supports.” Any idea what I’m doing wrong? Thanks for all your work!
Charles
You probably loaded a version of the plugin with the schemaVersion set to a higher number, then reverted to one with a lower number. Set it back to the higher number (or one beyond that) and you should be fine. —Jeffrey
Hello,
Thank for the detailed guide!
after adding custom fields to about 10K photos, i’m trying to use them for “title” or “caption”, or any other field that I can read from the JPG to my WordPress site, but it seems that the “Wrangler” can’t read the values.
For example : putting this “Reg {PluginProperty=SpottingInfo.AC_REG}” into the TITLE field (“add/ovverwrite metadata…”) gives only “Reg”.
The line in the fields plugin is
{ dataType=’string’, searchable=true, browsable=true,version=1, id=”AC_REG”, title=”Registry”},
and of course, the field has a value – tested for several photos.
Any help will be appreciated!
Are you sure that the LrToolkitIdentifier in your Info.lua file is exactly "SpottingInfo"? If so, perhaps zip up your plugin and mail it to me and I’ll take a look. —Jeffrey
Hi, Jeffery: I’m wondering if the custom metadata field in Lightroom will appear in the file displayed by Adobe Bridge. At my day job, I’ve been tasked with devising a new work flow to replace MediaPro–abandoned by PhaseOne. I really need the custom fields for a variety of data that needs to be displayed in image reviews, contact sheets, purchase orders, among other uses. I know I can try it out, but I don’t want to mess with my Lightroom without knowing what additional work I may have to do. Thanks. Jim
No, plugin custom data appears only in Lightroom. I’m not very familiar with Bridge, but I’d guess that the only way to get data from Lightroom to appear there would be to update standard fields, and write those fields back to the master images (via “Metadata > Save Metadata to File”). —Jeffrey
Thanks, Jeffrey. I guess I’ll just have to try it. But, assuming Lightroom is XML compliant, which is probably a good bet, given that Adobe wrote XML, saving the metadata to the file should be enough. Whether Bridge can “see” the new fields is another matter. I use Bridge to share files with my colleagues, as there is no easy way to share a Lightroom catalog over a network. Do you know a way? Thanks, again. Jim
I would imagine that plugin custom metadata is not written to XML, but I have not tested it. As for sharing with colleagues, perhaps look into Lightroom’s cloud-sync features? —Jeffrey
Is there any possible ways to customize new panel content(with checkbox, radiobutton,button) on the right side of lightroom classic below the metadata library??.
Plugins can have per-photo custom metadata fields of a few basic types, and with my viewer-preset builder plugin you can include those fields within the metadata panel, but there’s no way to add a new panel on the right side, or on any side, that I know of. —Jeffrey
Thanks for your reply…
Can you send me some example to add add checkbox and radio buttons inside custom metadata.?
Search for “dataType in the Lightroom SDK Guide. You can use enum to get the same functionality as a checkbox (enum values “yes” and “no”, for example) or a radio button. —Jeffrey
Thanks jeffrey…
Hi, Is it possible to call webservice when clicking url button from metadata and return some value(eg: Hello World text) from webservice and show it in a popup window inside lightroom??
aa
No, there are no such hooks for that that I know of. Clicking on a metadata URL simply opens the URL in the system browser. —Jeffrey
And also any possible ways to place button inside metadata instead of url button.
My requirements is to place textbox and button anywhere inside lightroom.
Once when i click on the button it should call some webservice which i have entered in the textbox and return the value from webservice and finally show the result in the lightroom. Any possible ideas??
I don’t know of any way to add a button to Lightroom’s metadata UI. The best I can suggest is a persistent floating window (see LrDialogs.presentFloatingDialog) with a button that invokes your process on the currently-selected photo. —Jeffrey
Hi there, Nick from Los Angeles! I’m wondering, is there a way to get the custom metadata fields to show up in the Filename Template Editor? My images include thousands of species of fish, and I’d love to be able to easily batch rename my photos based on the custom metadata.
No, sorry, Lightroom doesn’t give plugins access there. The best I can suggest is to use the “Write Field” feature of my Bag-o-Goodies plugin to copy the data into a field that the Filename Template Editor does give you access to, then do the rename. —Jeffrey
Hi Jeffrey,
Writing from the UK and have run into a problem while creating a plugin to help track submissions to stock sites. The plugin loads OK and displays “Unsubmitted” as the default, as expected. When I click and select another variable from the list (Accepted, Pending, etc.) it continues to display “Unsubmitted” despite the tick being by the one I’ve clicked on. Any ideas what’s going on?
metadataFieldsForPhotos = {
{
dataType = ‘enum’,
searchable = true,
browsable = false,
id = ‘ADobeBool’,
title = LOC ‘$$$/Fields/Adobe=Adobe’,
values ={
{
value = nil,
title = LOC “$$$/Fields/Adobe/nil=Unsubmitted”,
},
{
value = submitted,
title = LOC “$$$/Fields/Adobe/Submitted=Submitted”,
},
{
value = accepted,
title = LOC “$$$/Fields/Adobe/Accepted=Accepted”,
},
{
value = rejected,
title = LOC “$$$/Fields/Adobe/Rejected=Rejected”,
},
{
value = resubmit,
title = LOC “$$$/Fields/Adobe/Resubmit=Resubmit”,
},
},
},
Put quotes around ‘submitted‘ and other “value =” arguments (except for nil of course) to make them strings containing those words. As it is, they’re references to nonexistant variables, and as such, are the same as nil. Unrelated, for the titles, you don’t need the LOC stuff unless you’re also creating translation files. You can simply use title="Submitted" if you like. —Jeffrey
Hi Jeffrey,
Thanks for taking the time to reply – and telling me *why* it was going wrong! You’ve helped make it easier to track submissions across multiple sites.
Geoff
Is possible to export the custom fields? include it in xmp or other ways?
No, not directly. However, you can probably move the data from the custom fields to unused standard fields using my Metadata Wrangler plugin. —Jeffrey
Hi Jeffrey, this is Jessica writing to you from The Netherlands. Thanks for you helpful posts, which I used before for tweaking LR.
But now I ran into a problem: 2 years ago I made a custom metadata plugin to record metadata on my artworks. Recently I got a new computer, reinstalled LR but forgot about the plugin :(…. (I thoroughly cleaned my old computer and brought it to a recycling station.) So now I’m left with a LR catalog which, as I understand from your post, contains all my custom metadata, but I don’t know how to access them, since I don’t remember the name of the plugin nor the custom fields.
Do you know if there’s a way of retrieving that information from the catalog? Thanks for your help.
It’s in the AgPhotoPropertySpec table within the sqlite3 database that is the catalog. If you’re on MacOS, you can open Terminal and within it run this command:
(Where “mycatalog.lrcat” is the full path to your catalog), and the results should probably jog your memory. —Jeffrey
How can I make a large metadata window, like large Caption?
In the resulting .lrtemplate file for your metadata-panel field list, find the section dealing with the field you want to be big, and add “height_in_lines = 7,” at the top of the section. (It can go anywhere in the section for the field list; just make sure that each line within a section is separated from the others by a comma, and that there’s no dangling comma at the end of the section.) —Jeffrey
Following up your latest reply to my comment I can’t find the resulted .lrtemplate
Where is it usually stored?
The base folder for presets is documented here. The sub-folder is “Metadata Field Lists”. —Jeffrey