— Take Two —
Introduction
Three months ago in “How To Best Export Lightroom Images to an iPad, iPhone, Etc.” I wrote about my old workflow in getting my portfolio photos from Adobe Lightroom to an iPad. The setup and flow was much more complex than one might think it needed to be, mostly due to limitations and bugs with iTunes, but also due to some limitations in the Lightroom plugins I was using. I was happy to have eked out the best quality iTunes allowed, but the whole process felt horribly clunky.
I've now solved many of the problems I ran into then, in part by making major updates to the plugins I use in Lightroom, and also by abandoning Apple's “Photos” app in favor of a third-party photo-viewing iPad app.
The overall workflow is now smoother and faster in most every respect.
In this post I'll talk about Lightroom setup, photo selection and processing, and exporting photos to the iPad. I'll frame the presentation in the context of the app I use on my iPad, but the bulk of the discussion is relevant for any Lightroom-to-device workflow.
- Initial Lightroom Setup
- Album Setup
- Image Selection and Preparation
- Getting Images to the Device
- Publishing From Multiple Computers
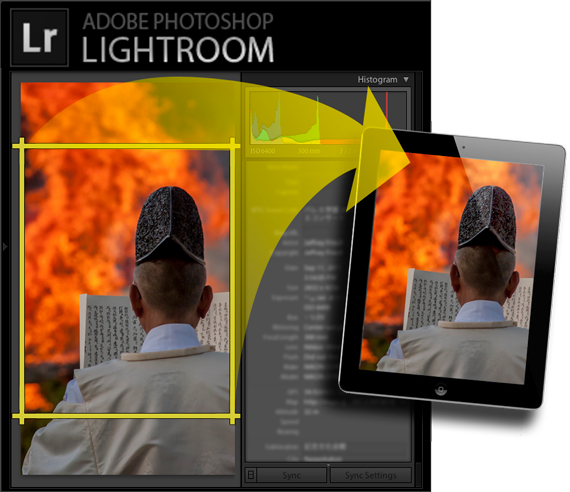
By the way, the example photo in the mock-up above is from this post on a festival rite at the Heian Shrine in Kyoto, Japan.
Initial Lightroom Setup
Setting up Lightroom first involves installing these plugins:
Collection Publisher — controls the overall workflow, and allows arrangement of photos into albums for the target device.
Crop-for-iPad — (optional) allows for device-specific crops to be applied on the fly during export, for selected images that don't have the same aspect ratio as the target device's screen, but would look better when filling it.
Metadata Wrangler — (optional) allows you to strip selected metadata from the exported copies, either to save space or to preserve privacy.
Geoencoding Support — (optional, not needed for Lr4+) if you want to be able to geoencode images, and the target device can display the geoencoded location (and you want to be able to do that).
Once installed, perform the initial setup of the Collection Publisher publish service. There are a bazillion sections to configure, but most are straightforward and unsurprising, so this will go quickly...
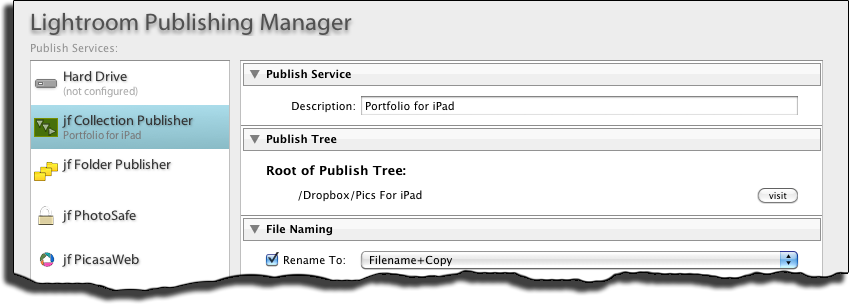
The second section, “Publish Tree”, indicates where image copies intended for the target device will be kept on your local system. (Personally, I use a Dropbox folder, for reasons that I discuss below.)
The next six sections of the dialog are standard for most any Lightroom export; I'll quickly go over the settings I use...
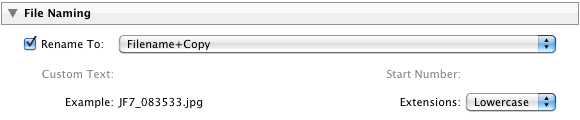
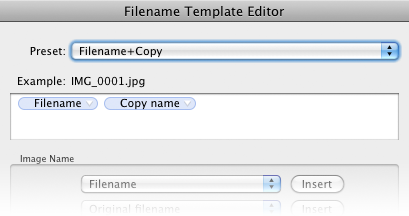
Because I might have two renditions of the same image (e.g. color and black & white versions), I want to make sure they're differentiated, so my standard file-naming rule for all my Lightroom exports is one that combines the file name and the copy name:
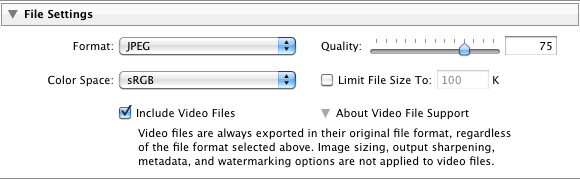
The output should be an sRGB JPEG of fairly nice quality, but due to memory and processing concerns on the target device, should not be too high. (If you're not familiar with exactly what this means, you'll find this useful: “An Analysis of Lightroom JPEG Export Quality Settings”.)
In choosing the pixel size of the exported image, take into account the maximum size that the target device (or the target app on the target device) can handle natively. Choosing a size larger than that just wastes memory and processing power as the app will have to downsize images on the fly or upon load, and choosing a size smaller means that you can't zoom up as much as is supported.

At the moment I've got my rule set up for “long edge to 2,000 pixels” because it should be reasonable for most apps while I test; later once I've settled on an app and know its specs, it'll be a simple matter to update this setting appropriately and republish my portfolio.
I leave sharpening at “standard for screen”...

I don't have Lightroom remove any image metadata, and I don't do any watermarking...
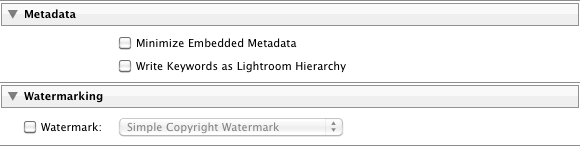
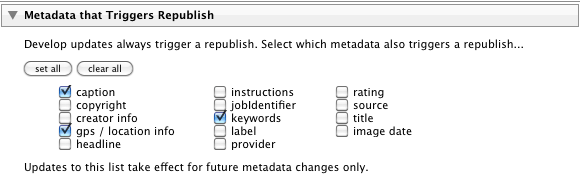
... but a bit below, I'll pick and choose what metadata I want to retain and remove.
The next sections come from some of the plugins installed in Lightroom, and added to the export via the section in the lower left of the Publishing Manager:
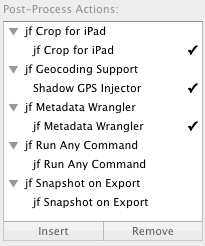
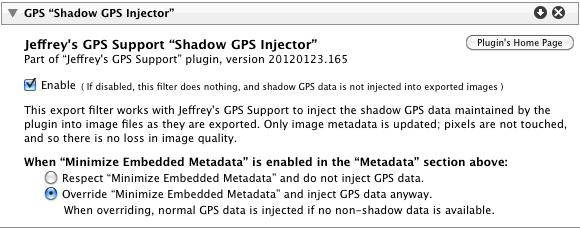
In Lr3 I include the geoencoding “Shadow Injector”, though this is no longer required for Lightroom 4:
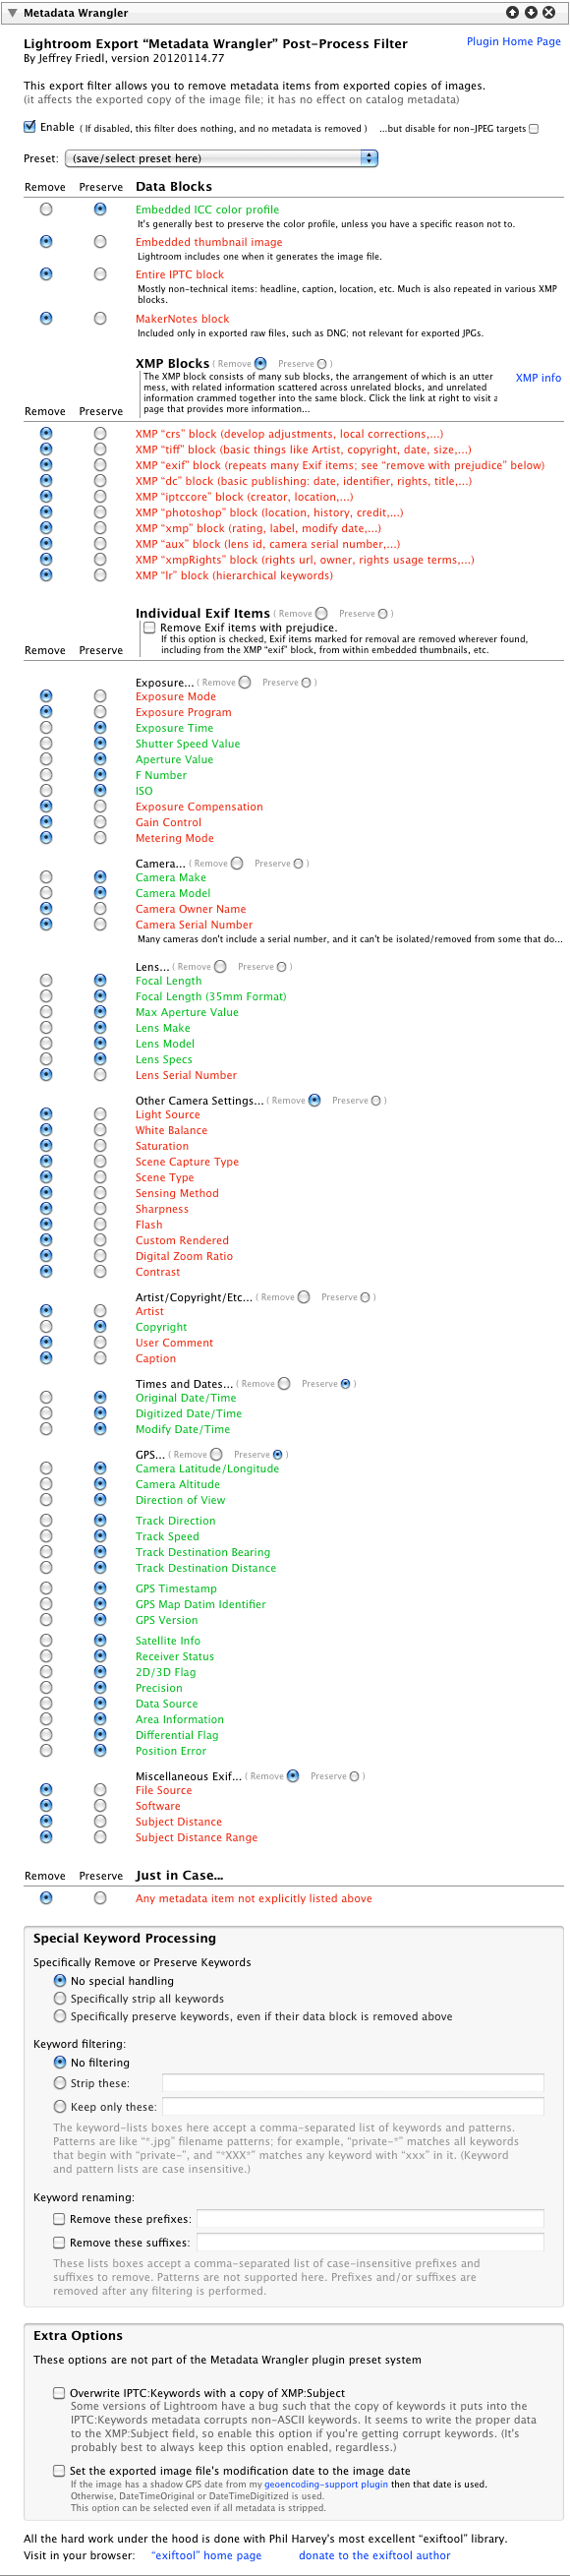
Then in this next monster section courtesy of my Metadata Wrangler plugin, to reduce space I strip all but explicitly-desired metadata. I leave in basics of the exposure, the geoencoding stuff, copyright, and the like...
Then I have the “crop-for-iPad” plugin settings...
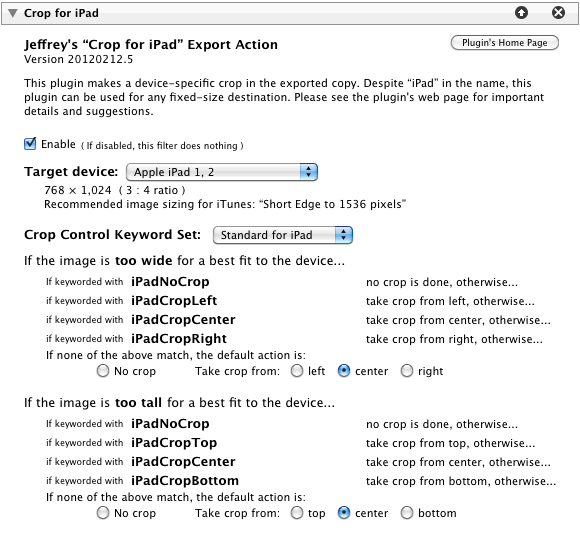
As each image is exported, this section defines whether an on-the-fly device-specific crop will be done to the exported copy, and if so, what kind, and from what part of the image.
The first area of this section indicates the target aspect ratio (the width/height ratio of the target device). The plugin includes data on a number of devices from Apple, Amazon, Blackberry, HP, HTC, Motorola, Samsung, and more, but you can also choose “custom” and enter your own width and height.
The “Crop Control” area is where you indicate, with keywords and a default, whether a crop should be taken for each image, and if so, from what part of the image. You can set things to your taste, but as illustrated above, if a photo has the keyword “iPadNoCrop”, no crop is taken. If it has the keyword “iPadCropRight”, a device-best-fitting crop is taken from the right. And so on. If none of the keywords match, I've chosen to have it take a crop from the center.
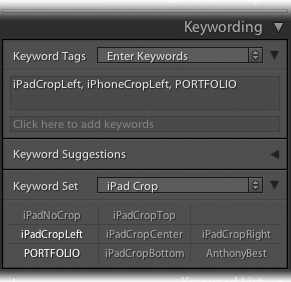
As illustrated at right, I've made a “Keyword Set” for use in the Library's “Keywording” panel that makes it easy for me to apply these. (The “PORTFOLIO” and “AnthonyBest” keywords are used in my workflow to indicate which photos to send to the iPad in the first place, as we'll see later in this post.)
You can guess from the “iPhoneCropLeft” keyword that I have a matching set of keywords for the copies I send to my phone, via another publish service set up almost identically to the one we're setting up now, but because the iPhone's screen had a different aspect ratio, it may need different crops, and so that publish service uses a different set of keywords, and, of course, a different target folder.
When using these kinds of keywords, it's cleaner to keep them internal to your Lightroom setup, so don't forget to edit each keyword (by selecting “Edit” from the keyword's context menu in the Keyword List panel) to deselect “Include on Export”.
A note about the crop: the crop done by the plugin is lossless (does not reduce the quality at all) because the plugin uses the Independent JPEG Group's most-excellent “jpegtran” program. The alternative is to convert the JPEG to pure image data, perform the crop, then reconvert back to a JPEG, all of which necessarily reduces the quality. So, it's gratifying that there's a lossless solution available, but one technical side effect of how bits are fiddled under the hood is that a “bottom” or “right” crop might actually be shifted as many as 15 pixels away from the bottom edge or the right edge.
Now we're back with additional sections from the overall Collection Publisher publish service. I want the images to be regenerated (republished) if I change certain things...
This next section on image renaming is the most complex of the entire setup:
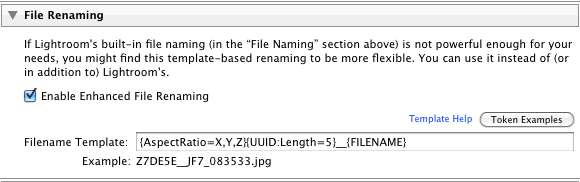
Lightroom's built-in file renaming seen earlier isn't powerful enough to do what I want, so I use this optional processing in the Collection Publisher to achieve my goals, which for my general portfolio images are:
An overall sort based on aspect ratio, such that all Landscape-oriented (wider than tall) photos are grouped together, and then all Portrait-oriented photos (taller than wide) are grouped. I want this so that someone flipping through my photos won't have to keep flopping the device around to adjust for each photo's orientation.... they'll merely have to rotate the device once when passing from one orientation to the other.
Within each group, I want images to be random. I don't want photos from one shoot or one season to get clumped: even spectacular photos can get monotonous if all of the same ilk.
The file-renaming rules in this section are the standard template tokens that my plugins use for all kinds of things, and in this case I use the sequence:
{AspectRatio=X,Y,Z}{UUID:Length=5}__{FILENAME}
The first token, {AspectRatio=X,Y,Z}, starts off the filename with an “X”, “Y”, or “Z” depending on whether the image is portrait, square, or landscape, respectively. Being at the start of the image filename, this groups files (when sorting by filename) by aspect ratio.
The next token, {UUID:Length=5}, essentially becomes five random characters. This causes a sort based on filename to be random within each group, yet maintains the overall grouping.
Then there are two underscores, and finally the filename computed by the Lightroom-standard file-naming section we saw earlier. I add this just so that I can maintain the ability to know which image it is just by looking at the filename.
The end result of this are filenames that don't look pretty,
XF4DC1__JF7_100620.jpg
XF889C__JF7_101972.jpg
XFB839__JF7_103866.jpg
XFFB90__JF7_080212.jpg
Y4E322__JF7_077785.jpg
Z00903__JF7_078691.jpg
Z016C6__JF7_099880.jpg
Z02EB6__JF7_083189.jpg
Z039A4__JF7_040249.jpg
but they sort as I like: images are grouped by aspect ratio, and random within each group. If the display app allows sorting by image date as well, I can toggle between a random and a chronological display.
So, that's it for the publish-service settings.
Album Setup
After saving the initial publish-service settings, I'm left with a publish service with one default collection named “at root”. I don't need it, so I delete it.
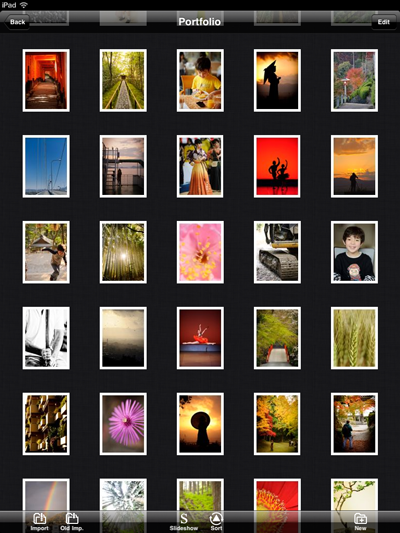
I then create a smart publish collection for each album I want on my iPad, which in my case at the moment is just one for general nice pics (“Portfolio”), one for pics of my kid (“Anthony”), and one filled with shots of the Japanese archery event I photographed last month (“通し矢”). The create dialog for each looks like:
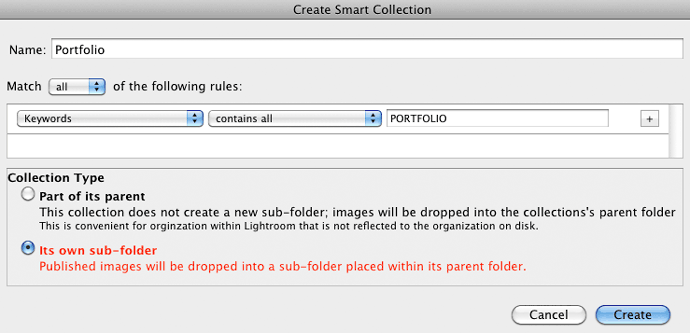
Each is set so that it's its own album in the export folder hierarchy, and each is populated via keyword matching. In the example, any image with “PORTFOLIO” as a keyword is included in the “Portfolio” collection, which becomes the “Portfolio” folder on local disk, and eventually on the target device.
And that's it for setup.
Image Selection and Preparation
The most difficult part of this entire process is selecting images to include in my portfolio, or, putting it more accurately, picking images not to include, since the gut instinct is to share everything. The few that make the cut are directed to each album by assigning the relevant keywords that I used in the various publish-service smart collections.

Crop Preview Tool
As I add each photo, I need to decide whether to have it appear on the target device with a full-screen crop, and if so, which crop. On a Mac, my crop-for-iPad plugin features a handy tool, shown at right, via the “File > Plugin Extras > Preview Crop” menu. It allows one to cycle through the possible crops for a given device, and optionally apply the keywords required to achieve the crop.
A few notes about the crop-preview tool:
It works on OSX only.
In order to build it, I take advantage of some undocumented side effects I discovered in Lightroom's plugin infrastructure, but they don't happen to work on Windows. It's neither something good about OSX nor bad about Windows, just the way the luck fell.
Clicking on the image cycles through the three crops (top/middle/bottom in the example).
I'd like to have made it so that you click where you want the image or the crop, but I couldn't figure out a way to make it work. Lightroom's plugin infrastructure is pretty limited in all areas, but particularly with UI-related things.
You can configure the color and opacity of the mask (shown blue in the example), as well as the color of the border (shown yellow). I normally use a black mask, to mimic the black surround of the iPad.
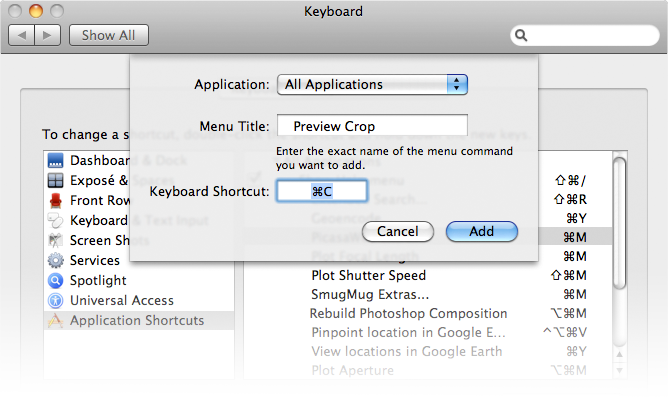
It's super convenient when the crop-preview command is mapped to a keyboard shortcut. Choose “Keyboard” in “System Preferences”, then add an Application Shortcut with a Menu Title of three spaces followed by “Preview Crop”. (The leading three spaces are required for it to work because Lightroom adds them to get an indented presentation in the Plugin-Extras menu.)
I leave “Application” set at “All Applications” because I swap often between Lr3 and Lr4 (and for some things I'm still testing even with Lr2).
Getting Images to the Device
Any time I make a change to the service (add or remove photos, or edit photos or their intended device-specific crops), I need to republish to local disk, then get the resulting images to the iPad.
The former is easy, and it the same for any publish service: select the collections and hit the “Publish” button.
Getting the images to the device is a separate step, and depends strongly on the device and the app used on the device. For Apple's “Photos” app that I gave up on, you'd just publish to the same folder that iTunes syncs photos from, and you're done. But for all the esoteric troubles mentioned in my earlier writeup, I don't use the “Photos” app any more.
If the app supports FTP, as Photo Manager Pro does, you can use the handy FTP client built into the Collection Publisher, near the bottom of the Publishing Manager:
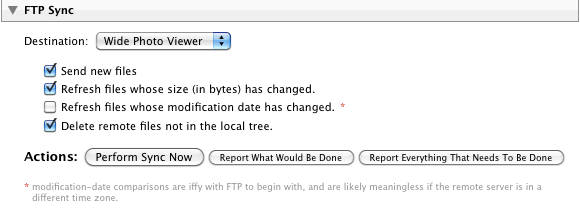
This allows a full sync... send new or changed photos, and delete ones that are on the device but no longer in the publish tree. Prior to building this, a full sync was a nightmare because I couldn't find anything to do it in one shot. Now it's a breeze.
Another photo-viewer app that supports FTP is WidePhotoViewer, but there's a bug in Lightroom that stops this plugin from syncing to it properly. The developer is looking into a workaround for me.
If you're an app developer and you add FTP sync to your photo-display app, drop me a note and I'll include a mention of it here.
Some apps allow Dropbox integration, and in that case you can just set your publish root to a Dropbox folder, then access it from the app.
My Tech-Related Photography Posts
- My Lightroom-to-iPad Workflow
- Lightroom Goodies (lots of plugins)
- Digital Image Color Spaces
- Online Exif (Image Data) Viewer
- Jeffrey's Autofocus Test Chart
- Photoshop Calendar-Template-Building Script
- How to Prepare Photos for an iPad
- A Qualitative Analysis of NEF Compression
- Tripod Stability Tests
more...
Publishing From Multiple Computers
At the moment, my photo archive is split among three different Lightroom catalogs (photos older than about a year in a Lightroom catalog on my desktop, with recent images in a Lightroom 3 catalog on my laptop, and the most-recent images in a Lightroom 4 catalog on my laptop), and I'd like to be able to publish portfolio pictures from any of them to a common hierarchy.
Dropbox is perfect for this. It syncs a folder tree back and forth among multiple computers so changes in one are reflected in all the others. So I can add and remove photos on the desktop, publish them there, then do the same on my laptop and in the end I have all the photos for the iPad on both machines. Then from either I can do the FTP sync to the target app, and only the changes are sent over. It's a smooth workflow.
Sorted all my photos over 200 just the way I wanted them in photomanager pro last night. Took a look at them this morning and they have all been resorted. Is there a reason the program decided to resort my photos?
Please advise if you can.
There’s no direct way to communicate the order as seen in Lightroom to PhotoManager Pro… PMP simply gets the files, and must figure out its own ways to sort from there (by filename, or embedded data like capture time). I’ve just sent a note to the PMP developer asking whether we can find some way to coordinate the Lightroom custom order; we’ll see. —Jeffrey
Was checking meta data last night attached to each photo all seem to be fine. I did notice the meter data was included on some photos and not on others. Then this morning I checked and no meta date was available . Any idea why?
I’m not sure what you’re reporting, but if you’re saying that metadata in PMP seems to appear and disappear, it sounds like a bug you should report to PMP’s developer. —Jeffrey
How do you update meta data on images that were imported from my photo stream into photomanager pro ? Also, I did download those images from photomanger pro to the root of publish tree (photos for ipad) on my main computer. I am no longer using photo stream or iphoto.
Do I have to republish all the photos, over 300? And then re snyc to photomanager ?
Thank you.
I don’t quite understand what you’re asking, but it sounds like yes, if you’re switching the source of PMP images from the iOS photo stream to FTP via Lightroom, you’ll need to republish all the old images through the new method. —Jeffrey
The metadata for this photo has been changed by both Lightroom and another application. Should Lightroom import settings from disk or overwrite disk settings with those from the catalog? Any idea what I whatever choice I should pick.
Thanks.
It depends entirely on the situation, and it’s too complex to address here. Perhaps check out Victoria Bampton’s ebook, Lightroom’s help files, etc. —Jeffrey
Lens information not showing up in the meta data. Please advise.
Not enough information here (what metadata, viewed how?) to answer. —Jeffrey
Metadata Wrangler plugin lens info is preserved. But is not included PMP meta data after syncing with FTP via lightroom. The lens info is included in lightrooms meta data info.
You can inspect the files sent to Photo Manger Pro (e.g. with my online image metadata viewer) and if you see the lens info there, it’s just a matter of PMP not showing it to you. In my tests, they don’t show it, so you might ask them about it. —Jeffrey
I like to water mark my images with my copyright with the year the photo was taken. If I add images to PMP via YOUR plugin is there away to customize the water mark . IE I am importing images into PMP , which were made in different years and want to add the water mark based on year the image was made. Another words , I want to be able to water mark photos that were made in 2012 with a 2012 water mark and photos that were made in 2013 with 2013 water mark. Right now all the imported images into PMP are getting the same water mark.
I don’t know much about Lightroom watermarking (because I don’t use it), but the standard has long been the Lr/Mogrify plugin. It should allow you to create dynamic metadata-based watermarking. —Jeffrey
Hi Jeffrey,
For those of us who are new to these tools, would you please expand your explanation to include what we’d specifically do after we’ve created a publish collection assuming we’ve bought the Photo Manager Pro app? Maybe it should be obvious but we’re newbies.
a) Would the target (the root folder) of the publish service be a folder on the hard drive?
b) Do we install Cyberduck or other FTP client on our computer?
c) How do we fill out the FTP dialog box in the JF Collection Publisher?
We’re also wondering how we could do this using a USB cable rather than using FTP, and we’re wondering why you don’t choose to do it that way. It seems simpler; what are we missing?
Thank you so much from Gerry and Julie from Lowell, MA
I use FTP rather than USB because that’s what Photo Manager Pro (PMP) supports. I have no control over that iOS app, so have to work with what it supplies. To answer your a/b/c questions, the target of the publish service would be some local folder that accumulates a full copy of everything you want to send to PMP. When you do the FTP sync, it’s syncing from that folder to PMP… Lightroom is already out of the picture by that point. You need no other FTP client; it’s built into Lightroom and the plugin. The FTP dialog is Lightroom’s and I dislike it… you have to edit a new preset every time your iDevice happens to get a new IP. When you start the server in PMP, it’ll tell you its host (four numbers separated by dots). In the FTP dialog in Lightroom, put that host in the “Server” slot. Put the username and password as indicated in the PMP server-status page under “Host”. Leave “Server Path” blank, Protocol at “FTP”, and Port at “2121”. —Jeffrey
Why do keep deleting my comment, I spent a lot time trying to explain and providing the information and then you just delete. If you don’t have an answer at least acknowledge my comment, instead of just deleting it. This has happened twice now.
They weren’t deleted…. your IP address changed, so you could no longer see your own waiting-in-moderation comments. Sorry that it took a while to get to them. —Jeffrey
I made an edit on one of my published photos using your plugin. The edit was unchecking the watermark , but I wanted the watermark to remain on the rest of the published photoes, however, the watermark was removed from all the photos. Anyway to make the edit to a individual photo and not the hole batch?
Lightroom doesn’t allow for that… the export settings for the entire publish service. One (kludgy) way around it is to publish only the one image after making the change (by holding down the Option/Alt key to turn the [Publish] button into [Publish Selected]) and kicking others out of the “Republish” queue via the “Mark as Up To Date”). The longer-term solution is to build a second Publish Service with settings the same as the first, except for the watermark setting. —Jeffrey
Hi Jeffrey,
John from Ridgway, CO here. I’m wondering if you’ve looked to see if the Photos app in iOS 7 is any better (than previous versions) at handling photos exported out of Lightroom and through iTunes. I’m not happy with the way Apple seems to be ignoring bugs these days, but maybe something changed with iOS 7? I’m only asking because this method you’ve devised, while very impressive, is also way more complicated than most folks want to have to deal with.
Also, why do you not like/use Photosmith on your iPad? They claim to allow two way syncing with Lightroom… I’ve not tried it, but it seems popular, and would certainly simplify things if it worked okay.
Thanks for your time and effort on all of this!
Sincerely,
John
I’ve not moved to iOS 7 yet, and likely will resist as long as practical. The lack of organization-ability in the Photos app could be fixed by an iOS upgrade, but there’s also the dorking that iTunes does to the pixels before being shipped over there. All that being said, the Photos app is probably fine for most folks; my approach is for those who want something better. As for Photosmith, it looks dandy if you’re interested in what it offers (and many are), but personally, I don’t want to edit anything on a tablet. Just display for me, thank you. —Jeffrey
Thanks for the quick response Jeffrey! I can understand not wanting to edit on your iPad, but it doesn’t matter if it allows for syncing of catalogs, right? It’s not making you do edits is it? Is there something else about it that ‘dorks’ your photos? (Love that term…)
Thanks again,
JC
I want a portfolio-display app, not an editing app, and that’s what Photosmith is (or was when I looked at it). Seamless sync would be nice, though. —Jeffrey
Another constraint related to the builtin Photos app and iTunes is the need to perform a complete sync of your iDevice to download a single picture. With your tools, I can just add the one changed picture in next to no time.
A couple of minor annoyances process, however:
1. The need to manually set the target IP address for each FTP transfer. I wonder if there is anyway to be more clever about it so that it’s automated? At the very least, is it possible to “register” address reservations I make in my router and their logical name (“Scott’s iPad”) and pick from a list?
2. Have LR locked up while transfering a large batch is a bit annoying. Is there anyway to run the sync in background?
Thanks. I really appreciate your products.
Scott
#1 is indeed annoying, but I can’t do anything about it, unfortunately. As for #2, I can try to put the process in the background…. I’ll see what I can do. —Jeffrey
I downloaded and installed Collection Publisher and Metadata Wrangler, and followed your instructions to publish/sync to Dropbox. It works like a charm. Have you outlined a procedure to complete the trip to Photo manager Pro? I have the photos on my iPad via dropbox. How do I sync them with Photo Manager Pro app?
Thank you for all the work you have put in to share this information, and writing these plugins.
Robert Castaldo
Fort Worth, Texas, USA
Search for “FTP” on this page. —Jeffrey
I am using LR5. I have downloaded collection Publisher and installed it using a Dropbox file as the root. I then installed Photo Manager Pro on my ipad. I tried to do a FTP sync and have failed more times than I can count.I either get a cannot connect message or if I fill in a destination folder it tries for hours and doesn’t do anything. I then had the bright idea that it was because my Mac using OS10.8.5 doesn’t allow FTP anymore unless you use terminal commands to set it up. I found instructions to do that and it doesn’t seem to make any difference. Any other ideas? It says that Error from Lightroom’s FTP engine: Couldn’t resolve host name.
You don’t need to set your Mac to allow http://FTP... that’s for incomming FTP, but to send to the iPad you’re connecting to it from the Mac. So don’t worry about any FTP setting on your Mac except the one in the plugin, where you give the details of the destination (your iPad). Make sure the iPad is on the same local network… if not, there’s no way you can make things work. And make sure that network is not a “guest” type of network, because those specifically isolate each connection from each other. Both the Lightroom computer and the iPad must be on the same local non-guest network. —Jeffrey
Error from Lightroom’s FTP engine: Couldn’t resolve host name. same as others? using LR 5.3. It connects to the server but instantly gives the error?
any updates?
Dave
If it can’t resolve the host name, it’s not connecting to the server. You’d see that message, I think, only when you give a non-numeric IP (e.g. “yahoo.com” instead of something like “192.168.1.2”), but with something on your local network I’d exepct only the latter. Are you sure both the target and source are on the same non-public WiFi network? (A public WiFi network, like in a hotel lobby, often isolates every connection from every other, so even two devices on it can never talk to each other directly). If you can connect with a third-party FTP client, perhaps you have some kind of security setting blocking Lightroom from using FTP? —Jeffrey
Jeffrey, I’m starting with your plugins, to generate photo sets for iPad albums, and some family members’ electronic photo frames. I build my personal albums on my jalbum website & would like to generate sets of jpg’s for these additional destinations, but do most of the work once, not three times. Hence your Collection Publisher is appealing.
A few questions: I set up two publish services with jfCPublisher so far, and I’m struggling with image order. I understand why you want a random order, but I would like to set/preserve a particular order. I put a couple image sets into ordinary collections-each for a specific album. I sort & organize, arranging images to tell the story of that particular album.
Question-1: Apparently there is no way to copy a collection to the Publish Service?
Q-2: When copying these images into the corresponding iPad jfCP collections, my arranging is lost. Must I always rearrange manually?
Q-3: I have jfCP rename with a leading integer, so my desired order is now locked into the file names. If I now add a new image to the collection, there is one new item to publish. When I publish it, it restarts the image numbering sequence at the beginning. Must I then: delete all the published image files, mark all items for republish, then republish manually, every time I change/add to the collection set?
Q-4: Is there any way to use my carefully organized collection from this iPad jfCP service….in another jfCP service where I want the same image sets output with different sizing and perhaps metadata setups? Or must I recreate the collection from scratch.
Q-5: I found the Collection Agent plugin online which syncs collections–and thus might allow me to create a collection and then reuse it in a couple of jfCP services. But haven’t tried it as the author warned it will NOT work correctly, “if publish service demands publish collections be created manually, e.g. some of Jeffrey Friedl’s.” I’m out of my depth here, do you think this might work in this case?
Thanks much for the help. Bob from Virginia
What you’re trying to do (preserve image order in exported filenames) is (almost?) impossible with a publish service. How can it write filenames now that will retain the ordering you want with whatever unknown future additions you make? As for multiple collections, Lightroom makes no provision for copying them, and doesn’t give a plugin any way to affect the order (except when created perhaps?), so you’re very much trying to fit a common-sense round peg into the highly-limited square hole that is Lightroom’s publish service. It’s great when you have a square peg, though. You might try the Collection Agent plugin (after making a backup of your catalog). It might work. It won’t work for my Flickr plugin because of the extra data I need to keep in the background there, but it may well work for the Collection Publisher. —Jeffrey
Thanks for the answers. Progress so far:
If I create a collection in jfCPublisher, and manually ‘user order’ images how I wish; and specify an initial index in created filenames, then when I publish, I believe I keep my desired image order okay. If I revise the images in the collection, then I delete the previous published image set and re publish then I believe I’ve got desired order in the new files. I’m inexperienced enough at this that I don’t understand your comment “What you’re trying to do (preserve image order in exported filenames) is (almost?) impossible with a publish service”
The bigger nuisance as you suggest is duplicating collections for use in several publish services–without having to manually set user order in each collection. (This is maddening, painful!) However, if I create and reorder images in a collection in the Collection Panel, I find I CAN duplicate it by Option+dragging the collection within the Collection Panel. The duplicated collection DOES retain the user order I specified. However, sadly I don’t seem to be able to copy or duplicate those collections down to a Publish Service collection. (Why aren’t LR users howling about this? I must really not understand the publish services, cause this seems like one of the most obvious features one would want.)
I did install Rob Cole’s Collection Agent plugin & tried copy & sync operations. I was able to copy a standard collection definition to a jfCollectionPublisher collection. However, the photos in the copied collection lost my desired user ordering which I had done in the source collection. This is the same result as if I manually copied all photos in a source collection and then paste them to a destination collection: The sync operation likewise lost the user order. So that unfortunately gains us nothing. Cole does have an “Exporder” plugin which might do the job, but it is still in beta and I’m not sure it actually does what I want.
I’ve donated/registered several of your nice plugins and will continue the process and learning. I hope some workaround develops to avoid having to precisely repeat my efforts to re-order identical collections of hundreds of images….3 times.
Well, if you delete everything and republish everything every time you make a change, I guess that’ll work, but you’ve just defeated the whole point of Publish, which is to create an ongoing relationship. If you’re going to re-export everything every time, skip Publish and just use an Export Preset. About the inconveniences of copying collections, or referencing other collections, you’re preaching to the choir. I think Adobe is juggling a lot of priorities in such an ambitious project as Lightroom, but Publish doesn’t seem to be one. —Jeffrey
Should read
Jeffrey,
I have had TOTAL success with the above instructions resulting in the folder structure and photos appearing in Photo Manager Pro on my iPad 4, many thanks.
But how do I also sync the same photo folders to my Wife’s iPad which is on the same network?
Martin (Leeds, England)
Just fire up the FTP server on her iPad’s Photo Manager Pro instead of yours, and FTP-sync to it. —Jeffrey
Really enjoy your article, thanks a lot for sharing it. Just one quick question for you: What’s your thought toward Lightroom mobile?
Not my cup of tea… I don’t want to edit in a tablet. —Jeffrey
Hi ,
Enjoy reading your articles.
One question for you. Is there any way to review RAW files on an iPad without importing the files.
My current setup includes Sony DSLT’s and I generally go on long photo tours (7 days and more) and hence generate of loads of images. Am using a Colorspace UDMA 300 GB to dump all my photographs, this is a great backup device and has the ability of viewing the RAW files. The read speed though for each file is a few seconds and operation with its buttons clunky. So its not a great review tool.
I do not carry a laptop for weight issues but carry an iPad for browsing, reading and writing. Was wondering if I could use the large screen to review the RAW files and if possible delete rejects directly from the CF/SD card or the above mentioned device. I do NOT want to import or convert or process the files, just plain review and reject. I have searched the net but the only option seems jailbreaking the iPad which I am reluctant to do.
Any suggestions will be highly appreciated.
Cheers,
Rajneesh
I don’t have any suggestions, sorry, but I think due to the size of raw files, most anything working directly with the memory card will be clunky (though something that works only with the embedded JPEG preview, as opposed to the raw data, may be fast). I heard that there are camera-connection kits for iPads, but I have no experience with them. —Jeffrey
I recently upgraded my iPad to IOS 8. After that I noticed that all my custom-named Photo albums were gone. Turns out, they have gone up to the iCloud. I cannot re-sync from iPhoto on my Macbook without upgrading from Mavericks to Yosemite. I am loathe to upgrade until I hear that all my apps will work with the new operating system.
So now I have an even bigger incentive to adopt a workflow as you have outlined. My photos are all stored in Lightroom 5. Do you know if the Lightroom plug-ins are compatible with Yosemite, or should I stick with Mavericks.
I don’t think there are any dependencies on that level, so Lightroom and the plugins should be fine either way. —Jeffrey
Hi Jeffrey. I was having the same problem that Alistair was having: the Crop for iPad extension was just not showing up in the export dialog. I finally disabled all the extensions, then enabled Crop for iPad first, and it showed up. I am using Lightroom 5.7 + Yosemite + lots of Plug-in extensions.
Have you looked at the Cloud options with CC. Surely this workflow is a bit redundant now…..
My intent is explicitly not a cloud/web-based solution (I want access to the photos even in absence of internet connectivity). —Jeffrey
Enabled Enhanced File Renaming, with sort by Aspect Ration. Lightroom renames and exports the files as expected. Viewing the exported images in Windows Explorer, the tall images are first, followed by the wide.
iTunes imports the images into an album in the iPhone 6 Plus. However, the images are not sorted by orientation. What am I doing wrong?
What you’re doing wrong is using iTunes and Apple’s Photos app, and expecting it to make sense. I haven’t used that avenue for years, but a cursory look at the interwebs tells me that Apple is still going with its tried and true “random” ordering. /-: That’s one reason I don’t use Apple’s Photos app. —Jeffrey
What’s up, Jeffrey, from Northern VA, USA?
I think the workflow you’ve outlined here is excellent and I’ve just implemented it. I have what may be a naive question about renaming; but I want to pose it before I do what seems to make sense to me (some experimentation) and jack something up.
I’ve created several folders, filled with photos. Each set of photos within a particular folder uses a different, descriptive, naming convention that I set up in the collection publisher prior to each export. Now, I find myself having to republish photos here and there. How can I maintain my naming convention in this case? Does the publisher track my naming preferences, as it does with other aspects that allow me to republish? Can I un-click “File Naming” and it maintains what happened historically? Or am I stuck with a more manual approach? Now that I think about it, it seems that I would have this issue even if I hadn’t been so “creative” with my naming, considering that, at the moment, I’m trying to republish a subset of my entire set of published photos.
Thanks!
I don’t quite understand what you’re asking, but perhaps this will answer it: when a photo is generated during a Publish, whatever rules are in place in the Publish Service for file naming are used to come up with a filename, and that’s what’s used. If it’s a republish, whatever the file had been before is renamed to whatever the new file is. If you change the file-naming rules in the Publish Service, it takes effect from that point on (for new and modified images). —Jeffrey
From Belgium – The latest versions of Photos on iOS9 support a folder hierarchy. Albums can be organized in folders and subfolders. This is perhaps a trigger to reconsider developing a publisher for Photos, based on the Folder publisher?
The “Folder Publisher” plugin preserves the folder structure of the originals, and if that’s what you want, by all means use it to export to the folder that iTunes reads. Or use “Collection Publisher” to create your own hierarchy. —Jeffrey
Just setup and tried Collection Publisher for FTP to Photo Manager Pro and I’m not getting the keywords. Is there something I’m doing wrong. I have installed the developer plugin http://ftp.upload. Connects and updates great but no keywords on the iPhone. Once working I will try the iPad.
I don’t know how (or even whether) Photo Manager Pro deals with keywords… I’ve never futzed with it. You might send them a note to ask. If they indeed read from the file, make sure you’re not stripping data during the publish. I’m sure it has nothing to do with keywords one way or the other, but no need to bother with a separate FTP plugin… I’ve built FTP into Collection Publisher. —Jeffrey
Photo Manager Pro does not handle Keywords. Is there another App that does?
Hi Jeffrey,
I’m trying to get your crop plugin to do what I want it to do – but with no luck so far. Maybe you could help or maybe it can’t be done…
What I’d like to get is a landscape crop out of a portrait oriented photo. The original has a resolution of around 3400 p wide by 4600 p high. I’d like the crop to be full width, so 3400, by appr. 1900 to make it 16:9 (my TV screen).
Whatever the setting I use, I ALWAYS end up with the same portrait oriented, non-cropped picture. There is never any crop.
I am not using key words, default is set to center crop. Could you help me with the correct settings to use?
Thanks,
Arne
Could restart Lightroom to clear the log, then give it a try and confirm failure, then send the log and I’ll take a look. Oh, and please make sure that you have the latest version of the plugin, and that you’ve marked in the plugin dialog that the target is a non-rotatable screen. —Jeffrey