
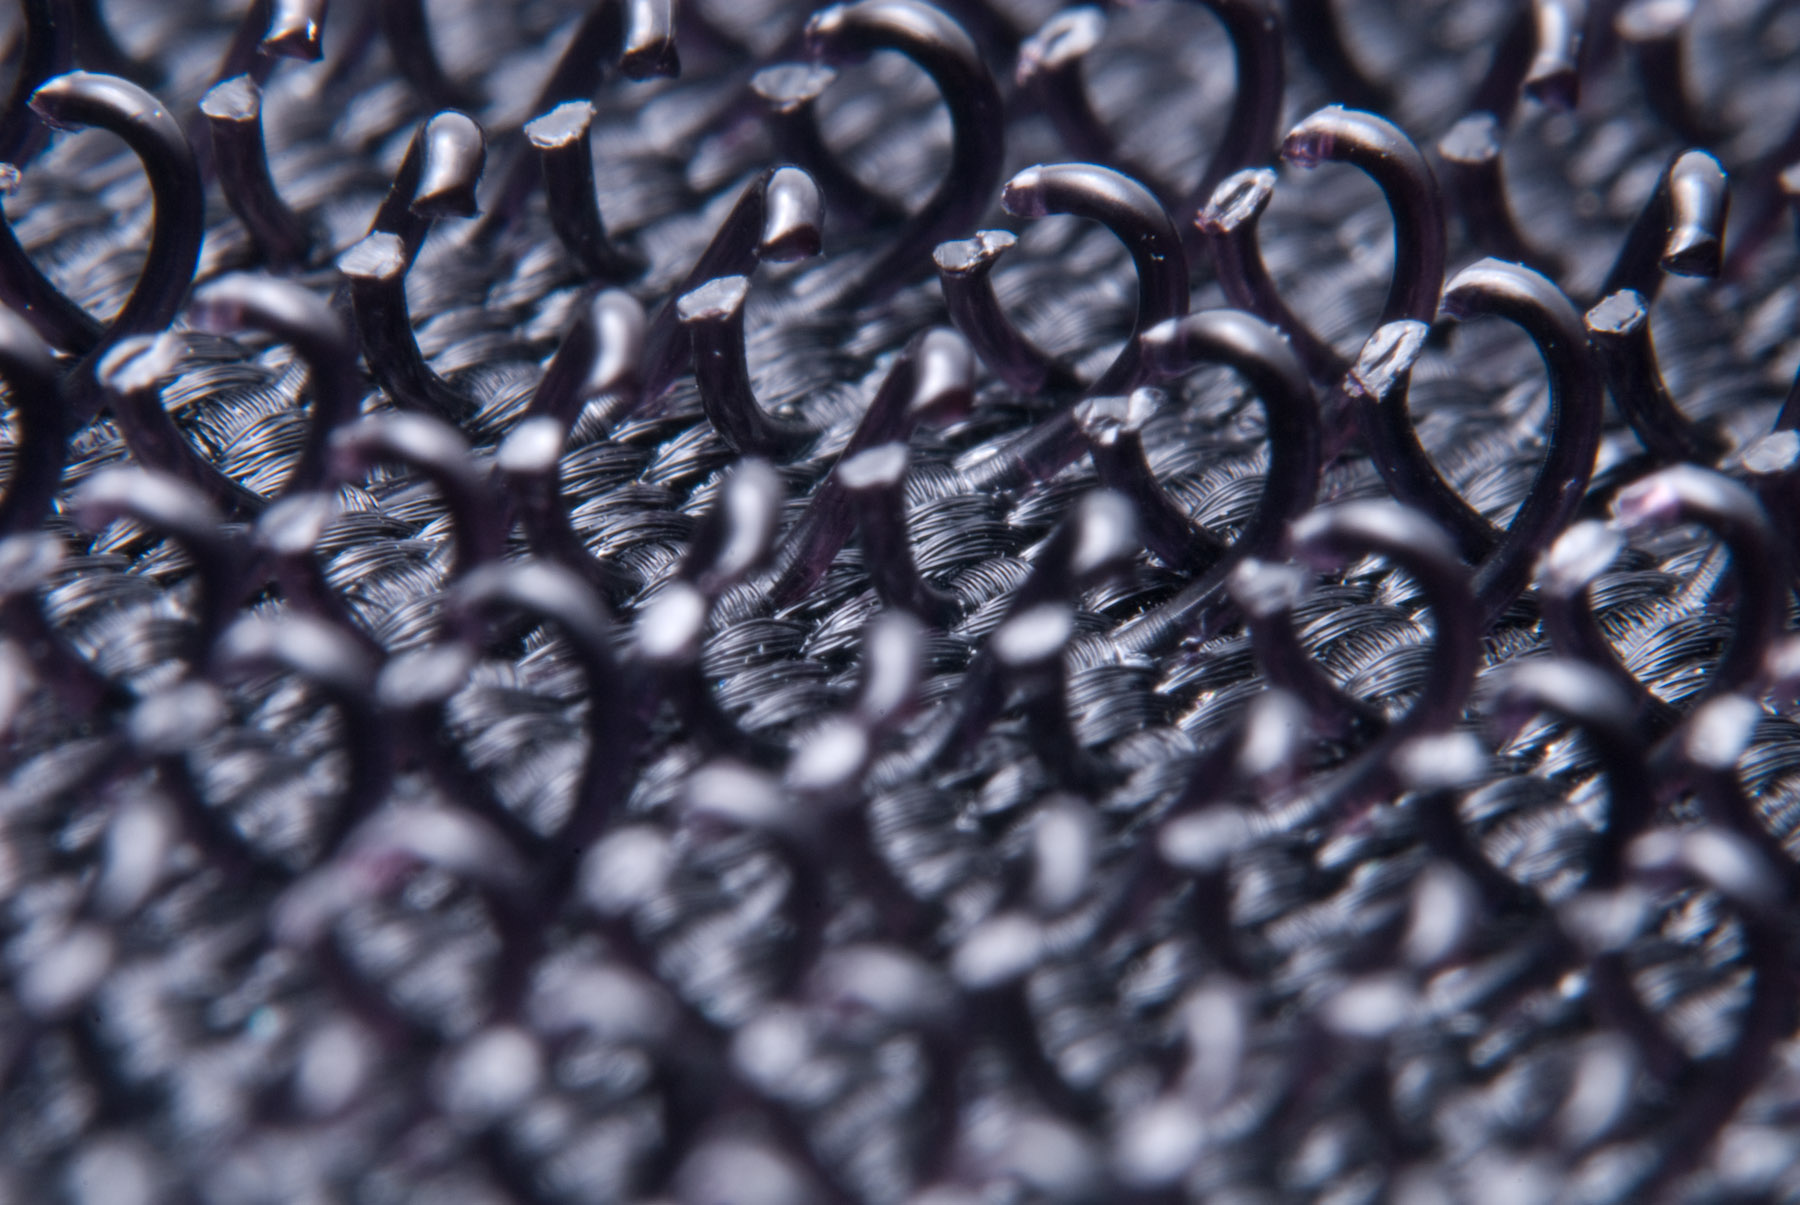
Nikon D200 + reversed Sigma 30mm f/1.4 — 1/250 sec, f/16, ISO 160 — full exif
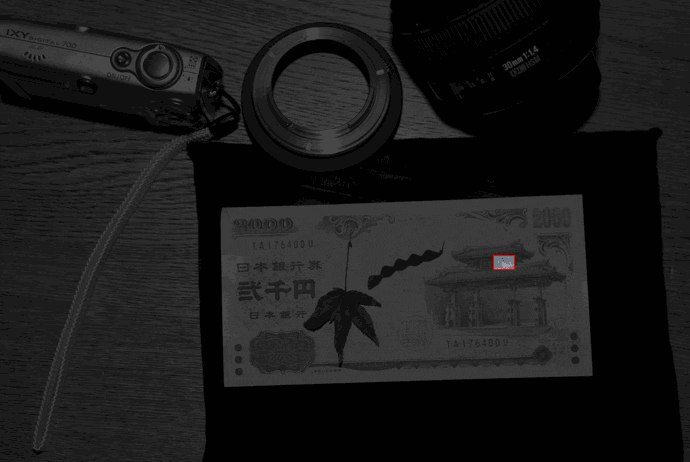
Part of a Japanese 2,000-yen Banknote
at 650× Magnification
Well, I'm not sure “650× magnification” is exactly the right way to say it because there are so many ways to lie with numbers. The area of the bill shown is about 8mm by 5.3mm, or about 0.066 square inches. With an average LCD display at 86 DPI, the image above appears at about 8 × 5.4 inches, or about 43 square inches (although how big it appears for you depends on the physical size of your monitor, your monitor's dot pitch, your desktop size, and perhaps some browser settings).
So, from the actual area of 0.066 square inches to a display area of 43 square inches, that's a jump of about 652 times.
Of course, the small image above is greatly reduced from the out-of-camera original. Clicking through to a somewhat larger version yields 4,435 times magnification, while the un-resized original yields over 20,500 times magnification....
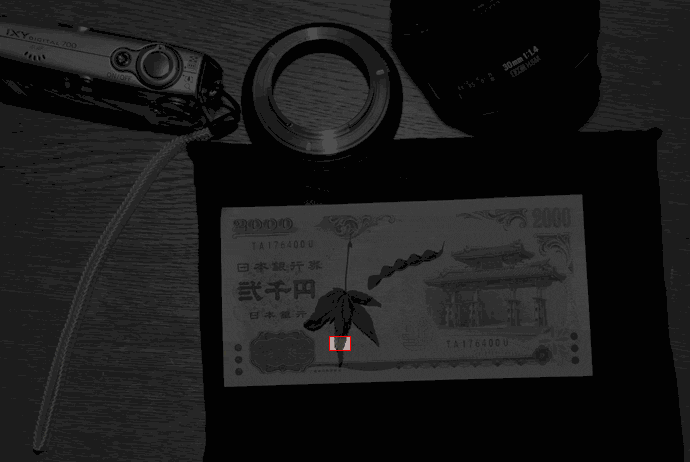
20,520× Magnification
Wow.
I'm impressed by these numbers perhaps only because I'm new at this, or perhaps I've made some basic error in math, but it seems pretty darn cool to me.
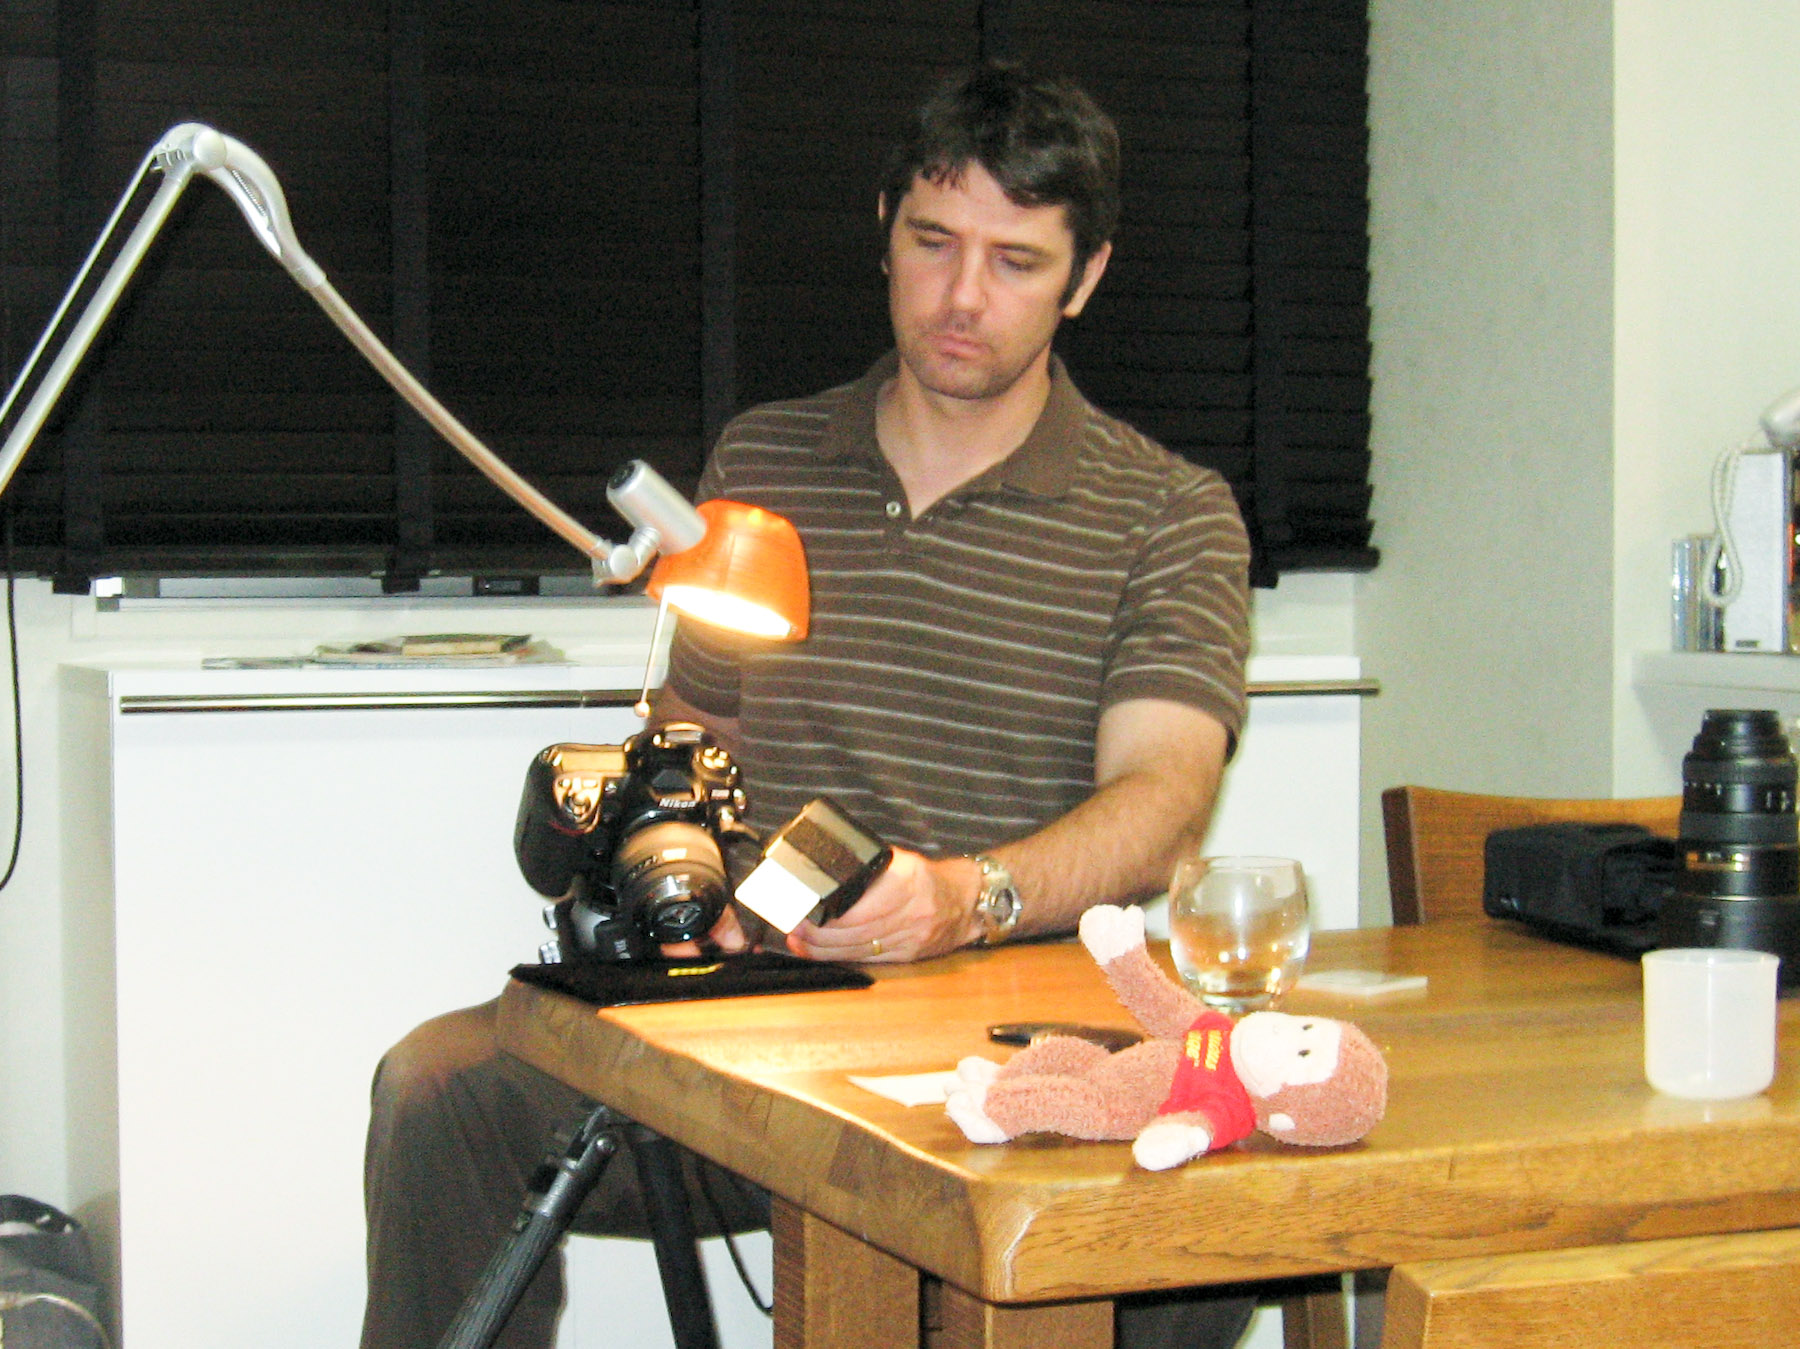
I'll talk a little in this post about this kind of macro photography, but first, to give a sense of the sizes, here's a picture I snapped showing the Japanese 2,000-yen bill, the seed pod from yesterday, and some other things I photographed and will talk about.

Nikon D200 + Nikkor 17-55 f/2.8 @ 55mm — 1/60 sec, f/8, ISO 160 — full exif

Mouseover the box to highlight the area photographed
Mouseover the boxes to highlight the approximate area of each item photographed (the seed pod, however, was at somewhat of an angle, so more of it showed up in the frame than is indicated here). The leaf and the other view of the bill are shown later in this post.
In the upper right is the Sigma 30mm f/1.4 that I used to take the macro shots. Between it and my point-n-shoot camera is the Nikon BR-2A lens reversing ring, attached to a Nikon BR-5 62mm adapter ring. Using this combination, I can mount the Sigma onto my D200 backwards, so that the part normally stuck to the camera body is sticking out, facing the subject.
Here's a picture of it that Anthony happened to take while I was working on this yesterday. At four years old, he has no understanding of “minimum focus distance” and only a little understanding of “being still,” so the result is blurry, but you can see the lens/body contact pins at the very bottom center. Normally, they're inside the camera body, but when the lens is reversed, they're on the far outside.
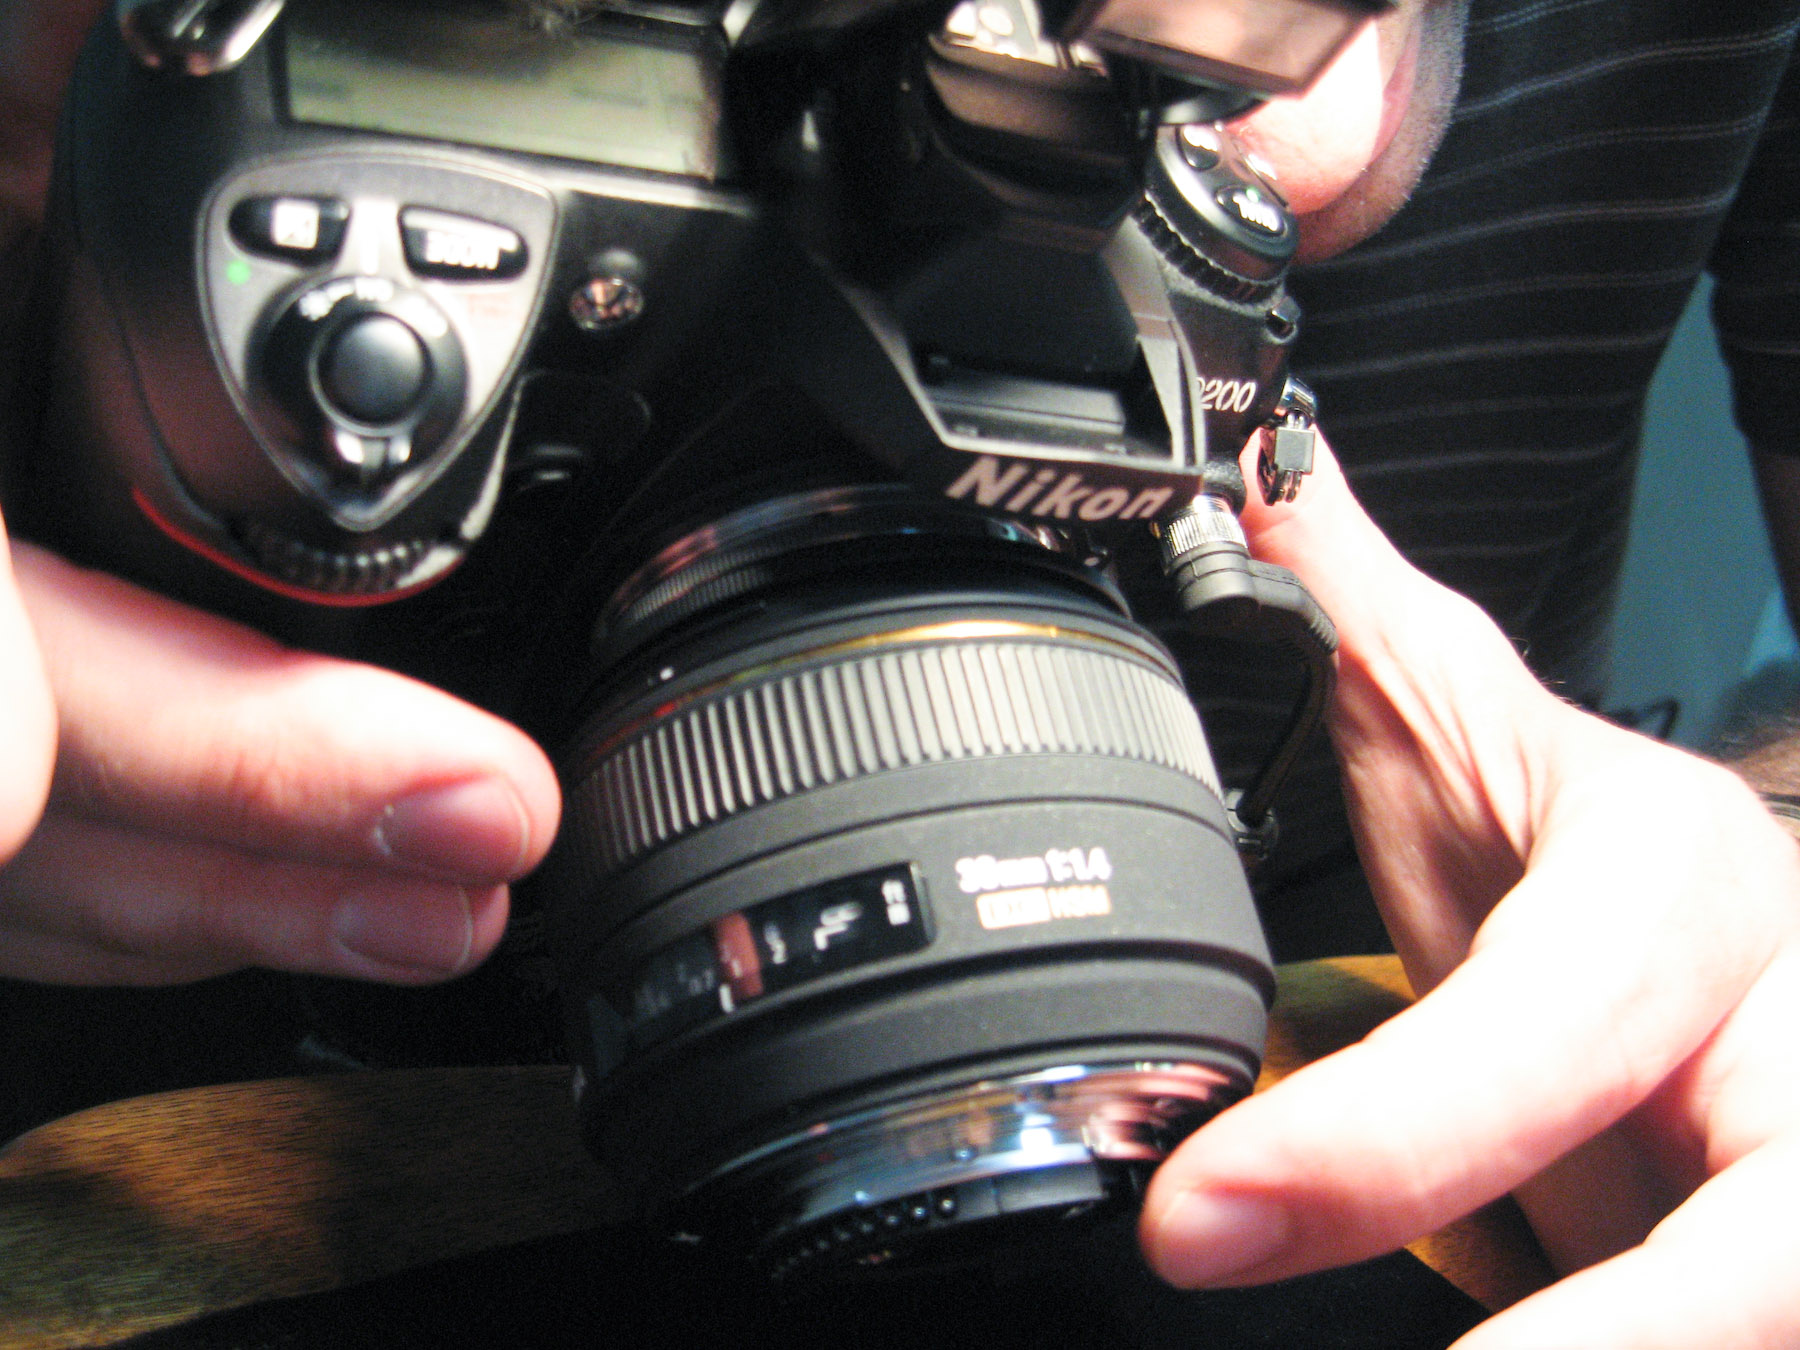
Working The Aperture on a Reversed Lens
photo by Anthony M. Friedl, age 4
It feels decidedly wrong to mount a lens on backward, but for whatever reason, it can create some great magnification. Generally, the wider the lens, the more magnification. (That is, a 30mm lens used this way creates more magnification than a 50mm lens used this way.)
Before going into details on this ungainly setup, I'll offer a few general comments about macro photography...
Macro Basics
Macro lens magnification is measured by how large an image it projects of something onto the film/sensor, relative to the thing's size in real life. “1:1” or “1×” means that an object appears on the sensor at its actual size. “2:1” or “2×” means that it appears at double actual size. The opposite, “1:2” or “0.5×,” means that it appears at half its actual size.
None of this, by the way, says anything about how large a print you can make from the result, which depends on a lot of other, unrelated things.
The generally-accepted definition of a “macro lens” is one that can project at least as large as 1:1. Most lenses don't even come close to this: the best my pro-level 70-200/2.8 can do is 0.16×, with my 17-55/2.8 doing only slightly better at 0.2×. For “normal” photography, one generally doesn't really care about any of this, so this lack of magnification is not a problem.
For those wishing to get very close up, most lens manufactures generally offer a few lenses with a macro mode that allows 1× magnification, but some manufactures get a bit generous with the “macro” label, so be careful when shopping. It's not uncommon to see 0.5× lenses marketed as macros, and I've even seen a 0.13× lens labeled “macro.”
Other Macro Solutions
A dedicated macro lens is by far the easiest to work with, but if you want more magnification and/or less cost, a number of other ways are available...
Reverse-mount a normal lens, as described earlier. By itself, the Sigma 30mm shown above can't even do 0.1× magnification, but when mounted backwards, it reaches almost 3× magnification.
The good point of doing it this way is that you can get some great magnification at fairly low cost. On the bad side, it's extremely awkward to work with, as I'll talk about later.
Use extension rings or bellows. Extension rings are basically spacers that fit between a normal lens and the camera body, and like holding a magnifying glass further and further from your eye, it allows greater magnification.
I used a set of Kenko extension tubes with various regular lenses for some of the images on my earlier posts: one on cherry blossoms, another about an assassin bug, and a third on big cherry blossoms.
Extension tubes don't generally offer as much magnification as reverse-mounting a lens. With my few lenses I've tried extension tubes with, the best I've gotten is only “almost 1× magnification.”
Crop. It's not at all macro photography and is totally cheating, but simply cropping a photo can make it seem as if it's a great close up. I once posted a picture of a syrphid fly that fills the frame, but it does so only because I cropped it from a much larger picture.
Had I taken a real macro photograph, I'd be able to zoom up to see much more intricate detail, but as it was, the crop left me presenting at its highest resolution, so there was no more detail to be had. (Considering my mild phobia of bugs, I guess this is a good thing.)
There are a few other ways as well, but those are the common ones. Here's an excellent page with many details on this stuff. The specifics are for Nikon equipment, but the generic lessons it teaches can be applied to other brands.

George
photo by Anthony, age 4
Challenges of Reverse-Mounting a Lens
As I mentioned earlier, I took my close-ups with a reverse-mounted lens. Working with a reverse-mounted lens is really really awkward, for several reasons:
You can't focus with the lens — to focus, you have to physically move the camera or the thing being photographed. The depth of field is extremely thin, so your accuracy in placing these things must be finer than the width of a strand of hair.
Actually, I was able to make very subtle focus changes with the lens's focus ring, but I'm not sure whether that didn't degrade the picture quality. I've heard that when you reverse-mount a lens that it should be set to infinity focus. I dunno.
When a modern no-aperture-ring lens is reverse mounted, the aperture is left closed at its smallest setting. This is generally good because that gives you the most depth of field, and if it had an aperture ring, you'd likely set it there anyway (or maybe toward the middle, for added sharpness). In either case, because of the small aperture, you generally can't see a thing through the viewfinder, because everything's to dark.
To see anything, you have to open the aperture by manually working the little tab at the back of the lens (which is now at the front of the lens, due to the reverse mounting).
That's what I'm doing with my index finger in the picture above titled “working the aperture on a reversed lens.” The little tab, which is normally controlled by the camera, is very near the lens glass, making it all to easy to accidentally leave a big finger print exactly where you don't want it. Been there. Done that.
Because none of the lens connections are actually connected to the body, none of the modern automatic conveniences work. This includes autofocus and light metering, and even recording basic info about the shot (what lens was used, at what settings) in the image exif data.
Of course, that's on top of not being able to set the lens aperture via the camera.
This all combines to make working with a reversed lens a royal pain.
It was bad enough with the static, unmoving objects I was photographing in the comfort of my own dining room, but it can get much worse.
With magnifications at these levels, the camera has very little light to work with, so you almost certainly need a flash or a good tripod... or both.
If you use a tripod, you can use longer shutter speeds to get the exposure needed, but that limits you to things that don't move (e.g. no bugs).
If you use a flash, you can photograph things that move, but the chances of the thing actually being in focus when the flash goes off is really small. It's only mildly troublesome that a bug might be crawling around; the real problem is your unintended movement between thinking you have focus and actually taking the shot. Remember, the depth-of-field is hair-thin, so seemingly imperceptible movement translates to a completely lost shot.
Even if you use a flash, you still need to be able to see through the viewfinder to frame and focus, which means that you have to do the awkward finger-wrap-around to delicately open the aperture yourself. Then, you frame and focus the image. Then, without moving at all (and hoping that the subject being photographed doesn't move) you let the aperture spring closed and release the shutter.
So, you need a flash, but I think I've not yet mentioned that an on-camera flash can't be used because the subject is too close to the lens, at least not without rigging some kind of bouncer/diffuser that can get a lot of light right in front of the lens.
The king of this kind of photography under adverse conditions is insect-photographer Mark Dijstelberge, whose images are amazing and far surpass anything I can do under the best conditions. The close-ups are so extreme and presentations so beautiful that his work can be enjoyed even by the bug-squeamish like me. He also has an informative page about how he takes his photos.
Yesterday's Macro Session
Like the Japanese bill, yesterday's extreme close-ups were done with a reverse-mounted lens under almost ideal conditions. I was in my dining room with the camera mounted on my nice tripod, with a powerful off-camera flash (Nikon SB-800) and subjects that weren't moving.
Anthony took a picture of me while I was working on the seed pod, after I'd framed and focused. I held the flash in one hand and the remote shutter-release in another. The seed pod is on a small bit of black felt.:
Taking the Shot
photo by Anthony M. Friedl, age 4
The situation wasn't perfectly ideal because I didn't have a way to make fine adjustments in subject placement. Focusing involved holding the aperture open with hone hand while trying to slightly move the felt with the other. And particularly with the banknote, I had difficulty getting the paper exactly perpendicular to the lens.
In the photo above, the incandescent light with the ugly orange shade is there only so that I can see to focus; it's not nearly strong enough to provide enough light for the actual shot unless I leave the shutter open for a while.
That's exactly what I did in the shot below, which is 1.6 seconds at ISO 320, with the bright halogen light just out of frame.

Nikon D200 + reversed Sigma 30mm f/1.4 — 1.6 sec, f/16, ISO 320 — full exif
Very Small Portion of a Fairly Small Leaf
(See the third image in this post to see just how small a section of how small a leaf.)
To see the depth of field with the lens wide open, I held the little aperture-control tab open while I took the next shot.

Nikon D200 + reversed Sigma 30mm f/1.4 — 1/10 sec, f/1.4, ISO 100 — full exif
Exceedingly-Thin Slice
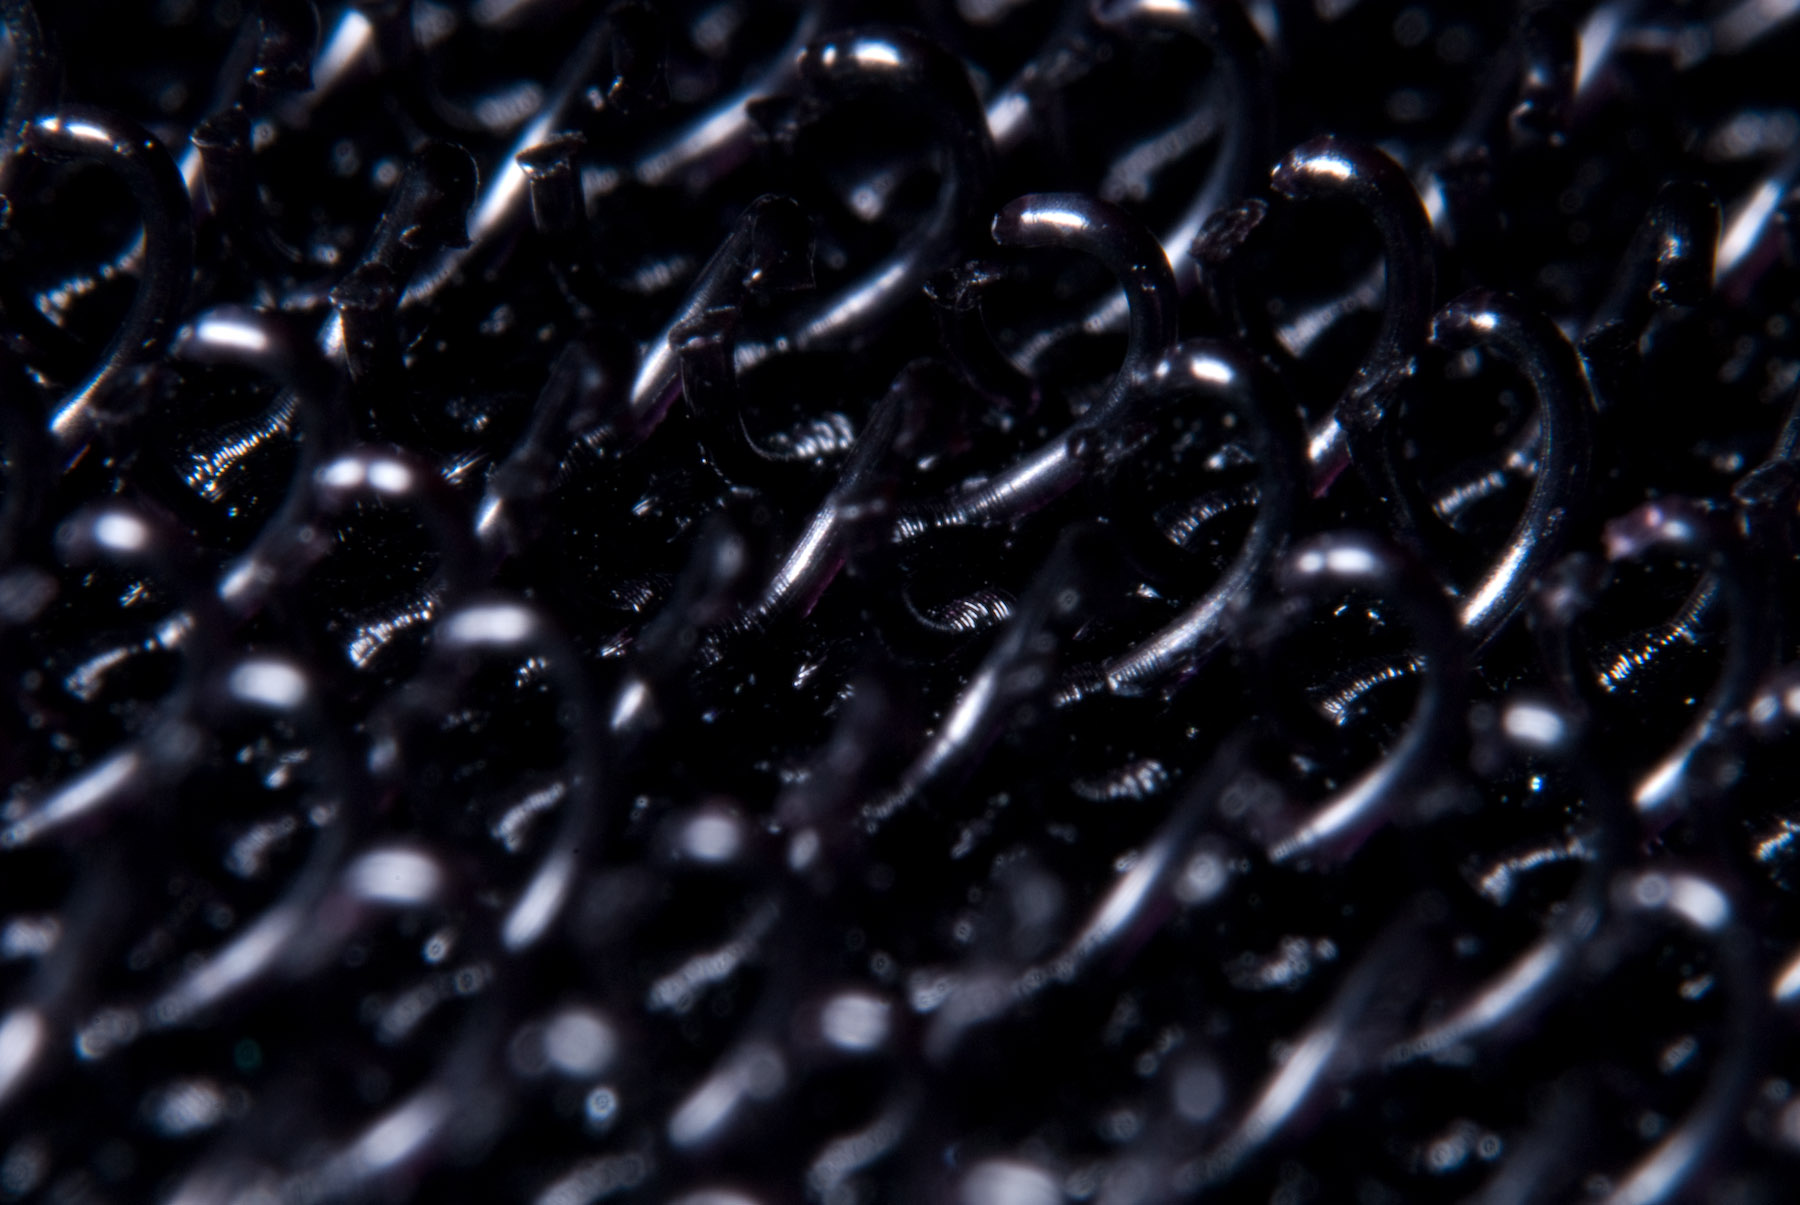
As with any photograph, the lighting can make a huge difference. Consider the Velcro™ shot from yesterday:
Nikon D200 + reversed Sigma 30mm f/1.4 — 1/250 sec, f/16, ISO 320 — full exif
Velcro Shot from Yesterday
To get that even lighting, I draped a tissue over the lens/Velcro, then fired the flash directly into the tissue from above:

Setup for Yesterday's Velcro Shot
Now, compare that with the following, which used no tissue, lighting the Velcro in the same way you see me lighting the seed pod above.
Nikon D200 + reversed Sigma 30mm f/1.4 — 1/250 sec, f/16, ISO 320 — full exif
Dark: Flash but no Diffuser
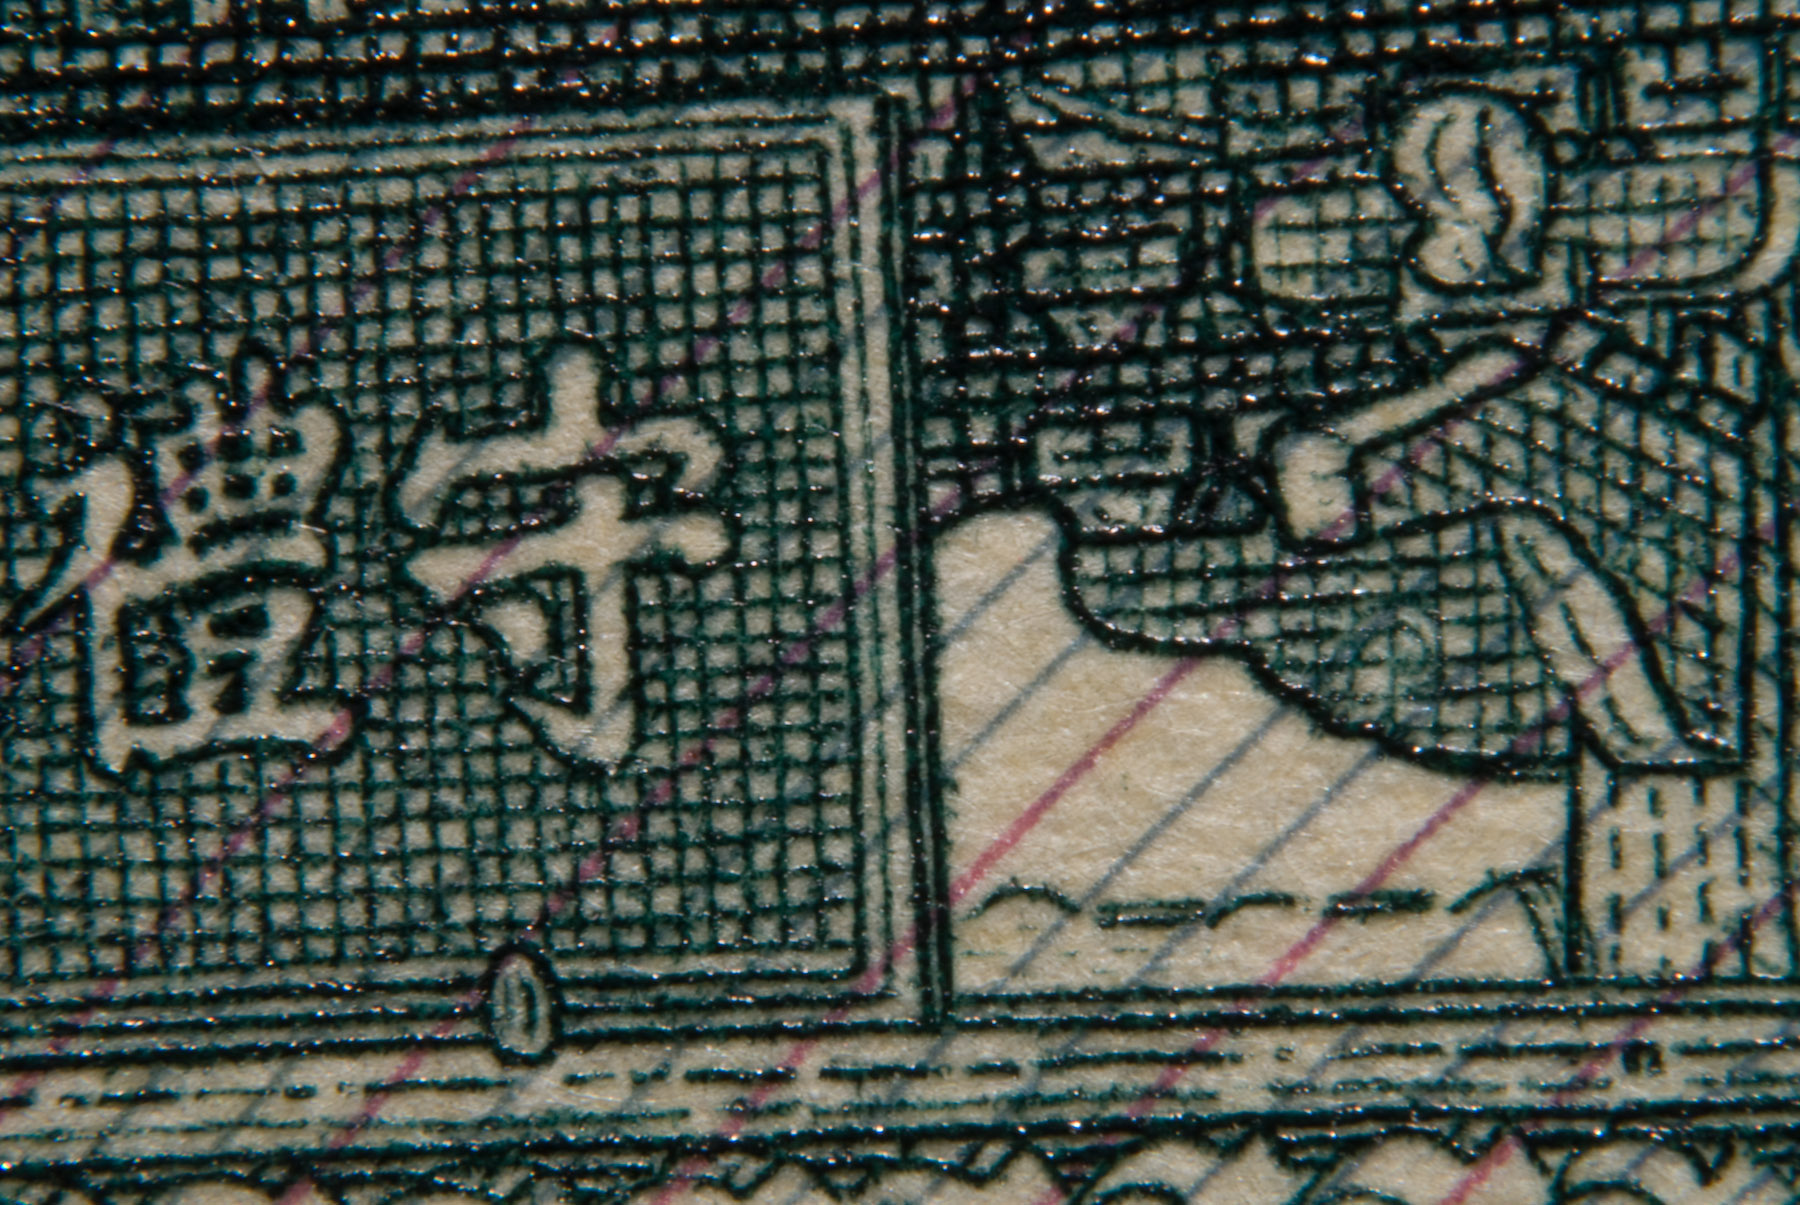
Finally, to end this long post, here's another section of the Japanese 2,000-yen banknote, without a flash, at five seconds.
I will have to try this with my Sigma 10-20!
“George” is great. What camera is Anthony using? Does he have his own?
He’s using our point-n-shoot (shown in the 3rd picture of the post), a Canon IXY Digital 700 (aka “Canon Powershot SD550” in the US, or “Digital Ixus 750” in Europe — I hate Canon camera naming schemes). I love the “George” picture too, and just stuck it in there for fun. —Jeffy
Check out this photo of a reversed 50 mm combined with a 180 macro!
http://tinylanscapes.wordpress.com/2007/08/07/micro-gerbera/
This guy has some incredible macros on his blog.
Love the blog. It’s exactly the info i’m looking for. I’m new to DSLR photography. In fact, so new, I don’t own a DSLR yet. I’m waiting until after Christmas, when I’ll probably pick up a D40x…or maybe a D80 (used) when the D300 is released.
I’m torn between getting the standard kit lens (18×55), the upgraded kit lens (18×135), or no lens, and just buying a VR lens separately. Any advice would be most appreciated. Particularly your thoughts on what lens to buy for macro photography, which I really love and would like to do myself.
I’m thinking I’ll need at least two lenses (the kit lens perhaps, and a dedicated macro lens). I have the Nikon light ring (SB-29), so I”m ready to rock and roll once I get the camera and a macro lens.
Last question: Should I skip the D40x and just go w/ a D40, and put the difference toward lenses?
Thanks.
I just got my 52mm-62mm reverse adaptor for my lenses, a bit different that yours but can get amazingly thin depth of fields.
Hey, I’ve been taking macro photography ever since I can remember but doing mostly repros and never thought of using lenses this way.
This is great and something new, Jeffrey.
Thanks, James