
Japanese Banknote at 35 × Magnification
A couple of months ago I posted about basics of reverse-lens Macro photography, where I showed some items photographed with some magnification that is considered fairly extreme by macro-photography standards. I threw around “true but misleading” big numbers like “45,000 ×” in jest, but in the normal nomenclature of macro photography where magnification is represented by the relative size of the object to its projection on the film or digital sensor, the photographs in that post were just a bit less than 3 × magnification. Pretty strong stuff.
I later posted an example at 5 × magnification, making the edge of a compact-flash memory card look like a cheese grater.
In today's post, macro images are at a ridiculous 34.7 × magnification.

The Setup
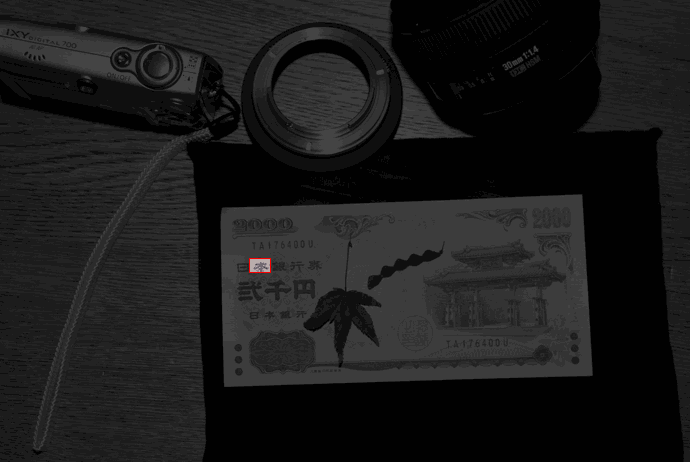
camera, lenses, and stuff · Flash and snoot · Reading lamp · Target Area (sort of)
(mouseover the above to highlight their location in the image)
The shot above, taken with my point-n-shoot, is not very clear, so I'll explain a bit. (Mouseover the descriptions below the caption to highlight their location in the image.)
The camera and a bunch of lenses and stuff (explained below) are attached to my tripod via a Really Right Stuff B150-B Macro Focusing Rail. The flash is mounted on a mini tabletop tripod, and because I couldn't really get it up close enough, I snooted it with some tinfoil to channel those photons – those not lost to heating the foil – right to the target area. The reading lamp was to provide light during focusing.
In the photo above, the target is a 5×7 WhiBal card, which has a little ruler sticker on it. The white part of the sticker – totally washed out in the crappy photo above – has a one-centimeter ruler on it with tiny little tickmarks demarcating each of the 10 millimeters. Here's one:

Ruler Tick
The black tickmark is 0.312mm wide, which is 0.0123 inches, or 1/81st of an inch. The full frame is 0.679mm wide. The actual sensor is 23.6mm wide, which places the magnification at 34.748 × in each dimension.

Put another way, it's equivelant to scanning at 144,805 dots per inch.
The picture above is not very clear, for a number of reasons that will become apparent as I explain the setup that went into the shot.
First let me list the equipment, from top to bottom as seen in the setup shot above and at right:
- Nikon D200 camera body
- Kenko 12mm extension tube (partially obscured by my shutter-release cable)
- Kenko 1.4 × teleconverter
- Kenko 20mm extension tube
- Kenko 2 × teleconverter
- Kenko 36mm extension tube
- Nikon BR-2A lens-reversing adapter
- Nikon BR-5 62mm adapter ring
- Adorama 77mm-62mm step-down ring
- Nikon 17-55 f/2.8 zoom lens, at 17mm, reversed
Let me say right away that I, too, recognize what I'm sure most of you instinctively know: this setup is really stupid. Fun, yes, but not at all practical. First of all, the connection on all those Kenko products are not very good, so there's a bit of play between each. Adding them all together as I did here left the lens dangling like the swinging weight of a grandfather clock. It could easily move side to size half an inch. That absurd amount of “play” is not at all conducive to image quality.
All that magnification means that you need more and more light right on target in order to be able to see anything, which meant that even when I put the bright halogen reading lamp as close to the target as possible, I still couldn't see anything through the viewfinder without opening up the lens' aperture. Even when opening it up all the way, what I could see was dim at best.
As I discussed on the reverse-lens-basics post, to open the aperture on one of these no-aperture-ring lenses, you need to gently move a small tab at the base end of the lens (which becomes the far, business end when the lens is reversed). I couldn't do this by hand because the lens was just dangling there, and the slightest touch moved the extremely small field of view (less than a millimeter!) completely off target. So, I wedged a toothpick to hold the tab open.
Even though I could now dimly see something through the viewfinder, focusing was still a challenge because of the extremely small depth of field. Really Right Stuff makes some excellent stuff (the ballhead of my tripod being simply amazing), but their B150-B focusing rack left much to be desired in this situation.
And let's face it: you can't expect much in the way of image quality when you slap together a bunch of different optical components, even if they were well and firmly connected.
So far, this is a “lose lose lose” situation, but it gets worse. Virtually nothing can be in focus when the lens is wide open, so one generally stops down all the way to increase the depth of field, but stopping down past a certain point tends to reduce sharpness due to diffraction. In this case, images at f/22 looked extremely muddy, as the tick-mark above shows. About the only thing clear in these shots is the indication that I need to clean the camera sensor.
So, to get something a bit more sharp, I need to set the aperture somewhere in the middle. It's all a rough guess based upon how I shove the toothpick between the tab and the lens mount, and anyway, once I do that I really can't see anything through the viewfinder, so it all became, in one sense of the phrase, a crapshoot. The first picture of this post is one of those that was taken with an in-the-middle-somewhere aperture, so it's much sharper than any of the others.
I really wish I had a nice picture to show here, but everything came out so muddy that it's not really worth it. I did try some pictures of a dead bug. They were gross.
In the reverse-lens-basics post I showed this picture that highlights a tiny section of a Japanese banknote:
Photographed at a bit less than 3 × magnification, that area looks like this:

Nikon D200 + reversed Sigma 30mm f/1.4 — 1/250 sec, f/16, ISO 160 — full exif
About 3× Magnification
Here's the top of that Chinese character from today's shoot:

Muddy 34.7 × Magnification
I could have probably worked harder to get a clean shot here, but with the frustrating macro rail, lack of light to focus, and a temperamental toothpick/aperture situation, I decided to call it quits for the evening.
Thanks to Zak Braverman for having loaned me the two teleconverters. I would have liked to add my own Nikon 1.7× teleconverter, but its mounting ring is designed to physically disallow connection to equipment not specifically intended to work with it. With it, I suppose I would have gotten magnification of about 60 ×, and even more muddiness.
If I ever try this again, I'll have to have a very bright light for
focusing, and, if possible, a wide-angle lens with an aperture ring that I
can use in place of the 17-55 zoom. Much more, and I'll be rivaling a
friend who runs an electron microscopy laboratory. ![]()
Never under estimate the power of simple fun! Great post. Inspiration, indeed.
Hi Jeffrey,
I found your blog through Matt’s Lightroom Killer Tips website and saw your macro/micro experience. Your comment about the focusing rail being more of a challenge brought to mind my previous work in macro photography. Instead of moving the camera, you move the subject. There are translation tables available that move quite precisely in very small increments that enable better focusing. The following is a link to a mfg/supplier of this type of equipment. I was lucky enough to find a vertical translation table for $5 at a camera store. They had no idea what it was worth ($450.00 new). You may want to consider this approach as a better method of focusing when shooting macro. Generally, your results are pretty good.
http://shop.mellesgriot.com/products/Hardware/hardware.asp?plga=073584&CatID=1332&mscssid=&Version=Inch&Page=1
I enjoy your blog/web pages. Thanks for letting everyone see your approach to life (having fun).
Best Regards,
Dave
I enjoy your blog so much I lived in Fukuoka and Okinawa in the early 1980’s and have never been back. I miss the people and culture. I want to especially thank you for the cherry blossom pictures. Nasukashii. Arigato goziamasu.
Cheers,
Bruce
OMG Jeffrey. You’ve revealed that Japanese banknote as a fake. Will all banks need to install a setup like yours to discover more?