(Note: this post will be of interest only to camera geeks)
Among the camera toys I picked up recently are the components needed to make a really great tripod. The components, from top to bottom, are:
- Clamp — Really Right Stuff PLC-1
- Head — Really Right Stuff BH-55
- Column — Gitzo GS3510S
- Legs — Gitzo 3540XLS
- Quick release plates — Really Right Stuff (not shown)
(mouseover the items above to highlight them in the image at right)
I'll talk about each of these below.
If you're new to serious photography, as I have been during the last few years, Thom Hogan's writeup on the psychology of tripod purchases is a must read. Some of his specific product recommendations are now a bit dated, but overall, it's a great writeup with advice that makes a lot of sense to me.
In short, Thom says that the common path for many photographers to a good tripod is through a number of ever-more-expensive intermediary tripods of increasing (but still lacking) quality, until they finally lay out the cash for a good tripod. So, why not avoid spending the money on the intermediary junk and get something good right off the bat?
My first tripod was an ultra-light Velbon ULTRA MAXi F (described here) that is better than nothing, but woefully flimsy/inappropriate for a big SLR with an even bigger lens like my Nikkor 70-200 f/2.8. Its small size and light weight keep it appropriate for some occasions, but for my first serious tripod, I thought I'd take Thom's advice and buy quality stuff the first time.
Before looking at the individual components, here's a shot of them with my Nikon D200 and Nikkor 17-55 f/2.8...
The Legs
The leg component is the Gitzo GT3540XLS Series 3 Systematic 6X Carbon Fiber 4 Section G-Lock Long Tripod, and at $750, is the most expensive part of the setup.
These legs are fairly tall (maximum height to the base is 6' 6” / 198cm), which suits my 6' 4” height. However, due to the “6X Carbon Fiber” they're still fairly light. The “G-Lock” leg locks (for lengthening and shortening the leg sections) are very cool and fast/easy to use.
I do have one caution about them: it's all too easy to pinch the heck out of your hand if you don't pay attention while handling them.
The picture below shows the joint where the leg joins the base, with the leg only partially deployed. As the legs are deployed apart, the gap between the leg and base closes until the adjustable stop meets the base. With legs more than six feet long, that's a lot of leverage conspiring to crush the fleshy parts of your hand.
Be careful.
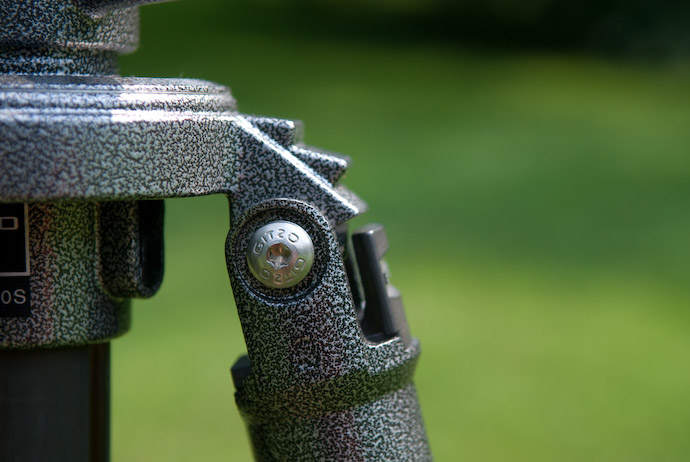
Nikon D200 + Nikkor 17-55 f/2.8 @ 55mm — 1/640 sec, f/4.5, ISO 250 — full exif
Partially Open Leg Joint (Gitzo 3540XLS)
The Column
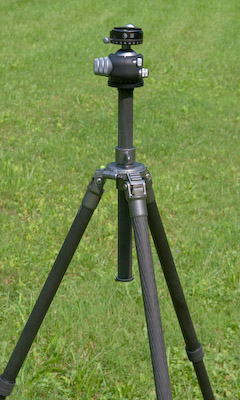
My set of Gitzo legs doesn't come with an adjustable center column, but I added one so that I'd be able to make slight height adjustments without having to futz with the legs. At $170, the Gitzo GS3510S Compact Rapid Carbon Fiber Column is not cheap, but the flexibility is worth it.
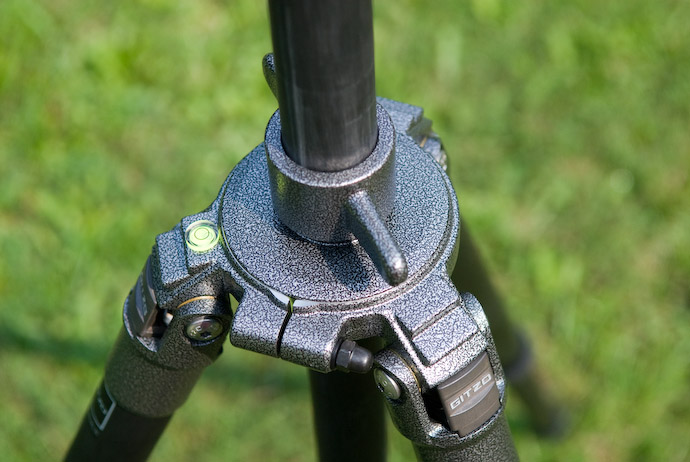
Nikon D200 + Nikkor 17-55 f/2.8 @ 55mm — 1/1600 sec, f/4.5, ISO 250 — full exif
Tripod Legs with Adjustable Center Column Installed
Some people eschew a center column altogether, to maintain maximum sturdiness. Whatever loss of sturdiness the column brings will be much too small for me to notice (update: or not!), I think, and anyway, should I want to, it takes only a minute to swap it back out.
Some use a center column to add reach to an otherwise short set of tripod legs. My particular center column increases the maximum height by a whopping 15 inches, although with the tallness of my legs, adding reach was not really an issue.
The column takes some space even when completely retracted, but it leaves over a foot of vertical-adjustment flexibility. I doubt I'll ever use it extended anywhere near its maximum, but it seems rock solid even when fully extended.
By the way, one negative aspect of a center column is that it increases the minimum height at which the tripod can be used. The Gitzo legs can spread out to be almost flat to the ground, but you can't bring the tripod down that far with the column sticking down. I don't think that this will be a concern for me, but I can always replace the column with the original flat base, should I need to.
The Head
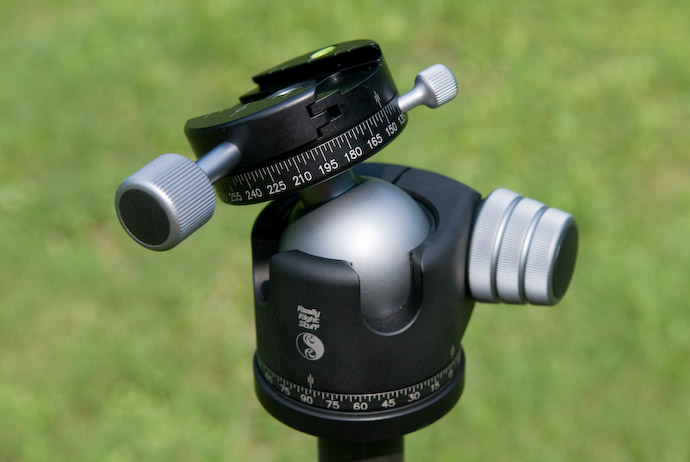
The pièce de résistance of my setup is the Really Right Stuff BH-55 ballhead:
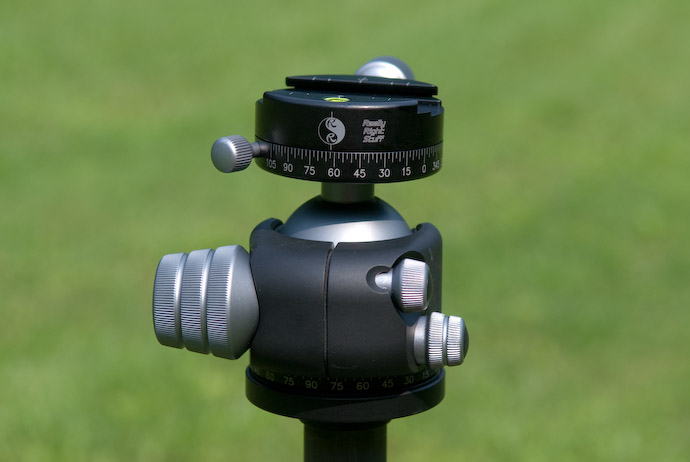
Nikon D200 + Nikkor 17-55 f/2.8 @ 55mm — 1/1250 sec, f/4.5, ISO 250 — full exif
Really Right Stuff BH-55 Ballhead
with PLC-1 Panning Clamp on top
The ballhead is a large, smoothly-finished ball inside a black casing, with three controls.
The large tapered-and-knurled knob is the ball lock. When loose, the ball can turn freely, allowing the camera to rotate about all three axes. Yet, just a quarter turn of the knob changes from a ball that flops around to an absolutely rock-solid unmovable grip that's advertised to support 50 pounds (10× more than my heaviest camera/lens combination).
The medium-sized knob (in the lower-right of the picture above) is the swivel lock. The whole ballhead rotates over the base, but can be locked with this knob.
The small somewhat-recessed knob just above the swivel lock is the ball drag adjustment. Basically, it allows you to set the minimum drag on the ball (that is, the “maximum floppiness” of the ball when the large knob is at its most loose). By setting this just strong enough that gravity won't allow the camera to flop down when you let go of it — but not so strong that you can't easily move it by hand — you get the effect of a platform with a perfectly-balanced counterweight. Cool.
One can not really overstate how beautiful this $355 piece of equipment is. It's very finely machined and polished. The movement is silky in every respect. Even when the ball is fully loose, there is not the slightest bit of play in its movement.
It's perfection incarnate. Basically, you almost want to lick it.
The Clamp
On top of the ballhead is a Really Right Stuff PCL-1 Panning Clamp, shown below.
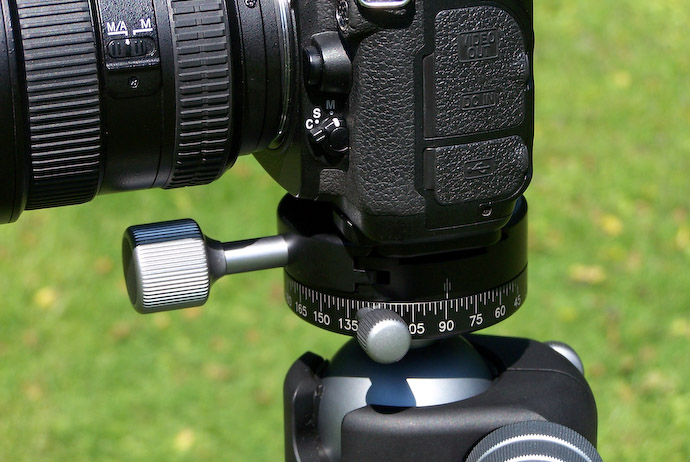
Kodak DX6490 — 1/500 sec, f/3.2, ISO 80 — full exif
Really Right Stuff PCL-1 Panning Clamp
between my Nikon D200 and a Really Right Stuff BH-55 Ballhead
The large knob opens and closes the clamp that grips a quick-release plate attached to the camera or lens (discussed in the next section), allowing the camera or lens to be slipped on and off quickly.
The smaller knob is the panning lock, comparable to the swivel lock of the ballhead.
The more common clamp to use in this situation is the Really Right Stuff B2 Pro, which has no panning/swivel feature, but at $72, it's much cheaper than this $235 panning clamp. The panning clamp is overkill for most situations, since you can already rotate the camera with the ballhead's swivel base, or by simply loosening the ballhead and rotating the ball.
However, to create panoramas, you need to be able to pan (rotate) the head on a perfectly level plane, and that's not easy with a ballhead alone because to do so with the swivel base of a ballhead, one must get the tripod base perfectly level by adjusting the lengths of the legs, which would be arduous, to say the least.
So, with this panning clamp, you set up the legs without worrying about levelness, then use the ballhead to level the clamp (which is easy), then use the clamp's swivel to pan.
By the way, an alternative method would be to use a leveling base on top of the tripod legs, instead of a center column, then mounting the ballhead on that. You'd need to level the base, then use the ballhead to level the clamp, but then you'd be able to pan with the ballhead's swivel. That seems to me to be more complex and bulky, and with it you lose the flexibility of an adjustable center column, so I went with the PCL-1 panning clamp.
(I don't do panoramas very often, so I really don't need this,
but satiating one's lust for new toys rarely has anything to do
with “need” ![]() )
)
Quick Release Plates
A quick release plate is a small plate that attaches to the bottom of the camera (or to the shoe of larger lenses) that can quickly be attached or detached from the tripod via the quick-release clamp discussed above.
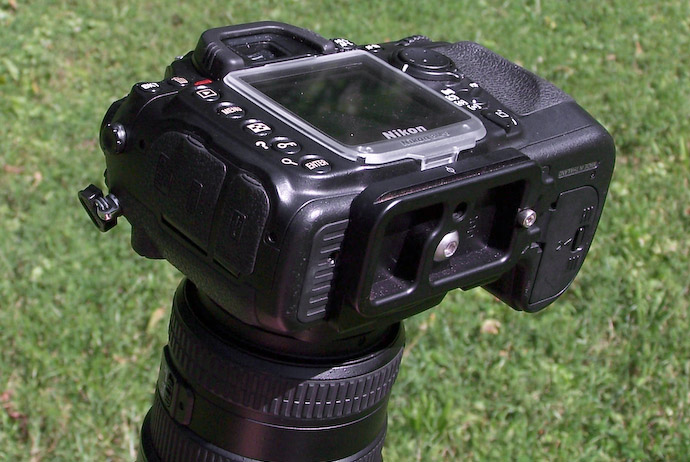
Generic plates are worthless because even when tightened, they can allow some movement of the camera on the plate. Good plates are designed to fit each specific camera, so for my D200, I have the Really Right Stuff BD200, shown here attached to the bottom of the camera:
Because the plate is designed exactly for the camera (and because it's made so well), there isn't even the slightest bit of play between the plate and the camera. I leave the plate on my D200 all the time. I don't really notice it when I don't need it, and it's right there when I do, so it makes using a tripod all the more inviting.
This plate is generally intended for use when the camera is in a “landscape” orientation (producing an image that's wider than it is tall, like most images on this post), and since the camera is attached to the clamp, and the clamp is attached to the ballhead, you can't just tilt the camera 90 degrees if you wish to change to a “portrait” orientation (more tall than wide). There are two ways to mount the camera in a portrait orientation...
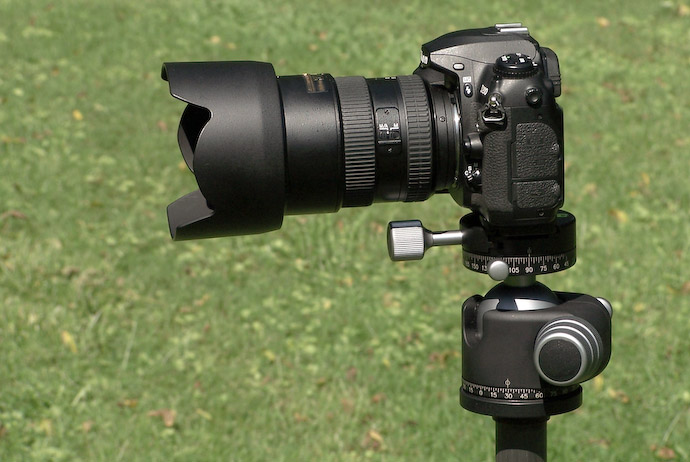
One solution is to rotate the ballhead into one of the two drop slots in the ball housing. In the picture below, you can see one of the slots clearly, and the other less so:
Nikon D200 + Nikkor 17-55 f/2.8 @ 40mm — 1/1500 sec, f/4.5, ISO 250 — full exif
Opposite View of the BH-55
Showing one of the drop slots
The problem with using the drop slot is that takes the weight of the camera from over the ballhead/tripod and moves it off to the side, so everything becomes less stable. It's fine for occasional use, but the better solution is to attach an L-plate onto the camera instead of the simple plate shown two pictures above.
So, I also picked up a Really Right Stuff BD200-L that can be used instead of the other plate, creating a connection point both on the bottom of the camera and on the left side. Using the left-side part then allows the camera to clamp into the tripod in a portrait orientation.
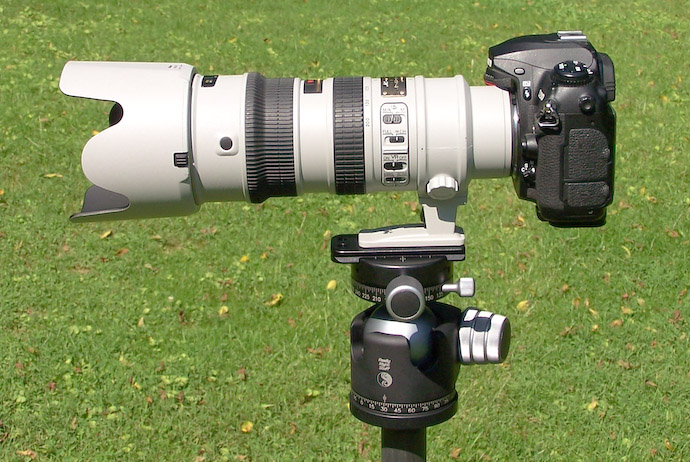
Finally, I got a Really Right Stuff L10 plate for my Nikkor 70-200 f/2.8 zoom, as shown here:
These plates are expensive ($55, $140, and $55, respectively), but they're well made and anyway, they're required (along with a quick-release clamp) unless you want to leave the camera bolted to the ballhead all the time.
Summary
Once I had it all together, I stopped by a local camera shop to pick up a carrying bag for it. I ended up getting a simple padded lightstand/tripod case for $35 (that I see now that Adorama sells for $20) and my tripod purchases were done.
Having acquired these components recently, I've not really gotten a chance to use them much yet, but other than the aforementioned finger-pinching that I've now learned to avoid, everything seems absolutely top notch. At $1,800 for a tripod, I'd hope so!
Thanks a lot for the write-up. I’ve been confused over the various tripod parts, and this clarifies everything perfectly.
The only thing NOT clear is to what extent tripods improve image quality and at what shutter speeds. Can we count on you to perform some rigorous tests in the future?
You know, all that equipment is much to bulky and annoying to transport all the way back to Japan. How bout I take it home when I’m up there next week? I’ll keep it safe for you until you come back again. I offer this convenience to you purely out of sisterly love.
I’m jealous. Especially over the RRS ballhead.
Hi Jeffrey, thanks for that great write-up. I still remember that sage advice of 10+ years ago you gave me. You learned the importance of getting a GOOD tripod while filming one of your brother’s wedding. Still good advice today.
I had great fun in reading this. Thanks alot. I read Thom’s tripod advice a half year in the past and I must say you get the message to a great extend 🙂
One mark: You know about the nodal point of a camera/lens combination? If you pan your D200 around the tripod mount, you get parallax errors. It is ok for far away subjects like in usual landscape (read: bad composing) panoramas but you get real problems if you have near and far subjects in the frame.
Really Right Stuff sells a nodal rail that solves that problem (they have different ones for different length ranges), but I figured that I should exercise some restraint, so opted against it (for the moment :D) —Jeffrey
Sorry, still can’t see past that HUGE 70-200! Wow! What a great lens. But what a huge lens. Seriously though, you’ve put together a serious tripod. Definitely pro caliber.
NB: the links to RRS aren’t specific, just lead to the site (Safari) i.e. still have to browse for the item
just thought I’d mention..
Nice write up BTW:D
If you want to get very serious about panoramas you might also look at the Nodal Ninja 5 or 5L, so you can pan about the enterance pupil in both directions.
What’s the make and model of the tripod case you got? The links above do not seem to show this and I’m looking for a case/bag for the same tripod.
One of the advantages of using a tripod leveling base is that you can compose your panoramas so the horizon is not dead center. With a hot-shoe dual-axis spirit level, you can level the camera in your ball head (after it has been leveled by the base leveler) on the left to right axis, then aim your camera up or down on the vertical axis to compose the horizon above or below center, as you wish.
Great writeup, by the way, as well as very fine photos. I love the bokeh on photos 1 and 3.
Just to add my 2p worth: the gitzo tripods are the best IMO, I had the old aluminium one until the CF versions came out and I had that Velbon too once!
I agree that it’s best to fork out ona proper tripod at the outset, it saves loads in the long run.
I love the Gitzo leg clamps, they’re fast and don’t pinch your fingers like other clamps and are easier to use in the cold.
I also have and endorse the RRS heads, although I have gone with the BH-40 with quick release lever as my biggest lens is the 70-200 2.8 mk2 and that is OK for that and the shorter lenses
All in all the best setup Ive ever had – great recommendation!
Hi Jeffrey, just curious as to why you needed both the standard plate and the L-plate. I’d assumed that with the L-plate you could either remove and remount, as intended, or use the drop-slot if you’re working quickly. Is there anything you can do with the standard plate that you can’t do with the L-plate?
Thanks,
JB
I didn’t recall ever having the non-L plate, but sure enough, there it is in the photo. Maybe I returned it. I have only the L-plate for my D700. —Jeffrey