This post is a continuation of my earlier tripod-test posts:
- Considerations for Building and Using a Tripod
- Tripod Stability Tests, Part I
- Tripod Stability Tests, Part II
- Tripod Stability Tests: on Shutter Speed
Part II compared different equipment setups; in this post, I'll look at the same results, but with an eye toward differing photo-taking techniques.
All images on this post were taken at f/8, ISO 100, with a 1-second shutter speed, with a pro-level 70-200 f/2.8 zoom at 200mm.
These are all from the same test session as those presented in earlier posts, so all the same caveats apply.
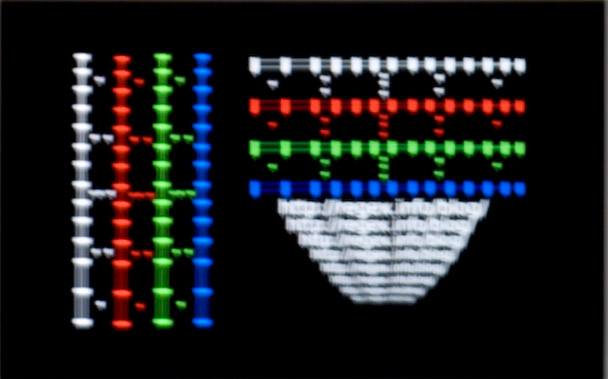
We'll start with my reference setup, which is a pro-calibar set of Gitzo legs without any of the leg sections extended, no ballhead, and no center column. (The specifics of all my components are detailed here.)
(no center column, no ballhead, no legs extended)


Here are the details on each button that can be mouseovered above:
- Ref — my standard reference image, taken with the most stable setup and technique.
- Mup (10 sec) — image taken with a remote shutter release, and mirror lock up left to settle for 10 seconds between the mirror being put up and the shutter being released. (Because the set of tests in this particular box are with my most stable tripod setup, and because “Mup (10 sec)” is my best technique, in this box only, “Mup (10 sec)” is the same image as “Ref”.)
- Mup (1 sec) — only one second pause between putting the mirror up and releasing the shutter, after at least a 10-second pause since last touching the camera.
- no Mup — simple remote shutter release without mirror lock-up, having waited at least 10 seconds since touching the camera before firing the shot.
- Bonk — simple remote shutter release, but I gave the lens a bonk with my hand on second before releasing the shutter. (I'm not really sure what this test is intended to show. Certainly, there is quite a bit of variance in how I bonked the lens each time.)
- Hand (Careful) — snapping the picture without a remote shutter release, being as careful and gentle as I could.
- Hand (Not careful) — snapping the picture without a remote shutter release, not paying too much attention to being soft and gentle.
With the reference (most stable) setup shown in the images above, it seems that you could use a hammer to release the shutter and the results are still excellent.
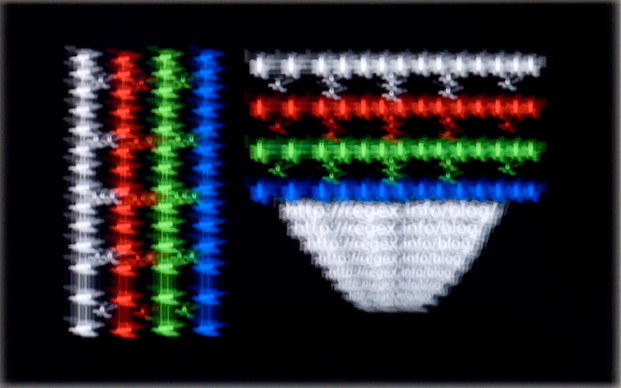
Let's move to a more realistic setup: 3 of the 4 leg sections extended (of the very tall Gitzo 3540XLS, described here), Really Right Stuff's best ballhead (BH-55), and no center column....


There doesn't seem to be much benefit to mirror lock up, but there is clearly benefit to not bonking the lens, and to being careful when shooting by hand.
Let's add a center column and raise it 10cm (about 4 inches)...


Again, not much benefit to using mirror lock-up, but the benefits of using remote-release are more clear (no Mup vs. Hand/Careful).
Let's now be crazy and raise the center column to its maximum height of 32cm (about a foot)...


The results seem comparable to the 10cm-height tests.
Let's get rid of the center column, and extend all the tripod's leg sections to put it at its maximum almost-eight-feet height...


These are more clear across the board, as we'd expect from the tests presented in Part II, which showed little degradation in adding a center column, but notable degradation when raising it 10cm. I'd still not recommend bonking the lens, though.
Perhaps the most real-world tests, here are the same set of techniques on the small, flimsy, cheap tripod described in Part I....


My Tech-Related Photography Posts
- My Lightroom-to-iPad Workflow
- Lightroom Goodies (lots of plugins)
- Digital Image Color Spaces
- Online Exif (Image Data) Viewer
- Jeffrey's Autofocus Test Chart
- Photoshop Calendar-Template-Building Script
- How to Prepare Photos for an iPad
- A Qualitative Analysis of NEF Compression
- Tripod Stability Tests
more...
This shows that the need for remote shutter release goes way up as the quality of the tripod goes down.
You can really read a lot into these results, but let me again stress the caveats (some listed here) of these tests. In some ways they're more brutal than real-world usage (that is, less forgiving of vibration) which may well use much faster shutter speeds, but in other ways they're isolated in the studio away from real-world problems like wind.
Great read…I’m a little late in finding this but then again I just started getting into this…
I couldn’t find anything in regards to the settings of your 70-200 VR lens during the tests. Your earlier outdoor picture of the setup clearly shows the VR set to “ON”. This is not correct for tripod use. It will “look” for vibration to correct that isn’t there and end up introducing the “anti-vibration” as vibration…did that make sense 🙂 What was it set to during all the stability tests?
Ah, good point. Yes, it was off during the tests. The outdoor setup shot was just that (a staged setup shot) and since I wasn’t actually using it, I didn’t think to turn the VR off. Some larger lenses have VR that is intended for use on a tripod, but as you point out, not the 70-200. —Jeffrey
A very interesting project, for which you deserve congratulations, not least for the time, patience and effort involved.
Bearing in mind that I am not an engineer, it occurs to me that some of the results might be affected under certain circumstances by some small residual resonance in your tripod/camera setup in spite of the tripod’s inherent stiffness. I wonder if using a simple beanbag might enhance your test results, especially when the column is extended but also with all sections of the tripod in use. It might alsohelp in windy conditions in the field. The problem is that under certain circumstances, even the best system can be subject to some degree of resonance.
I have found draping a homemade beanbag over the lens/camera above their centre of gravity can provide some valuable extra stability that is reflected a critical improvement in a photograph taken under extreme conditions.
My own bag consists of nothing more than an old sock filled with rice packed firmly but not tightly so that there is some flexibilty when draping it. Its construction was purely empirical, not scientific but I have just weighed it and it comes in at 415 gm. At any rate, it fits conveniently into even my smallest camera bag and does not add too much weight.
An advantage of always having a beanbag to hand is that it can in itself provide a stable, damped platform when no tripod is available. On more than one occasion I have even wedged the bag into the joint between a tree trunk and branch with the camera on top. Not exactly high-tech but effective neverthless!
Just for the record, my tripod is not as advanced as yours, though still a quite good general purpose unit: Manfrotto 190XDB with 804RC2 pan and tilt head.
BTW, my location is Hong Kong.
You have made an outstanding contribution by not only by doing the testing, but also taking the substantial additional effort to document and share your results. Thank you! It is one thing to draw your own conclusions from your own work, but the public scrutiny really adds a lot of pressure.
I have an interesting challenge… A 5 lbs pentax 67 6×7 camera. It has a large horizontal shutter. I don’t shoot long lenses with it. I do use the MLU. Some folks go as far as recommending that you never use 1/15 with this camera.
Some folks suggest they get the sharpest results by leaning on the body/prism while gently releasing the shutter with their hands (I squeeze the shutter when I do that). It’s been said that hanging a weight over the prism is much better at dampening shutter vibes than hanging a bag on the center column. I’d guess there are speeds where a remote release would be better than pressing down on the body.. Though some folks say remote releases just don’t work as well as pressing down with this camera.
It’s much harder to test that stuff on film, but I really should do some tests. I’ve wondered if I could attach a laser pointer to the camera and then video record that dot on the wall (with a reference scale) using another camera (close to the dot). A frame by frame analysis should allow some correlation of the timing. Of course just viewing the video in slow-mo could provide a quick impression with a lot less effort. It would also be interesting to compare the free-standing tripod on different surfaces, and with rubber vs. spikes…
I’m sure the optimal approach depends on the tripod. I’m about to upgrade to a gitzo systematic.
With the 67, there is some audible feedback. And it seems that audible system noise is dampened when you add your mass to the camera with downward pressure…. Of course dampened does not assure sharpness.
Right now, I’m trying to decide which systematic to get… Whether to go with the 3541XLS, as you did, or go with the 3530LS…
Hi Jeffrey,
I’m Vietnamese and living in US now. I’m member of Vietnam’s biggest photography forum http://www.vnphoto.net. I like your test a lot and want to share it with my Vietnamese fellows. Can I use your test chart and part of the test result to explain about tripod technic and tripod test method? Of acourse, I’ll link to your blog. Thanks
Sure, of course. —Jeffrey