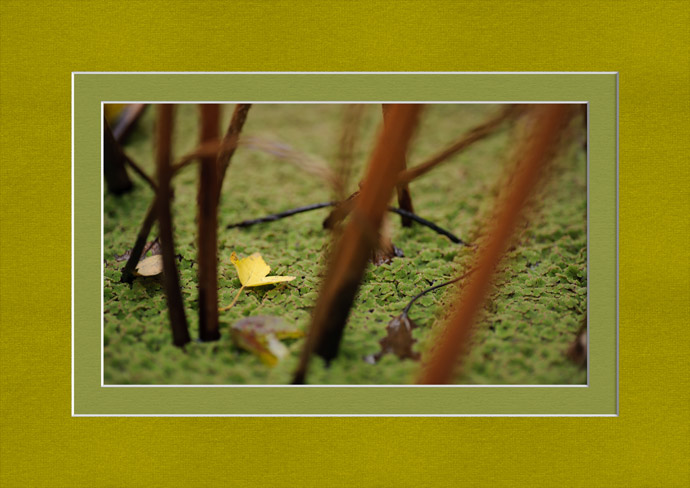
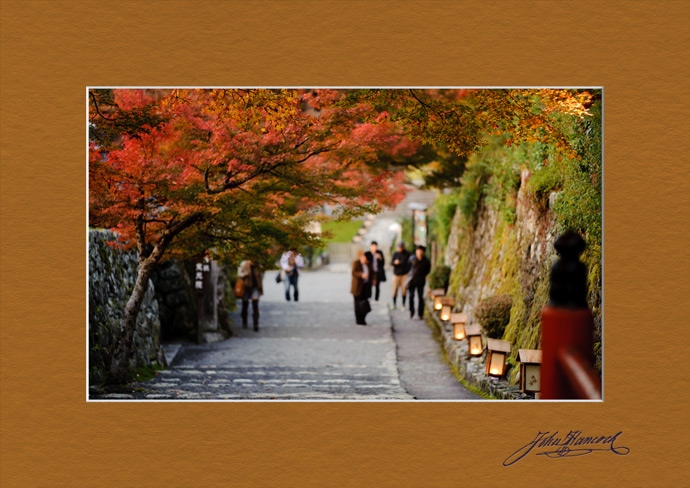
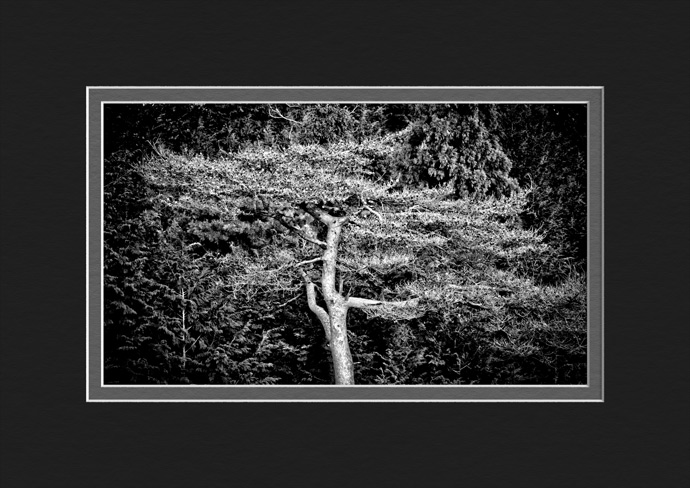
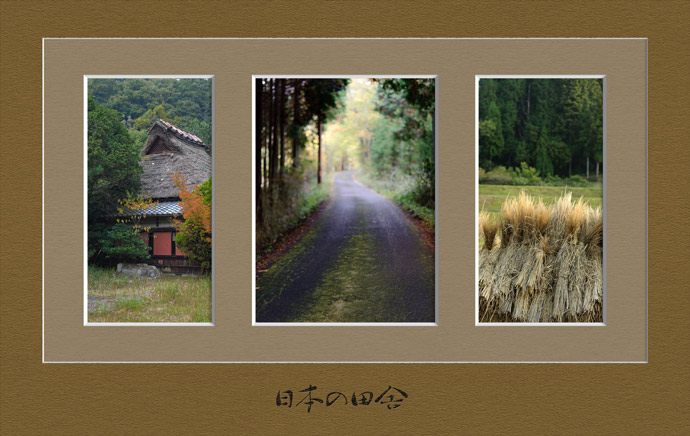
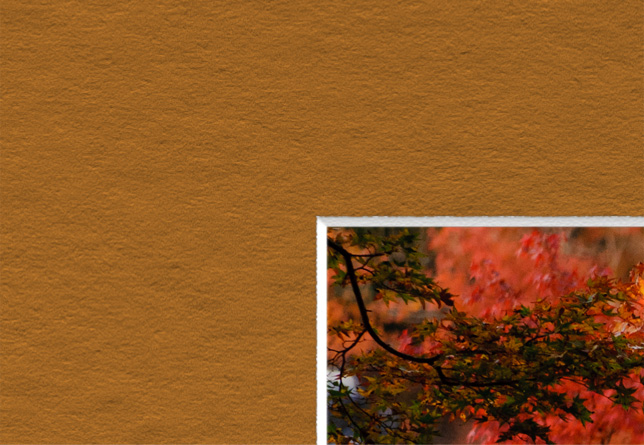
A few (low-resolution) examples...
So, I've been working on and off for a while on a Photoshop script that builds photo-realistic fake matting around images. The script is not done yet, but I'll present what I have in the hopes it's helpful to someone, and that perhaps I can get some good feedback for improvements.
Let me say up front that the process is a bit complex, somewhat out of necessity because I want very good results, but also because I haven't done the work to wrap the script up in a tidy hand-holding user interface.
If you're not comfortable editing a script file with a text editor, this post is not for you
If you'd like something more automated, consider a commercial product, such as John Hartman's pricy ($239) but automated Quick Mats. I've not tried it, but the samples seem promising.
Also up front: I've tested this on Photoshop CS5. I don't know whether it works on earlier versions.
If you just want to play with a sample PSD created by this script, you can download this 28-megabyte sample-mat.zip, which contains one PSD: A4 size @ 250DPI with one opening at a 1½-inch margin, and John Hancock's signature.
Post table of contents:
Features
Photo Realistic
Easy to Adjust Mat Colors For a Specific Photo
Customizable
Specific
Mat Overlays
Current Limitations
Mat's Photoshop Document
Installing The Script Files
Configuring The Script
Running The Script
Features
Let me start off outlining some of the features of the script....
Photo Realistic
That's the whole point... it's easy to make a fake-looking fake mat, but my script builds a result that incorporates many little visual cues to make a result that looks real when printed on a high-quality printer and displayed on the wall, even when inspected fairly closely.
Full-Resolution Crop
of an example to be printed at 250 DPI
Perhaps most importantly, the surface of the mat comes from an actual photograph of the surface of an actual mat, so when displayed at the proper resolution, it will be a true “actual size” representation of an actual physical mat.
Note: as discussed below, the photos on this post are necessarily displayed on your monitor at an incorrect resolution for accurate true-life sizing, so they'll all look less “natural” to an extent that depends on the specific monitor you're viewing this post on. I wish, of course, that I could show them properly on screen, but it's not technically feasible; however, in the end it doesn't really matter because these are intended to be printed, not viewed on screen.
Anyway, at the moment I have just four separate mat surfaces that have been prepared well enough to give a try at one resolution, but eventually I want to re-do them under higher-quality conditions. You can see the other surfaces in the next examples...
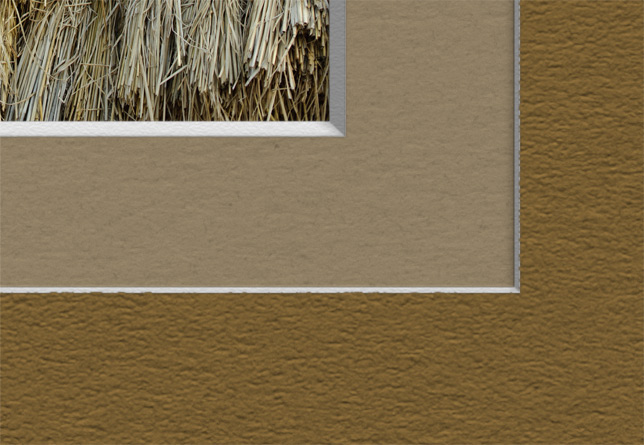
two mats of different thicknesses and material
my pattern #2 is on top of the photo, pattern #3 is on top of that
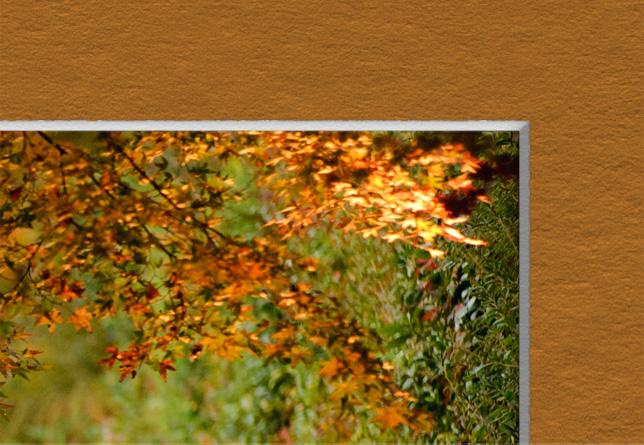
this is pattern #1 again
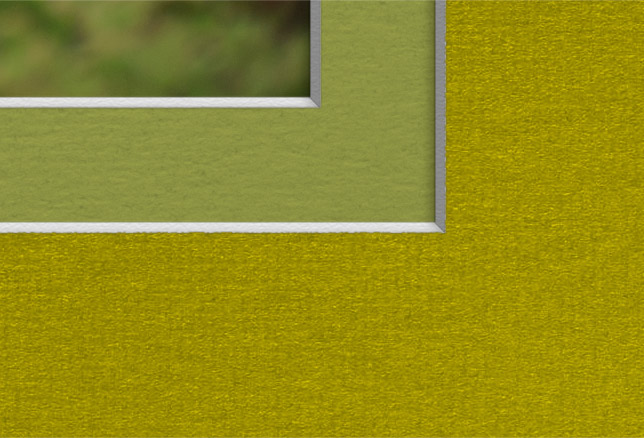
pattern #4 laid over pattern #2
A photo-realistic mat surface alone is a start, but it's not enough... other subtle visual cues the brain would expect in a physical mat are required. If done well, most people would hopefully not consciously notice these visual cues, but I'll mention them here...
For example, the edges where the mat is cut have a very slight raggedness that matches the surface of the mat. As for the cut surfaces themselves (that is, the thin inside portion of the mat exposed when the opening is cut), their size, shape, and shading are all dependent on an intended eye location and light location configured when you build the mat. The same intended light location also influences how a subtle shadow of the mat is cast onto the photo.
The inside of the mat exposed at the edges of an opening is not perfectly smooth, but slightly textured, as in real life. The thin edge in each corner where two cuts meet has a slight shading that doesn't seem to make much sense to me in theory, but I see it in real mats, so I include it here.
Easy to Adjust Mat Colors For a Specific Photo
This'll be discussed more in the section about the Photoshop document that the script produces, but the most important aesthetic decision of a mat — real or fake — is its color. In the final Photoshop document, you use the normal Photoshop color picker to select the mat color, which means you can just drag an eye-dropper around an image to try colors, perhaps also adjusting saturation or brightness.
Customizable
The script allows you to adjust for the paper size and the specific nature of the printer and paper to be used, the number of mats, their thicknesses, their surface texture and color, the angle of the beveled knife cuts used to make each opening, and the size and location of however many openings you want.
Because this script is for something that will be printed and placed on the wall, you can add important visual 3D cues to the mat cuts by incorporating the viewing location into the shape calculations. Because viewing such a result from the wrong position would look decidingly wonky, you'd want to use this feature only if you know that the print will tend to be viewed from a known general location. (For example, the prints hanging in my office are normally seen while sitting in my office chair.)
Some things are customizable after the mat document has been generated, so that you can adjust them to suit the specific photo you're dropping in. Most important is the color of the mat, which you can pluck from the photo with the eye dropper, but you can also control aspects of the lighting and shading, how pronounced or subtle the mat texture should be, etc.
Specific
The results of the script are intended to be printed on the specific printer in the specific way the script is configured for. You can, of course, generate general-purpose mat documents, but you can eke out more quality when being specific.

Example at 128 DPI
displays actual size on my laptop monitor
Specific DPI
The pattern on the surface of the mat is intended to be printed at a specific DPI. If you print or display at a different resolution, it will end up being scaled in one way or the other (expanded or shrunk), after which it may no longer look real. For example, the mats in the sample photos at the top of this post don't look particularly real: they've been shrunk down to ¼ of their original pixel size to fit in this post, and then expanded by the fact that the originals were intended to be displayed at 250 DPI, but they're being viewed on your computer monitor which likely has a DPI somewhere in the 70-150 range.
Since everyone's monitor setup is different, it's not possible to display an “actual size” example on a blog post... the “250 DPI full-resolution crop” above is likely quite larger than life, unless you're using an iPhone retina display, in which case it, too, is smaller. For what it's worth, at left is a version appropriate for my own laptop.
Specific Size
Most printers can't print right up to the border of the paper, unless they're put into a somewhat vague “borderless printing” mode that under the hood expands the image slightly to (hopefully) make sure the image goes well past the edge of the paper, so as to not leave any bare paper exposed. You've got no choice but to use this if you truly need to print to the edge of the paper, but if you don't need to (because, for example, the frame you intend to place the print in covers a smidgen of the edge of the paper), you can avoid the uncertain fate of “borderless printing” by finding the “unprintable margin” specs for your printer and including them in the script configuration. If you get it right, the exact pixels you need — no more and no less — will be generated for the print job, avoiding all “resize to fit” shenanigans that would throw off all the “actual-size” measurements that went into the mat composition in the first place.
Specific Ink Coverage
If you're not printing to the edge of the paper because part of the paper will be hidden by the frame, you may as well not waste the ink to print anything that won't be seen, so you can configure that as well, to leave the “hidden” parts of the mat unprinted. This is perhaps a bit overkill, but for dark mats in thick frames, it could save quite a bit of ink.
Here's an exaggerated example to illustrate these points, with particular details about the left margin...
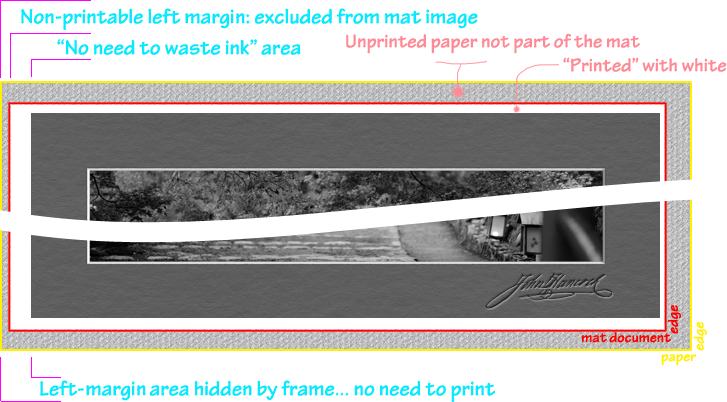
The result, if done correctly, is a slightly odd-looking mat image because printers “unprintable margins” tend to not be symmetrical. (Those of my Canon MP810, for example, are 3.388073mm on the sides, 4.98019mm on top, and 2.98741mm on bottom.) But once printed, the oddities match up perfectly, leaving an exactly-positioned result.
Mat Overlays
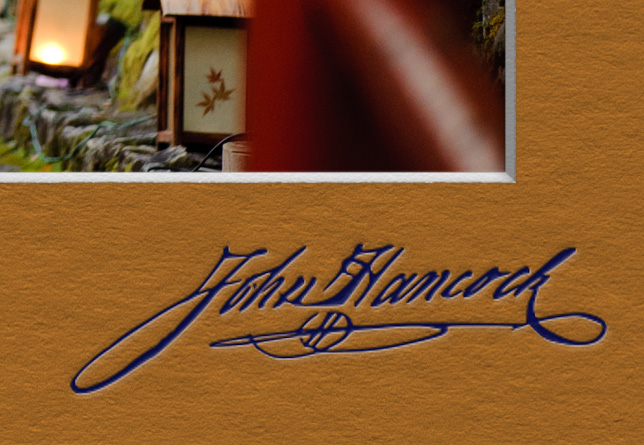
I've made it easy to configure overlays onto the mat, such as signatures, seals, and watermarks. Signing a print on the mat is a perfect example. My signature looks like a child's, so I'll use John Hancock's (this PSD, derived from the version as seen on Wikipedia):

Here's what it can look like when automatically overlayed by the script:

The script offers lots of customization on how the overlay is handled... the example above attempts to mimic an old ink signature that's rubbed off just a bit over time from the high points on the mat. But just two clicks and you can get an embossed feel:
These controls respond to the specific mat stipple pattern, so again, everything is quite flexible.
You can also overlay simple text...
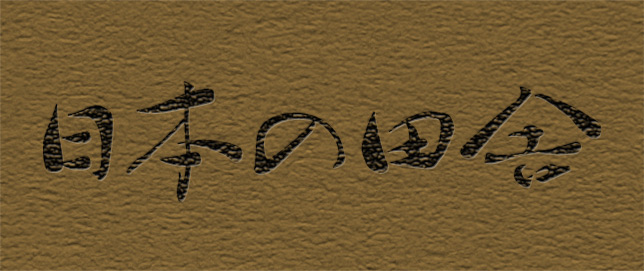
Text Overlay
( “Japanese Countryside” )
...and again, you have a lot of control in the script what kind of processing you want to apply to the overlay, and, of course, once the Photoshop document has been built, you can then take over full manual control.
You can arrange for the overlay to be cut along with the mat, as if it had been part of a physical mat in the first place.
Current Limitations
Some issues that remain to be improved...
250 DPI — So far I've prepared photo-realistic mat textures only at 250 DPI so far. It's probably fine to use at 200 DPI or 300 DPI, but getting further from the original 250 DPI will lead to a less natural look.
Needs a UI — It needs a dialog for mat configuration instead of requiring the user to edit a script. I just don't have the energy to build it now, though.
More Customization — Many more ways things can be customized in the script instead of being left to manual manipulation in Photoshop itself. Overlay text items, for example, don't yet allow for customization of the font and such.
Error Handling — Not much work has been done in detecting and reporting configuration errors... in the face of one, the script will likely exit with some kind of meaningless message from the bowels of Photoshop.
Non-ASCII Overlay Text — I haven't figured out how to get non-ASCII text into overlays. (The example above with Japanese text was created by configuring “TEST” in the script, then editing the text later in Photoshop.)
Mat's Photoshop Document
I'll get into how to configure and run the script later in this post, but in this section I'll give an overview of the Photoshop document that the script produces.
What you get depends, of course, on how many mats and overlays and cuts and such, but the layerset illustrated below should give a good idea of what you can do between document generation and actual printing.
Going from the bottom....
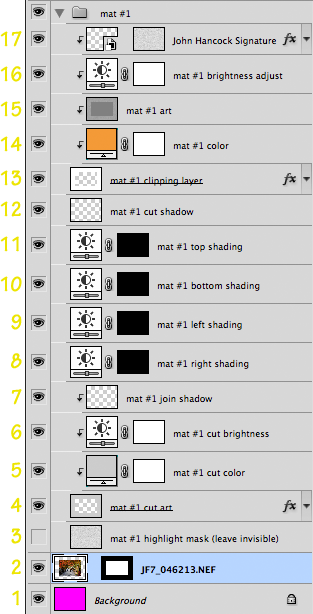
Layer 1 is just a bright garish color so that it's easy to notice when you inadvertently leave some area of the document unfilled, such as when not fitting an image fully behind the mask properly.
Layer 2 is where your photos goes. If you have multiple photos, their layers get added to this spot.
Layers 3 - 17 are for the mat; in a document with more than one mat, each mat is represented by a similar group of layers.
Layer 3 is a non-visible layer used internally by the script. It's not really needed once the script ends... a future version of the script will likely delete the layer before finishing.
Layers 4 - 12 are for the thin strips of mat material made visible by the cuts used to create the opening.
Layer 4 is the texture for the inside material.
Layers 5 - 6 allow you to adjust the overall color and brightness of the cuts.
Layer 7 is a very subtle shading added to the edge in the corner where two cuts meet.
Layer 8 - 11 is the base shading applied to the cuts in response to the relative light position.
Layer 12 is an additional shadow of the mat that can, in some cases, fall onto the photo (or underlying mat) and cut edges. Often you can't even tell it's there, depending on the photo and how you've configured the lighting. You can see an example above in the "example with two mats of different thicknesses and material" crop, both in how the shadow of the upper mat falls onto the lower mat, and in the lower mat, a very subtle shadow at the extreme right of the lower cut.
Layer 13 is the clipping layer that defines the front face of the mat.
Layer 14 is the color of the mat. It's just a solid-color adjustment layer, so you can pluck a color from the photo with the eye-dropper tool.
Layer 15 is the mat texture layer. You can reduce its opacity to reduce the impact of the texture, if you feel the natural texture is too strong for your tastes.
Layer 16 is an additional mat brightness adjustment layer needed if you want particularly bright mats. The Layer-14 color adjustment layer came from my post asking how to solve this colorization problem, and Layer 14 alone works fine in many situations, but you can't get really bright or white mats with it, so in those cases you'll also have to visit this layer.
Layer 17 is where any overlay layers are added, in this case illustrated with the John Hancock signature overlay. Futzing with the layer effects for these layers can yield quite a difference in the look. Particularly fruitful are the Emboss effect, and enabling/disabling the layer mask, which as been built to exclude where the underlying mat texture has highlights.
Installing The Mat Builder
The mat builder is provided in two zips file, a small one with the main script files, and a large one with the texture patterns.
Download:
Contents:
| type script file script file script file | filename Jeffrey's Mat Builder.jsx Jeffrey's Mat Builder Library.jsxinc Jeffrey's Photoshop Script Library.jsxinc |
Download:
Contents:
| type script file pattern preset | filename Jeffrey's Mat Pattern Data.jsxinc Jeffrey's Mat Patterns.pat |
After downloading and unpacking both zip files, you can install:
Clicking on Jeffrey's Mat Patterns.pat (from the second zip) in Finder/Explorer should launch Photoshop and install the pattern presets. You'll not see anything happen once Photoshop is open, but if you look in "Edit > Presets Manager > Patterns" you should find four “Jeffrey's Mat Pattern” patterns.
The other files (*.jsx and *.jsxinc from both zips) must be copied to the Scripts folder in your Photoshop install. Your install may differ, but the common locations are:
Mac /Applications/Adobe Photoshop CS5/Presets/Scripts/ Windows C:\Program Files\Adobe\Adobe Photoshop CS5\Presets/Scripts\ Once the files are copied and Photoshop is restarted, “File > Scripts” should then contain a new item, “Jeffrey's Mat Builder”.
But, don't run it yet... you'll want to make changes for your specific needs first, which is what the next section is about.
Updates are done in the same way, though you need install only the new files when updating from only one of the zips. (I don't expect the pattern data to be updated all that often.)
Configuring The Script
This kind of application begs for a nice UI that allows you to easily configure settings and save/invoke presets, but for now you've got to edit the raw file.
Before showing a full-on configuration file with all options illustrated, let me show a minimal one that creates a simple A4-sized image of one mat with a 1.75-inch margin around a central opening:
| 1 | #target photoshop |
| 2 | #script "Jeffrey's Mat Builder" // name to appear in the "File > Scripts" menu |
| 3 | #include "Jeffrey's Mat Builder Library.jsxinc" // defines "JMB" object used below |
| 4 | JMB.requireVersionAtLeast(1) |
| 5 | |
| 6 | var simple = { |
| 7 | paper: "A4", |
| 8 | DPI : 250, |
| 9 | mats : [{ |
| 10 | pattern_tag : "JeffreysMatPattern2", |
| 11 | ragged_edge : true, |
| 12 | cuts : [{ |
| 13 | margin : UnitValue(1.75, "in"), |
| 14 | fill_with_doc_at_open : true, |
| 15 | }], |
| 16 | }] |
| 17 | } |
| 18 | |
| 19 | JMB.build(simple) |
The configuration itself is on lines 6 through 17, which is then used on line 19 when invoking the builder. The paper size and DPI must be specified in every configuration, as must the mats. In this case, there's one mat using my pattern #2, and it has one cut.
It's set up such that if it's invoked while there's already a document active in Photoshop and that document has only one layer, a copy will be inserted behind the mat in the newly-created document. This allows you to “invoke the script on a photo”, so to speak. But you can always drop photos in after building the document, as well.
Here's the version included in the script-files download. It's its own documentation for how to use it... it's got lots of comments, doesn't rely on default values, and includes all settings, including ones that aren't used, just to illustrate that they exist.
| 1 | #target photoshop |
| 2 | |
| 3 | // |
| 4 | // Jeffrey's Mat Builder Photoshop Script |
| 5 | // Creates photo-realistic fake (faux) matting for (almost-)fine art prints |
| 6 | // |
| 7 | // https://regex.info/blog/photo-tech/mat-builder |
| 8 | // |
| 9 | // Copyright 2011 Jeffrey Friedl |
| 10 | // https://regex.info/blog/ |
| 11 | // jfriedl@yahoo.com |
| 12 | // |
| 13 | |
| 14 | var VERSION=1 // March 10, 2011 |
| 15 | |
| 16 | #include "Jeffrey's Mat Builder Library.jsxinc" // defines "JMB" object |
| 17 | JMB.requireVersionAtLeast(1) |
| 18 | |
| 19 | // |
| 20 | // All the items below with a value of "undefined" may be omitted. |
| 21 | // I've listed them here merely as documentation of what options are supported. |
| 22 | // |
| 23 | JMB.build({ |
| 24 | // Size and orientation of the canvas. |
| 25 | paper : "A4", |
| 26 | |
| 27 | // |
| 28 | // There's a list of known paper sizes in "Jeffrey's Photoshop Script Library.jsxinc" |
| 29 | // that you can can set 'paper' to, or you can set the size explicitly with: |
| 30 | // width : UnitValue("210 mm"), |
| 31 | // height : UnitValue("297 mm"), |
| 32 | // The paper size is always give for the paper in the Portrait orientation it's put |
| 33 | // into the printer as. |
| 34 | |
| 35 | DPI : 250, // Pixels per inch. Pick what you intend to print at. |
| 36 | |
| 37 | // Can be true, false, or "ask" |
| 38 | landscape : "ask", |
| 39 | |
| 40 | // Once mounted and hung on the wall, where is the primary viewing location? |
| 41 | eye_from_wall : UnitValue(2.0, "m"), |
| 42 | eye_below_center : UnitValue(0, "m"), |
| 43 | eye_right_of_center : UnitValue(0, "in"), |
| 44 | |
| 45 | // main lighting source (for shadows) |
| 46 | light_oclock : 3, |
| 47 | light_distance : UnitValue(2, "m"), |
| 48 | light_in_front : UnitValue(1.5, "m"), |
| 49 | |
| 50 | // |
| 51 | // If you're intending to put the print into a frame that covers the edge of the paper, you can |
| 52 | // avoid the ink wasted on print that won't be seen by setting some margins here. Make sure to |
| 53 | // use distances a bit smaller to allow some leeway. |
| 54 | // |
| 55 | hidden_by_frame : { |
| 56 | left : UnitValue(0, "mm"), |
| 57 | right : UnitValue(0, "mm"), |
| 58 | top : UnitValue(0, "mm"), |
| 59 | bottom : UnitValue(0, "mm"), |
| 60 | }, |
| 61 | |
| 62 | // |
| 63 | // If not printing in a specific "borderless" mode, most printers have some edge of the paper |
| 64 | // that can't be printed; if you'll be printing in such a mode, set these values as per the |
| 65 | // printer specs. |
| 66 | // |
| 67 | unprintable_margin: { |
| 68 | top : UnitValue(0, "mm"), |
| 69 | bottom : UnitValue(0, "mm"), |
| 70 | left : UnitValue(0, "mm"), |
| 71 | right : UnitValue(0, "mm"), |
| 72 | }, |
| 73 | |
| 74 | // |
| 75 | // Array of mats to be created. You can have any number of mats, and any number of openings in |
| 76 | // each mat. Traditionally, there's one opening in one or two mats, but you can make grids of |
| 77 | // openings, go crazy with 10 mats, etc. |
| 78 | // |
| 79 | // Earlier mats are laid down first, so in a multiple-mat situation, the first mat listed be |
| 80 | // the smallest opening with the image behind it, while subsequent mat would have progressively |
| 81 | // larger openings. If specifying the opening via margin from the edge, you'd want progressively |
| 82 | // smaller margins as you go. |
| 83 | // |
| 84 | mats : [{ |
| 85 | // |
| 86 | // If you have a specific color you'd like you use for the mat, you can along the lines of |
| 87 | // |
| 88 | // color : JPSL.RGB(100,0,0), // pure red |
| 89 | // |
| 90 | // but if you leave the color undefined, the foreground color will be used. |
| 91 | // It doesn't really matter much, because in either case it's trivial to change the color |
| 92 | // with the eye-dropper tool once the document is built. |
| 93 | // |
| 94 | color : undefined, |
| 95 | |
| 96 | // |
| 97 | // The color of the inside of the mat, exposed when the opening is cut. If not provided, |
| 98 | // the 80% white shown below is used, since the inside of most mats is indeed whiteish. |
| 99 | // You can also use the string "same as mat" for the same color as the mat. |
| 100 | // |
| 101 | cut_color : JPSL.RGB(80,80,80), |
| 102 | |
| 103 | |
| 104 | // Mats default to a 1mm thickness, but you can adjust that here. |
| 105 | thickness : UnitValue(1, "mm"), |
| 106 | |
| 107 | // The angle of each beveled cut into the mat. Default is 45. |
| 108 | // 70 is steep and creates a thin result; 90 is punch-out thin. |
| 109 | cut_angle : 45, |
| 110 | |
| 111 | // The pattern to use for the mat surface texture. Currently, you can choose from among: |
| 112 | // |
| 113 | // JeffreysMatPattern1 |
| 114 | // JeffreysMatPattern2 |
| 115 | // JeffreysMatPattern3 |
| 116 | // JeffreysMatPattern4 |
| 117 | // |
| 118 | pattern_tag : "JeffreysMatPattern1", |
| 119 | |
| 120 | // |
| 121 | // If 'ragged_edge' is true, attempt to rough up the edge of any cuts slightly, as |
| 122 | // appropriate to the mat's stippling pattern, to make the cut look less fake. |
| 123 | // |
| 124 | ragged_edge : true, |
| 125 | |
| 126 | // |
| 127 | // A mat can have any number of cuts to make openings (behind which you'll presumably place |
| 128 | // photos). Optionally, you can specify the image to be placed behind (and fitted to) the cut. |
| 129 | // |
| 130 | // There are many ways to specify the size and location of the cut.... the first one |
| 131 | // found is used (they're listed below in the order they're checked). |
| 132 | // |
| 133 | // All values for cut location and size are UnitValues(), e.g. |
| 134 | // margin: UnitValue("3 mm") |
| 135 | // or |
| 136 | // margin: UnitValue(3, "mm") |
| 137 | // |
| 138 | cuts : [{ |
| 139 | // |
| 140 | // Two ways to pre-load a photo behind the cut you're about to make... |
| 141 | // |
| 142 | // One is to have the script automatically place the document that's active at the time |
| 143 | // you invoke this script, so that you can effectively "apply" this script to document. |
| 144 | // This works only if said document is exactly one layer; the directive is ignored if |
| 145 | // otherwise. If you use this option, you probably want to set 'landscape' above to |
| 146 | // the string "ask". |
| 147 | // |
| 148 | // The other way is to provide the location of an image file, via "fill_with" |
| 149 | // |
| 150 | // You don't need to provide a photo for the opening, but if you want do, choose one of: |
| 151 | fill_with_doc_at_open : true, // true or false. If true, fill_with is ignored |
| 152 | fill_with : undefined, // put the full path to an image, in quotes |
| 153 | |
| 154 | |
| 155 | // |
| 156 | // If you don't provide a photo to fill the opening, it's left blank and you can drop or |
| 157 | // paste or place (File > Place) a photo in later. |
| 158 | // |
| 159 | // *If* you provide an image via either of the two methods above, you can specify the |
| 160 | // size via a minimum margin from the mat edge. This results in the cut being made to |
| 161 | // the exact proportions of the photo, so it's shown completely. |
| 162 | // |
| 163 | // (If 'min_margin' is not specified, the cut proportions are unrelated to the photo, |
| 164 | // so the photo will be expanded to fill the opening as well as possible.) |
| 165 | // |
| 166 | min_margin: undefined, |
| 167 | |
| 168 | // or, the cut can be specified as a constant margin from the edge of the mat |
| 169 | margin : UnitValue(1.5, "in"), |
| 170 | |
| 171 | // or, the cut can be specified as top/bottom and left/right margins |
| 172 | margin_leftright: undefined, |
| 173 | margin_topbottom: undefined, |
| 174 | |
| 175 | // or, the cut can be specified with margins on all sides |
| 176 | margin_left : undefined, |
| 177 | margin_right : undefined, |
| 178 | margin_top : undefined, |
| 179 | margin_bottom : undefined, |
| 180 | |
| 181 | // or, the cut can be specified with absolute upper-right / lower-left coordinates, |
| 182 | // provided via a 'loc' object that contains x1/y1/x2/y2 UnitValue members. |
| 183 | loc: undefined, // { x1:UnitValue(...),y1:UnitValue(...), .... } |
| 184 | |
| 185 | // or the four coordinates provided directly |
| 186 | x1 : undefined, |
| 187 | y1 : undefined, |
| 188 | x2 : undefined, |
| 189 | y2 : undefined, |
| 190 | |
| 191 | // or, the cut can be specified with the x/y coordinate of the upper-right, |
| 192 | // and a width and height. |
| 193 | x : undefined, |
| 194 | y : undefined, |
| 195 | width : undefined, |
| 196 | height : undefined, |
| 197 | |
| 198 | // an 'omit' of true causes this cut to be skipped; perhaps useful while testing |
| 199 | omit : false, |
| 200 | |
| 201 | // you can have as many cuts as you want, in separate arrays after his one |
| 202 | }], |
| 203 | |
| 204 | // |
| 205 | // An overlay is a separate image or text layer placed on the mat, such as |
| 206 | // an embossed seal, signature, or image title. |
| 207 | // |
| 208 | // If you've got an overlay defined but want to try without it (such as to |
| 209 | // speed up testing other aspects of the script), use |
| 210 | // omit: true, |
| 211 | // |
| 212 | overlays :[{ |
| 213 | omit : false, |
| 214 | |
| 215 | // An overlay can be an image file -or- a text string (via "file" or "text"): |
| 216 | file : "~/Documents/John Hancock Signature.psd", |
| 217 | text : undefined, // e.g. text: "My Super Pics" |
| 218 | // If you'd like to try the John Hancock signature yourself, you can grab |
| 219 | // it from: http://regex.info/i/s/John Hancock Signature.psd |
| 220 | |
| 221 | |
| 222 | // If you want to scale the overlay, provide a width, a height, or both |
| 223 | height : UnitValue("0.65 in"), |
| 224 | width : undefined, |
| 225 | |
| 226 | // To specify where on the mat the overlay should be placed, |
| 227 | // set the vertical location of the top or bottom edge, or of the middle, and |
| 228 | // set the horizontal location of the left or right edge, or of the center. |
| 229 | top : undefined, |
| 230 | middle : undefined, |
| 231 | bottom : UnitValue("0.35 in"), // cut.b2 + UnitValue("2mm"), |
| 232 | |
| 233 | left : undefined, |
| 234 | center : undefined, |
| 235 | right : UnitValue("1.0 in"), // cut.x2 - UnitValue("0.5 in"), |
| 236 | |
| 237 | // If the overlay should be cut when the mat is cut (as if it were actually on the mat), set this to true. |
| 238 | attached : true, |
| 239 | |
| 240 | // If 'attached' is true, we can make the overlay look a touch more realistic by |
| 241 | // allowing the highlights of the mat stipple to bleed through, as if the ink of the |
| 242 | // overlay got rubbed off over time. |
| 243 | use_highlight_preserving_mask_layer : true, |
| 244 | |
| 245 | // You can optionally provide function to apply to the overlay layer... |
| 246 | // this example works well for a dark signature on a lightish mat. |
| 247 | apply : function() |
| 248 | { |
| 249 | // style for a dark signature |
| 250 | JPSL.setLayerStyle({ |
| 251 | bevel : { |
| 252 | style : "emboss", |
| 253 | technique : "smooth", |
| 254 | globallight : true, |
| 255 | depth : 1, |
| 256 | size : 0, |
| 257 | highlight_opacity : 50, |
| 258 | shadow_opacity : 36, |
| 259 | up : false, |
| 260 | soften : 0, |
| 261 | } |
| 262 | }) |
| 263 | }, |
| 264 | }], |
| 265 | |
| 266 | // an 'omit' of true causes this mat to be skipped; perhaps useful while testing |
| 267 | omit : false, |
| 268 | }, |
| 269 | |
| 270 | // Additional mats go here if you like. Each appears "on top of" the mats listed earlier. |
| 271 | |
| 272 | ] |
| 273 | }) |
Running The Script
Running is as simple as invoking “Jeffrey's Mat Builder”. in the “File > Scripts” menu. (It may be worth while to assign a keyboard shortcut to it via “Edit > Keyboard Shortcuts” to make turnaround quicker while tweaking the script.)
That's it. It's not for the faint of heart. Good luck. Did anyone read this far?
Stupendous. I have been looking into creating mats for the last few days. But I have been unsuccessful because it is way beyond my photoshop capabilities. This works great. Thanks.
Steven
Works PERFECTLY!! So cool. Thank you SO much!!!
Jeremiah,
Tacoma, WA
One question I already meant to ask when you showed your work in progress but then somehow forgot to:
It seems in all your samples the cut edges cast a shadow straight to the left while the surface texture has its “light source” straight up (and the “embossed” stamp might actually be lit from 9:30 o’clock)? Is that intentional (or am I cross-eyed)?
Otherwise the results are incredibly convincing (I actually noticed those small cues you mentioned), great work!
The mat textures are so vague that I didn’t think the lighting direction mattered… the look changes considerably with the nature of the lighting, but any one view is as random as another, I thought. I suppose it’s possible to encode into the patterns what angle the light comes from, and have the script take that into account when choosing the pattern, but that seems overkill even to me. Thoughts? —Jeffrey
Hmm … Indeed very few viewers will notice – but there are those nitpickers like me. It really depends on your desired level of perfection. 😉
If you wanted to take the direction of your lighting into account for the mat surface I guess you’d need a library of each texture with at least three lighting directions (horizontal, vertical and diagonal). At least some of the textures have a “direction” themselves, so you couldn’t just rotate the texture to “follow the light”. And without a 3D representation of the texture I don’t think you could create the variations from one master, either.
Having the texture lit straight from above obviously is a reasonably universal choice, and I’ll happily use the script as is. (I certainly couldn’t improve anything from that level and I’m definitely not complaining!) Only with your samples (Matched to light coming from a window to the right?) it struck me as somewhat odd to have the virtual light directions at right angles considering the attention you gave to the detail at the cut borders…
I just didn’t think anyone could tell. I’d like to reshoot the mats anyway (it’s much more difficult than one might at first think, because you have to be able to convert them to a pattern that repeats without any obvious seams), so if I do I’ll try to shoot a few angles. —Jeffrey
There is actually a trick to easily creating repeating textures. Take any image of a texture that would have seams when tiled. Then, create a copy of it, and flip it horizontally (mirror image). Abut it on the right side of the original image. In essence, you want to “fold open” the pair of images like a book. Then, make a copy of the new, double-wide image and flip it vertically. Attach it on the bottom of your original. The resulting image will be twice as wide and twice as long as your original, and can be tiled seamlessly.
I don’t think that’s a general solution… you’ll have a seam the moment you put the two mirror images together. It may not be particularly noticeable with some patterns, and for those the technique can be useful, but it’ll stick out like a sore thumb with others. —Jeffrey
Jeffrey,
Thanks for this excellent package! Your mat textures are fantastic. The attention to detail on the mat simulation (rough edges, little shadows) is unbelievable – or should I say quite believable. We appreciate the work that went into this. I hope you’ll continue your efforts with additional textures and a user interface (for people with script-phobia).
Jeffrey,
This is just awesome. I really want to know when someone creates a UI for it. As it is, just an awesome script for adding the mats. I wish I could change the default to a white mat (plus the brightness adjust to make it a true white). Gray is pretty nice though.
Again…thanks so much.
Ah, I know why double windows were not working. There is an error in Jeffrey’s Mat Builder Library, line 1446. left should be replaced with right. 🙂 Now it works great!
Another Question, could you elaborate a little more on how these two variables are used….
light_distance : UnitValue(1, “m”),
light_in_front : UnitValue(5, “m”),
Thanks,
Konrad
Thanks for the find… I’ve pushed out a new version with that fix. The light source for the shadows is light_distance along the wall on the light_oclock angle, then light_in_front directly out away from the wall. —Jeffrey
Hi Jeffrey, I thought I’d share how I recently used your excellent script. I used it a little differently than others I would guess.
I found the three original Star Wars movie posters, put your excellent faux black matte around each poster, printed them out and then cut a custom real Matte for the frame I had. It looks great! Cheaper way of doing a double matte.
Here is a picture of the framed art work.
Excellent. —Jeffrey
Hey Jeffrey,
great script, especially for a PS scripting n00b like me 🙂
now…. trying to do a double mat…. i copy/paste the first mat lines to “additional mats go here”
and i get an error 25 expecting ] yadda yadda….
can you post an example script? 🙂
Thanks
copied from { on line 84(?) “mats : [{”
to line 270 (?) “},”
and that worked, thanks again! 😉
I have installed these scripts on cs5 with no problem but now I am try to install these in cs6. Install went fine but when I run the script I get an error that says “The command Create Clipping Mask is not available”
Can anybody help with this?
BTW I absolutely love this script and have used it on a lot of things on my wall. Thank you so much Jeff.
I resolved it here: http://www.mcpactions.com/blog/2010/11/08/photoshop-actions-cs4-cs5-troubleshooting-invert-not-available/
Looks like a great script! But I tried loading it into Photoshop CC and it does seem to work, but it does also generate errors. There was an error :”expecting numeric value” which may be my fault, and “Expecting place command, this version of Photoshop may not be compatible.” I hope you update this, as the mats look fantastic!
I’m still on CS5, alas, so I can’t check at the moment. I’ll probably end up getting the CC photographer’s bundle sooner than later, so if I do, I can test it then —Jeffrey
This is great Jeffrey! I have what is probably a really stupid question though, please bear with me. How do I edit the script so that I can add a second mat or change things such as the patterns? What program do I need to do that? I use a mac and CS6. The script works great for a single mat, and is saving me a ton of time. Your script makes a mat that is so much better than just adding a bevel and some shadows like all the other tutorials do. Thanks again
OK, I found a text editor and have tried modifying the script so I can include a double mat. I followed John OB posts, and I don’t get any errors when I run the script, but there is still only one mat. Any ideas? Thanks so much.
It’s impossible to tell what the problem might be from here, and I don’t have the bandwidth to offer individual programming support. If you have a programming-savvy friend, perhaps ask him or her to help you out… —Jeffrey
Thanks for this great tool. I’m using CS4 and had a speed bumps because there is no “Soft Round” brush preset. I did ultimately discover a preset called “Soft Round 5 pixels” and updated it in the Jeffrey’s Mat Builder Library, which worked. However, Photoshop also would mysteriously bomb sometimes on the brush call, but as far as I could tell that was close to the end of the script and most everything seemed to be finished. Lots of work went into this and I appreciate you making it available for free.
Jeffrey, I’m curious about the setup you use to shoot the mat patterns. Lightbox? Tripod? Lens used? I want to experiment shooting suede mats and would like some general advice.
I’m also thinking of maybe using a program like Pattern Studio to make the seamless part easier.
There are also lots of backgrounds available from Google Images, although I haven’t checked the resolution, it may be too low.
I put them on the floor of the livingroom, faced the camera down, and shot. The lighting was soft and diffuse (from a floor-to-ceiling window that runs the long length of the room). —Jeffrey
I’m a bit johnny-come-lately to this discussion as this was posted over four years ago, but will ask anyway: I note several comments indicate script problems in CC/CS6. Has it been updated in its current incarnation to correct those issues?
No, it’s not changed, but I still imagine it should work in CS6. I don’t have CS6 to test, though. —Jeffrey
Hi Jeffrey,
I am a long time user of several of your Lightroom plugins (Thank you!) and just came across this script as I was searching for something to do exactly this. Thought I’d drop a comment and let you and others know that I have successfully used this script in Photoshop CC 2015.3 (the latest version) just as it is and it worked perfectly. I did have to comment out the John Hancock signature 🙂
I have used the script with a file open and it worked fine, although it does delete pixels when it crops the image.
I have also used it successfully with no image open to create just the mat and then done a File/Place Embedded to put the file image in which gives a bit more control, at least for me. I have not tried multiple opening mats yet, but will post back when I do.
Kevin
Correction on last comment, it does not delete pixels (or crop for that matter) when placing a file. I wasn’t paying attention. It puts a mask on the file.
Has anyone had success creating double mats? If so I would love to hear how to accomplish.
For double mats, I generated 2 separate mats at different widths and pulling the layers together into the same Photoshop document. Worked like a champ. I then flattened the layers (leaving transparency), placed the mat into a Master page in an InDesign file and placed photos on separate pages resulting in one PDF containing all my photos matted and ready for the printer. Jeffrey – thanks so much for your generosity making this available.
Hi Jeffrey,
This is positively brilliant! Thanks a million for creating and sharing this wonderful add-in! I can’t believe how realistic the mats look when printed. The photo shop where we had it printed also commented on how nice the mats looked.
I easily created a two-layer mat. The only thing I found tricky was that the patterns seem to contain a lot of grey. So when I tried to create a white mat, for example, it came out as a medium grey. Maybe a pattern with more pure white and light pixels that still showed the texture would be possible.
From Rochester, NY
Have anyone been able to run it on Photoshop CC version 20.0.2? For me, it stops with the error “The command “Select” is not currently available”.
Does anyone know what is the latest version of Photoshop this script works with?
Hello Jeffrey,
I’m still using PS CS5 and your fantastic free Fake-Mat-Building Photoshop Script some 10 years later. It’s about time I say thank you for your generous creative genius!
Dave
Sorry, Dave again. I’m from Huntington Beach California “Surf City”.