(Note: this long-winded, painfully verbose post will be of interest only to serious camera geeks, if anyone)
After posting the first parts of my tripod stability tests (Part I and Part II), some discussion ensued about my choice of a one-second shutter speed for the tests, both in the comments added to the posts (comments for Part I and Part II), and in the forums at Digital Photography Review (starting from this post).
Well-presented comments from a number of different people suggested that a one-second exposure was too long, and by keeping the shutter open longer than the vibration vibrated, the added time would tend to “wash out” the more subtle effects of the vibration, rending the test results misleading. For example, if there was vibration for only 1/10th of a second in a 1-second shot, its effects would be seen only 10% compared to a 1/10th-second shot.
I understand the point they're trying to make, but I believe that it
does not apply to how I did my tests. As I said before, I'm not an expert
at this stuff, so perhaps I'm wrong. Hopefully, this post will make things
more clear, one way or the other. ![]()
One important mistake I made in my earlier presentations was that I didn't make it clear how my tests are different from normal tests. My defense is that I didn't really know how normal tests were done, which is probably a good thing because knowing could have limited my thinking while developing my own approach.
“Normal” Test Charts
It seems that normal tripod testing is done by pointing the camera at a paper with a test pattern printed on it, such as this:
(That's a crop from a low-res version of a video test pattern first made in 1956, available as a high-resolution vector PDF from a site with a lot of test patterns.)
My Test Charts
I created a digital test chart, color-on-black, and displayed it on my laptop's LCD screen....
The strong points of this test pattern, in my mind, are:
- The background is black, and as such, makes almost no impact on the test image.
- The “railroad track” lines use no anti-aliasing, so the LCD's pixels are sharp (either 100% on, or 100% off).
- Each of the three primary colors appear individually, in an attempt to create the most clear image on common image sensors (which generally have pixels that respond to the primary colors). (This is only a half-hearted attempt, because my laptop LCD's idea of primary colors are likely a chromatic mile away from the camera sensor's, but it's a start.)
Its the first point — a black background — that's important for this post....
The Fundamental Difference
I'll explain in detail further on in this post, but in short, the fundamental difference is that the normal “black ink on white paper” method involves taking a photograph, of which shutter speed is an integral and important part of a correct exposure. On the other hand, my method uses the camera along the lines of a device to detect photons, where the shutter speed merely indicates the duration over which photon detection occurs.
Perfect Situation: No Vibration
Let's consider the perfect case of absolutely no camera vibration while taking a test shot. In that case, the shutter speed doesn't matter for the background areas of the test chart, because fast or slow, no photons will arrive from it. (I use “no photons” quite loosely here, but you know what I mean.)
So, in the perfect case, the shutter speed has an impact on only how bright the lighted portions of the test chart show up. Too fast a shutter speed and nothing will show up, and too long an exposure and electrons will start to “bleed” to adjoining pixels. That last situation is well beyond simply “blowing out the highlights,” and requires a really long exposure, relatively speaking.
So, as long as the shutter speed used for the test is between the “too long” and “too short” speeds, the result should have meaning. At the ISO and aperture I used (100 and f/9), I could see the test image well enough at 1/250th of a second, so we'll call beyond that “too short.” I didn't test a shutter speed longer than 10 seconds, but they were usable, so we'll call anything beyond that “too long.” Their highlights were likely “blown out,” but that doesn't really matter to vibration testing unless electrons start to bleed to adjacent photosites.
So, considering that the range I just presented (1/250th to 10 seconds) represents about 12 stops, and the D200 sensor has almost that much dynamic range to begin with (as described here), I think most any speed within that range would properly reflect the perfection of our utopian case.
Imperfect Situation: Vibration
So, if there is vibration, how will that show up in the test image? If even the slightest vibration causes the lit portions of my test chart to shine onto the area of the sensor where the background normally appears, those photons will be like a flashlight in the dark, and show up in the result.
Vibration is often a back-and-forth thing, so if a shot's vibration lasts for, say, 1/10th of a second, it'll cause photons to collect on either side of a bright area (in an area that should be black) for half that time, or 1/20th of a second. That's well long enough to show up.
This is all very different than what happens with a normal test chart, where the background is white and is flooding the sensor with photons almost all the time. In fact, the only way the vibration shows up in such a situation is because the vibration caused a reduction in photons, a reduction that indeed can get “washed out” as the exposure time approaches a length intended to properly record the whiteness of the paper.
This difference in the two approaches is doubly noteworthy because of the nature of human perception of light. When a light is dim, as the background of my test chart is, a 10% difference in light intensity (number of photons) results in a much larger percentage change in brightness (human perception of light). Thus, a little vibration resulting in a little extra photons can be noticed.
On the other hand, when something is perceived as bright (like a properly-exposed sheet of white paper), a 10% difference in the intensity is perhaps not even noticeable. (It might come as a surprise, but you may not even notice half of the sun being blocked during an eclipse unless you happen to first notice the changing shape. You have to cut light by about 82% to cut the perceived brightness by half. What remains after 82% is cut — 18% of the light — is where a standard 18% gray card finds its origins.)
An Analogy
I set my camera up in a dark room, and took pictures of myself making a circle with a flashlight. In each shot, I made about one revolution with the light (sometimes a bit more, sometimes a bit less), and took about three-quarters of a second to do it.
Here are four of those exposures, with shutter times ranging from 1/2 second to 15 seconds:
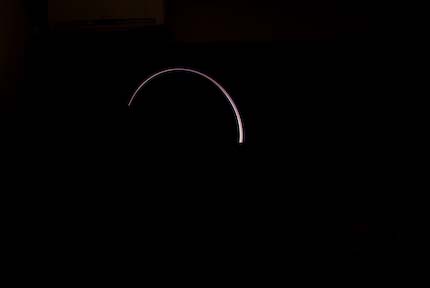
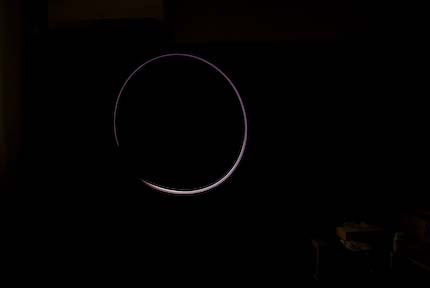
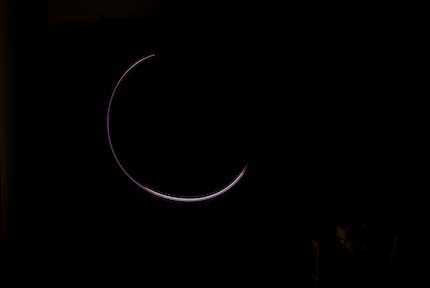
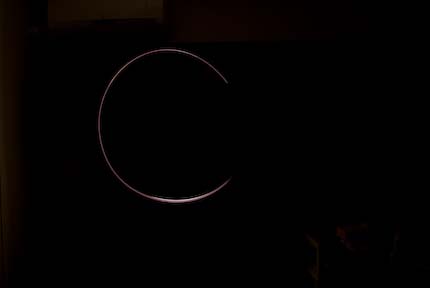
What I intend for this to show is that a short shutter time can cut off
some of the “vibration” (my flashlight circles), but a long one does not
reduce the impact of what was recorded. A lot of extra nothing is still
nothing (as the entirety of my blog so poignantly illustrates ![]() ).
).
Even if the circle-spinning went on for a long time, you'd see a blown-out circle, but you'd still be able to tell that there wasn't a big X through the center, or whatever. It would still tell you where the flashlight was and wasn't present.
Thus, for my tripod tests, I chose the relatively long shutter speed of one second so that they'd be more brutal: I'd watch for vibration for much longer than a normal photographic exposure.
Relevance?
What I've explained in this post is why my 1-second tests are not irrelevant for showing camera vibration. What I've not explained is whether these tests are actually relevant to how a tripod will perform in the real world.
I know that the tests I've already presented (and those I've done but haven't yet presented) are only a starting point. In one sense, they're supposed to be brutal in how they test the equipment, looking for the most minor vibration. Yet, at the same time, I know that I've tested them only under the best conditions (no wind, photographer not rushed, etc.), so in another sense I've gotten a “best case” reading.
A theoretical “best case” might be applicable in some studio situations, but in the real world, wind, rumbling trucks, etc., can have a strong impact, so the more important goal is to find out how a tripod degrades or holds up under those conditions. As Alexander Kiel notes in one of his comments, “it would be good to do some outside tests in a windy environment. I think that then the cheap tripod won't look so good even with the best technique.”
Indeed, I hope to do those tests sometime...
Ok Jeffrey you have convinced me. The combination of your unusual test chart and shutter speed now makes sense to me. But you must understand the reader. You presented in your first post a test which is build on this unusual technique. In such a case I think it would be better to first introduce this new technique, explaining why you had chosen it and comparing it to the old.
I fully agree that I should have presented it differently. As I said in this post, I didn’t realize at the time that what I was doing was unusual, since I didn’t really know of the common practice. In my first posts, I just assumed that the validity of the method would be apparent. —Jeffrey
I think the comparing part is important if you care about quality of doing experiments. You have the theory, that your way is superior of the usual and you did explain why. But like in physics you have to proof this by experiment. This said, it would be nice if you take a usual test chart, did a exposure at the most sensible shutter speed and compare the results with yours of the TFT test chart and long shutter speed.
Thanks for taking the time to do all of this! It’s a huge undertaking with a very technical audience.
From what I can tell (and your detailed description), it looks like your methods are valid and I’m interested as to what you plan on looking into next! As a member of the “cheap tripod owners association” I’m beginning to realize that I can now blame all my blurry pictures not on user error, but on equipment malfunction and therefore, justify the purchase of a better support system… or not.
Anyway, thanks for the neat series!
Hello Jeffrey,
Thanks again for your many informative articles. I’ve been delving into the archives and came across this:
“Vibration is often a back-and-forth thing, so if a shot’s vibration lasts for, say, 1/10th of a second, it’ll cause photons to collect on either side of a bright area (in an area that should be black) for half that time, or 1/5th of a second. That’s well long enough to show up.”
Small error which you may wish to correct: half of 1/10th second is 1/20th second (not 1/5th).
Duh, thanks! —Jeffrey
I had also not much earlier knowledge how to do tripod testing seriously – perhaps therefore your genious idea of a setup with an LCD-screen (black background, only one genuine pixel line in one colour) was quite clear to me from the very first beginning…
German company Berlebach (very nice wooden tripods) has a another nice nice test solution on their homepage http://www.berlebach.de/anleitungen/49.pdf (sorry, only in German), the basic idea is quite similar, but by far not so perfect as yours: They project a laser point to a mm-grid-paper and take 15 second (!) – shots from 6,5 meters away, also using the “photons out of control” like you, but not similar precise and tiny…
They use 3 scenarios: mutiple shutter release during exposure (=camera vibration), swinging pendulum on cord fixed to the gear head (=wind), dropping an 2 kg iron pice near the tripod (dynamic floor shock) – was impressed by their results, but owned the tripod earlier…
As for tripod materials: I use a Berlebach 8023 wooden tripod and Manfrotto 410 Gear head, that gives me very nice results in real life tripod photography even with an older, quite heavy Canon FD 600mm f 4 with 2 x FD TC Type A and Ed Mika glassless infinity adapter (also something genious) on a Canon APS 1,6 crop (= 1920 mm) and cable release, great wind/mirror/floor shock vibes reduction, much better than GITZO carbon or Manfrotto alu, but not seriously tested, just looking and comparing my outdoor results. (They have also even more sturdy ones like the 2002, they are cheap (160-200 €) compared to Gitzo, but they are – like all really good tripos – relatively heavy…) – perhaps try also something made from wood…
got addicted to read your testings, looking for more 🙂
cheers, Heinz (Austria)