Introduction
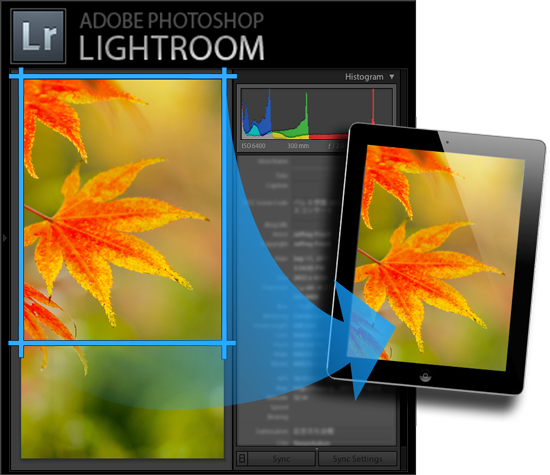
An iPad can be a wonderful tool for sharing your photography in person, one on one. In theory, loading your iPad or other Apple iDevice with photos from Lightroom is a breeze: simply export copies from Lightroom to a folder that iTunes has been told holds the pictures that should appear on the device, and each time you sync, voilà the photos appear on the device.
In practice, doing it well is much more difficult than you might imagine, so much so that as you learn about the obstacles that stand in the way, you just want to yell “How on earth can it be this hard?!”. It's a very un-Apple-like experience.
UPDATE: My workflow has changed completely for the better, so this post is now supersceded by:
... so please read that instead of this.
There is no end of reports from people thrilled with how the iPad displays their photography, and you may well have been syncing your own photos with success from day one, but I suspect this euphoria is borne out of ignorance: you're settling for poor results, but don't even know it.
Anyway, this post explains how I prepare my photos for my iPad and iPhone. It's probably true that no one will want to do every step exactly as I have, but the description of each step makes for a cookbook of sorts that you can draw upon for your own needs.
Apple's Standard “Photos” App
This post covers viewing photos with the “Photos” app that Apple provides standard on its devices. Nevertheless, some of the issues tackled in this post are of use to those using other photo-viewer apps (such as Marc Rochkind's WidePhotoViewer, or the FolioBook app that Martin Bailey recommends).
Similarly, parts of this post will be of interest to those using Lightroom to prepare photos for non-Apple devices.
Issues that Make this a Challenge
Some of the issues to be overcome on the way to iPad photo bliss...
Lack of Good Information
Plenty of so-called experts offer superficial, often incorrect, haphazard “solutions” (such as this) that seem great if they help you get photos to your device the first time, because anything is better than nothing. But if you want to do it well, those “helpful” instructions just mislead.
My post today contains a lot of specific, solid information that I've figured out along the way to building the solution I use, but I'm no expert: some of what I've discovered may well be dependent on a specific OS, OS version, iTunes version, device, and device OS version.
iTunes Dorks your Photos
For some reason, iTunes lowers the quality of every photo it prepares for the iPad. I don't mean simply that it downsizes and lowers the JPEG quality setting — it might not actually do either — but it does actually lower the visual appearance by slightly blurring the copy it sends to the iPad.
My post today discusses the details, and the Lightroom settings that lead to the least amount of iTunes dorkage.
It's Hard to Fit In
If a photo doesn't exactly fit the iPad's screen aspect ratio (that is, if it's too tall or too wide to fit perfectly), the iPad shrinks it down to get the whole thing on the screen, filling in the missing space on the right/left or top/bottom with black bars. This is exactly what you want if the photo's composition is perfect and you feel it would be a lesser image if it were somehow cropped to fit the device. But not all photos are so perfectly perfect.... many photos don't mind a slight crop around the edges, and really do look better when they fill the screen in all their glory.
My workflow offers a way to automate common crops on photos that you think would benefit (such as a best-fit center crop for this photo, a left-side crop for that, etc.), while leaving uncropped the photos you want left as is.
No Sort for You
Apple apparently lets you set the image presentation order when iTunes sends them to the iPad directly from iPhoto or Aperture, but for everyone else, setting the order — any order — is a challenge, particularly with iOS 4 devices. I'll go over what I've found.
My Approach
The rest of this post coves:
- Install the plugins used in exporting for the iPad.
- Set up a Lightroom Publish Service for export.
- Create Publish Collections that map to individual albums on the iPad.
- Populate the collections with images.
- Publish the images from Lightroom, to a local “for the iPad” folder.
- Send them to the iPad with iTunes.
The first three steps are a one-time setup; the final three steps are repeated as needed, when photos are added/removed, or changed.
Installing Requisite Plugins
In my solution, I use three of my Lightroom plugins, so the first step is to download and install and enable these plugins:
- Jeffrey's “Tree Publisher” Lightroom Plugin
- Jeffrey's “Crop for iPad” Lightroom Plugin
- Jeffrey's “Geoencoding Support” Lightroom Plugin (not needed if you don't geoencode your photos)
Make sure you have the latest versions of each, as some were updated recently to support this workflow.
Setting Up the Publish Service
My solution uses a publish service (in Lr3+) to populate a folder on your hard drive that you'll later point iTunes at. The trick is to select the various settings so that the images produced into the folder will make for the best final experience on the iPad.
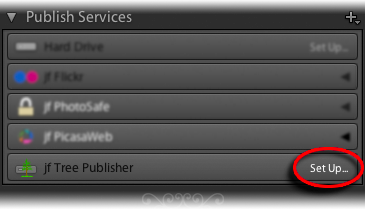
After installing the plugins, visit the Library module, and in the lower left, you'll find (perhaps among others) a “jf Tree Publisher” item in the Publish Services list, as illustrated on my system at right.
Click on "Set Up... to bring up the Publishing Manager in which we'll define how we want images prepared for iTunes.
The Tree Publisher dialog in the Publishing Manager has nine sections, each with various settings that we'll go over below, but before we do that, we need to add two more sections supplied by the other plugins we installed.
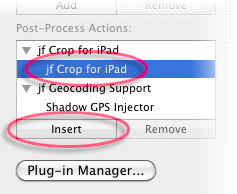
In the lower left of the Publishing Manager, you'll see the “Post-Process Actions” section, as illustrated at right. Depending on what other plugins you have installed, there may be other items in your list besides those shown at right. (Common plugins that provide post-process actions are my Metadata Wrangler plugin, my Snapshot-on-Exit plugin, and Tim Armes' watermarking and framing plugin LR/Mogrify 2).
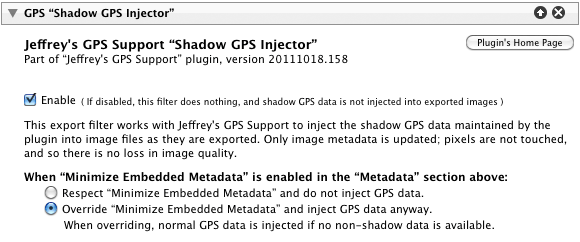
Click in on “jf Crop for iPad” as shown, then “Insert”. Then on “Shadow GPS Injector” and again on “Insert”. This adds the final two sections to the Publishing Manager for this Publish Service.
Now, let's look at the 11 configuration sections for setting up our publish service...
Give the publish service a name.

I use “Portfolio for iPad”. This name is used only in labeling the new publish service in the Library module list, and it can be changed any time.
-
Choose where on disk you want the for-the-iPad copies of the images to be kept, and what type of “Tree Publisher” service to create.

The folder you specify here as the “Publish Tree Root” is where Lightroom will put image copies intended for the iPad, and where you point iTunes at later. You might consider, for examples, a folder named “Pics for iPad” in your Pictures folder, but it's up to you. It can be changed later.
Be sure to choose the second tree-replication type, “Replicate a collection Hierarchy”. This setting can not be changed later, so be sure to set it when creating the service.
The next section is intended to tell Lightroom to refresh images when certain changes are made within Lightroom.
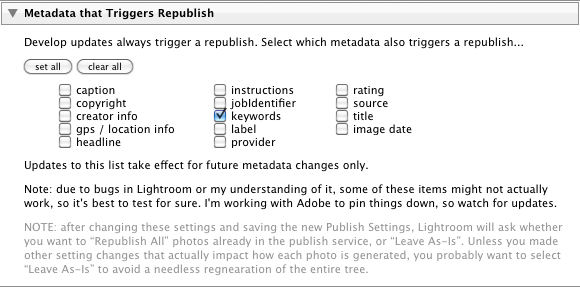
Develop changes always cause a refresh, so this section is for selecting metadata-changes triggers. Lightroom often doesn't work quite right in this respect, but it's probably best to set these so things will work if Adobe fixes these bugs in future versions of Lightroom. I chose “keywords” for reasons that will be apparent later.
This next session tells Lightroom how to name the files of the image copies prepared for the iPad.
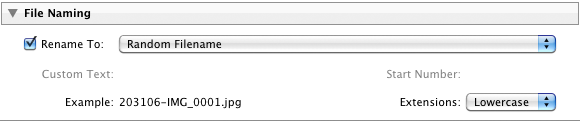
Because Apple's “Photos” app never shows the image filename, the selection here don't matter at all in that respect, but the filenames can be important in how the “Photos” presents images: in some cases, the display sort is based on the image filename.
I'll talk about sorting in general later, but in my case, I want the photos to appear in a random order, so I've come up with a file naming template that approximates a random sort:
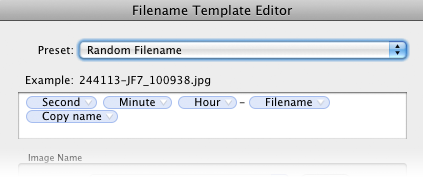
You can recreate it (or make your own) by selecting “Edit...” from the “Rename To” dropdown in the Publishing Manager. As you can see in the template, the first item is the “seconds” part of the time the image was taken, which is likely to be essentially random. The rest of the template expands on that idea, and tries to ensures that each image ends up with a unique name.
If you want images sorted by time, you'll want to pick a date-based filenaming rule.
The next section specifies that image format:
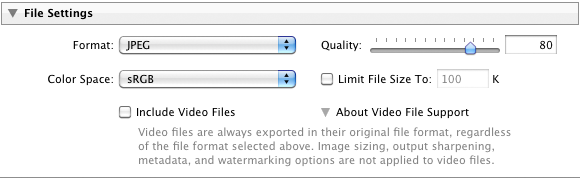
You might think that you'd want images files for iTunes to be of the highest quality possible... a lossless TIFF, perhaps, or at least JPEG at full “100” quality, but it turns out that this just wastes disk space because as best I can tell, iTunes always builds a new JPEG to send to the iPad regardless of what kind of image you provide. Judging by the file size, it's comparable to a Lightroom JPEG quality setting of about 80. (For more than you ever wanted to know about Lightroom's JPEG quality settings, see my “Analysis of Lightroom JPEG Export Quality” writeup.)
Furthermore, as I've mentioned, iTunes always adds some blur to the result anyway, so these conspire to leave little benefit in ultra-high-quality renditions for iTunes: I set Lightroom's JPEG quality on my iPad exports to 80.
By the way, I'd like to thank Stefan Zakarias, who, via the handle “Anywho” in this thread, shared details about how to inspect the raw JPEGs that iTunes prepares for the iPad.
Now we specify the size of the images to be sent to the iPad, in pixels. It's important here to select “Short Edge” and “1536 Pixels”. (The “Resolution” is irrelevant, so it doesn't matter what's entered.)

The iPad screen is 1,024 × 768 pixels, but the key size to keep in mind when preparing photos for it is 1,536 pixels: if the short side of the copy presented to iTunes is 1,536 pixels or shorter, the image sent to the iPad is not resized by iTunes. However, if the short side is longer than 1,536 pixels, iTunes shrinks the copy sent to the iPad until the short side as been reduced to 1,536 pixels.
(For reference, the same “short side to 1536 pixels” setting is used for the iPhone 4/4s and fourth-generation iPod Touch. Older iPhones and iPod Touches use a “short side to 768” pixels" setting.)
With a photo whose aspect matches the iPad screen, the long side ends up becoming 2,048 pixels when downsized (or, for reference, 2,304 pixels for an iPhone4/4s), but it could be longer or shorter depending on the image's aspect ratio.
I find it mildly annoying that iTunes resizes my large images, taking away the ability to zoom in all the way on the iPad, but the real kicker is that even if iTunes doesn't resize the image, it always builds a new JPEG, and always adds some blur. This means that even if you export a crisp sharp image exactly the size iTunes needs, it still blurs the copy sent to the iPad.
It's maddening. The best we can do is try to find a solution that damages our images the least. If we export at the exact screen size (1,024×768 or 768×1,024), the softness that iTunes adds is readily apparent the moment we move to the image on the iPad. However, if we export at the largest size iTunes allows (1,536 pixels on the short side), the initial display on the iPad is an on-the-fly reduction to fit the screen, and the quality of the reduction is very good, so the initial view is great. The softness will become apparent if you zoom, but at least the initial view is good.
Now we indicate how Lightroom should sharpen the final images it produces.

I set the sharpening to “Screen: High”, which on its own creates some fairly strong sharpening, but remember that iTunes blurs every photo on the way to the iPad, so this pre-sharpening tries to counter that. I've done a bunch of tests with various settings and “Screen: High” seems to give the best results, but it's ultimately up to a matter of taste.
For the most part, iTunes nor the iDevices do anything with image metadata, so I go ahead and strip it:

There are two bits of metadata that might be used by iTunes: the geoencoded coordinates and the image timestamp. The geoencoded location is handled later in the dialog, and as I discuss in the section on sorting, the image timestamp is supposed to be used as the display sort, but as best I can tell, it is not. Still, maybe I've made a mistake, or the image timestamp is used for your device/OS situation, so if you explicitly want a chronological sort, you may want to leave “Minimize Embedded Metadata” unchecked, and cross your fingers.
I don't do any watermarking.

The next section contains the settings for the Crop-for-iPad plugin:
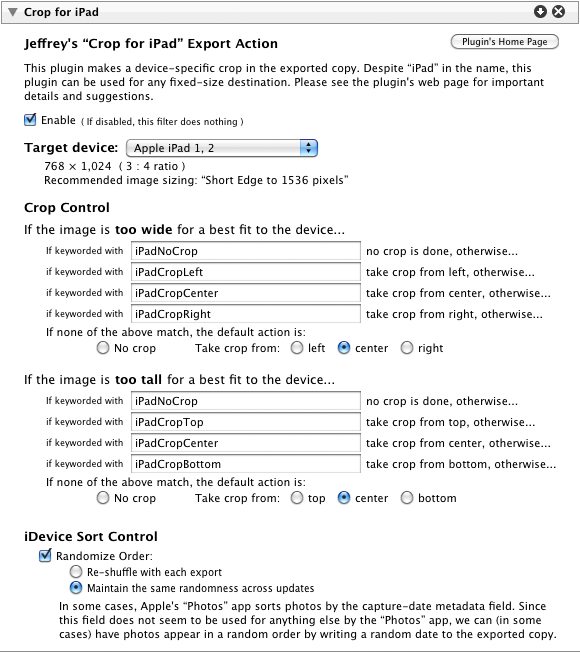
As each image is exported, this section defines whether a crop will be done, and if so, what kind, and from what part of the image.
The first area of this section indicates the target aspect ratio (the width/height ratio of the target device). I've seeded the dropdown with a number of devices from Apple, Amazon, Blackberry, HP, HTC, Motorola, Samsung, and more. Feel free to suggest additions. You can also choose “custom” and enter your own width and height.
The “Crop Control” area is where you indicate, with keywords and a default, whether a crop should be taken for each image, and if so, from what part of the image. You can set things to your taste, but as illustrated above, if a photo has the keyword “iPadNoCrop”, no crop is taken. If it has the keyword “iPadCropRight”, a device-best-fitting crop is taken from the right. And so on. If none of the keywords match, a crop is taken from the center.
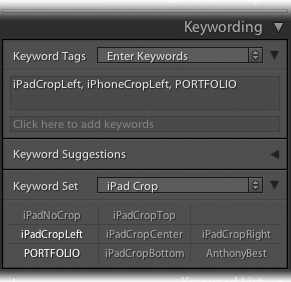
As illustrated at right, I've made a “Keyword Set” for use in the Library's “Keywording” panel that makes it easy for me to apply these. (The “PORTFOLIO” and “AnthonyBest” keywords are used in my workflow to indicate which photos to send to the iPad in the first place, as we'll see later in this post.)
You can guess from the “iPhoneCropLeft” keyword that I have a matching set of keywords for the copies I send to my phone, via another “jf Tree Publisher” publish service set up almost identically to the one we're setting up now, but because the iPhone's screen had a different aspect ratio, it may need different crops, and so that publish service uses a different set of keywords, and, of course, a different target folder.
When using these kinds of keywords, it's cleaner to keep them internal to your Lightroom setup, so don't forget to edit each keyword (by selecting “Edit” from the keyword's context menu in the Keyword List panel) to deselect “Include on Export”.
Finally there's a setting for iDevice Sort Control. We touched on image sort in the file-naming section above, and cover it in more detail later, but in short, some iDevices sometimes don't sort by the filename, but instead, may sometimes sort by the image date embedded within the image. I'm not sure whether it really matters, but just in case I want a random date injected into the copy prepared for iTunes (because, as I mentioned above, I want the image order to be random), so I've turned on the “Randomized Order” option.
A note about the crop: the crop done by the plugin is lossless (does not reduce the quality at all) because the plugin uses the Independent JPEG Group's most-excellent “jpegtran” program. The alternative is to convert the JPEG to pure image data, perform the crop, then reconvert back to a JPEG, all of which necessarily reduces the quality. So, it's gratifying that there's a lossless solution available, but one technical side effect of how bits are fiddled under the hood is that a “bottom” or “right” crop might actually be shifted as many as 15 pixels away from the bottom edge or the right edge.
-
The final section deals with the geoencoded locations where images were shot. If you don't geoencode your images, you can ignore this section, but you're missing out on a great fun feature.
I didn't realize it for the first several years I had an iPhone, but it turns out that if the images you send to the iDevice are geoencoded, a new “Places” tab shows up in the “Photos” app, at the same level as “Albums”, showing a map with pins where geoencoded photos were taken. Here's an example from my phone, zoomed up on southern Kyoto Prefecture...
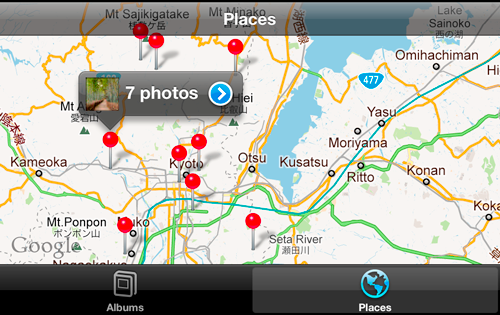
This is really fun... a fast, non-kludgy version of my blog's interactive photo map. So, I want to make sure to inject the geoencoded location into the exported images, even if we strip other metadata (as we do above).
Now we can click the “Save” button in the lower right of the Publishing-Manager dialog to actually create our Publish Service.
Phew!
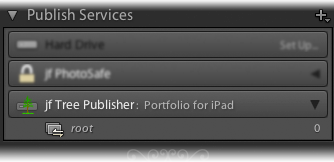
The newly-created (but still unpopulated) Publish Service can be seen in the lower left of the Library module, as illustrated at right.
At this point we've set up how photos are to be prepared for the iPad, but we've yet to actually chose the photos. To do that, we set up Publish Collections within the publish service, and populate them.
Choosing Which Images To Send to Which Album
When choosing what images to display and how to arrange them in albums, I consider:
I want a set of photos of my son, Anthony, as a modern equivalent of a wallet stuffed with snapshots.
When someone asks about my photography, I want a collection of “nice” photos that I can quickly refer to. For my blog I prefer photos that illustrate a story, but for this “Portfolio” album on my iPad, I want photos that stand alone on their own beauty or interestingness.
- I want to use keywords to decide which photos to include (the “AnthonyBest” and “PORTFOLIO” keywords mentioned earlier).
I don't like to have the viewer forever rotating the iPad to match whatever photo comes up next, so I like to group photos by orientation: landscape (wider than tall) and portrait (taller than wide).
For my “Anthony” pictures, I've taken the approach that I'll put them all into one iPad album, with all photos of one orientation photos first, then all the photos of the other orientation next. This means that one must rotate the iPad at most twice while viewing them all.
On the other hand, I have many more “Portfolio” pictures, so I've decided to go ahead and segregate each orientation into its own iPad album: “Portfolio Landscape” and “Portfolio Portrait”. Let's look at that setup first.
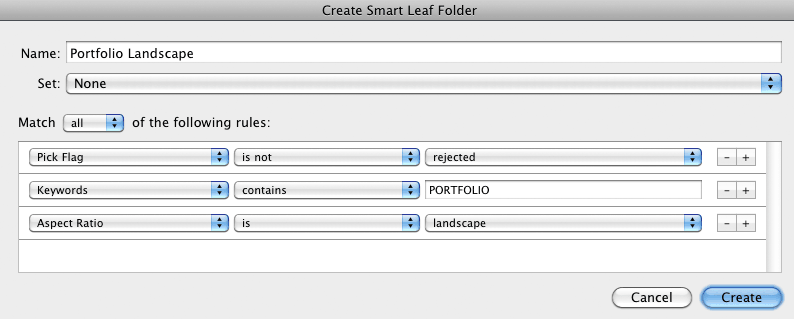
To create the “Portfolio Landscape” iPad album, I create a new Publish Collection inside the “Portfolio for iPad” Publish Service I just created. Bring up the context menu for the Publish Service by right-clicking (control-clicking) on the name in the list of publish services, then select “Create Smart Leaf Folder...”. Here are the rules I use:
I create a similar smart publish collection for “Portfolio Portrait”, except that the final rule is not quite what you might expect. Rather than “Aspect Ratio is Portrait”, I choose “Aspect Ratio is not Landscape”, so that perfectly square images (which are neither landscape nor portrait) will show up somewhere:
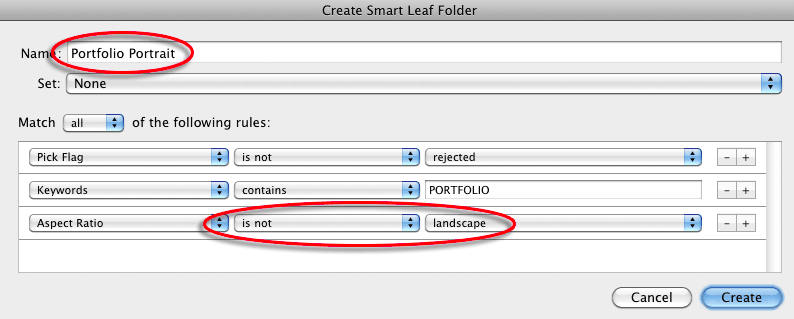
Be warned that when you change the “is” to “is not”, the “landscape” will automatically change to “portrait”, possibly leading to some confusion, so be sure to switch it back to “landscape”.
For the “Anthony” photos, I first create an “Anthony” publish collection set, via the “Create Non-Leaf Folder” context-menu item. (“Publish collection set” is the general phrase that Adobe uses; “non-leaf folder” is the tree-publisher's plugin-specific phrase for the same thing.) Then, within that set, I create two smart publish collections comparable to the two Portfolio collections, but with “AnthonyBest” as the keyword.
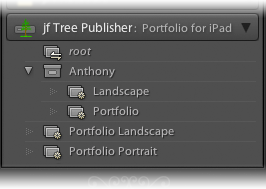
This leaves me with the publish service shown at right. Each first-level item except “root” becomes an album on the iPad, so I'll end up with three albums in the “Photos” app: “Anthony”, “Portfolio Landscape”, and “Portfolio Portrait”.
Note that I could have created normal (non-smart) publish collections, such that I would include a photo not via keywords, but by manually dragging photos into it. With my workflow and habits, I didn't want to do it that way, but there's nothing wrong with it.
By the way, because I never want to accidentally delete one of these photos from my Lightroom catalog, I include photos keyworded with “PORTFOLIO” and “AnthonyBest” in PhotoSafe collections.
Actually Exporting Copies From Lightroom
To send the photos out to disk so that I can point iTunes at them later, I select them all and click the big “Publish” button in the lower left of the Library module. Any time I make changes to the set of photos, or to any photo already there, I can republish the collections to refresh the versions on disk.
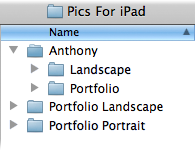
After I've “published” these collections, the folders within the top-level “Pics for iPad” folder (or whatever folder you chose as the root) will have been created and populated, as illustrated at right.
Again, recall that the iPad does not show album levels more than one level deep, so all photos within the “Anthony” folder or any subfolder, at any depth, is shown on the iPad in an album named “Anthony”. We'll talk more about this later, in the section on sorting.
By the way, note that you might also see an “iPod Photo Cache” folder. iTunes creates this folder for its own housekeeping, so it will be there after you've synced the photos to the iPad at least once.
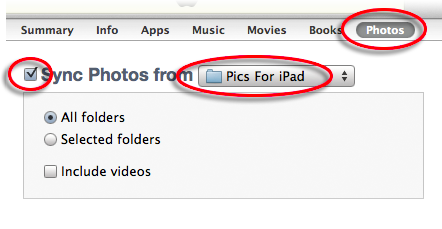
iTunes
Within iTunes, select the iPad in the sidebar, then in the “Photos” section, point the “Sync from” to the top-level publish folder, and sync:
iTunes will look at the images in the folder tree and “optimize” them, in Apple's parlance. This is the building of a new, possibly downsized, somewhat fuzzier JPEG copy of each, along with various small thumbnail versions. It's at this time that the “iPod Photo Cache” folder and its various data files are created. It's that data that's sent to the iPad.
You can now enjoy your photos on your iPad.
A Note on Image Sorting
Apple claims that within albums on the iPad, images are sorted chronologically based upon the image capture date, but I've found this to be iffy at best. In fact, everything about sorting seems to be iffy. I've done a lot of tests under a few situations (iPad and iPhone 3G running iOS4, and an iPad and iPhone 4Gs running iOS5, with various versions of iTunes 10 on OSX 10.6 and Win/XP) and have come up with a few bits of understanding.
With iOS 5 devices:
Sub-folders are sorted independently, so in the case of my “Anthony” album populated with images from two sub-folders (“Portrait” and “Landscape”), all the “Landscape” images are shown first, then all the “Portrait” images. Sub-folders are presented in order based upon their filename.
Within any particular sub-folder, images are sorted based upon their filename.
It's less straightforward with iOS 4 devices:
With iOS 4 devices, sub-folder images are not necessarily segregated. Images that are within sub-folders are segregated the first time you sync to the device, but images added during subsequent syncs may appear anywhere in the presentation order.
I haven't figured out the sort. I've tested the image-file inode-creation date, image file-modification date, directory-entry-creation date, by various Exif bits of metadata (CreateDate, DateTimeOriginal, ModifyDate, PreviewDateTime, and GPS DateTime), and nothing is consistent. As soon as I find something that I think is consistent, it fails when I add additional images and resync, or when I clear out the “iPod Photo Cache” folder and resync. (Clearing out the cache should have no effect on a deterministic sort, but since it does, the sort is clearly not deterministic.)
iTunes looks at the file-modification date to decide whether to reprocess an image, so if you use my Metadata Wrangler plugin in your workflow, be sure not to enable the "Set exported image file's modification date to the image date" option, or re-publishes will not be processed by iTunes.
Thanks for creating this workflow and the associated tools! Tom in SF
Jeffery:
I feel your pain, another case of apple knows best regardless of your needs. I already export all my photos (via tree publisher) in 1080P format (1920×1080) for display on the TV and other ‘casual viewing’ devices exactly as I want them and noticed something else when importing to my iPad2. If your hierarchy is more than one level deep, iTunes (in it’s infinite wisdom) ignores the additional levels and lumps everything together.
I.E. If you use a structure similar to mine such as Year/Event/photoxxx.jpg or Year/Month/photoxxx.jpeg, iTunes lumps everything from the same year into one ‘collection’. This may work for some, but when you have 1000’s of pictures every year… not so much. Go apple!
As if not to come off unfair, a will also take a jab a lightroom; why is it that they have a well thought our, flexible file rename dialog in the import / export areas, but if I want to use a custom folder name structure like YYYY\YYYY_MM\IMAGE.ext i can’t as I cannot define custom folder structures. They already have the logic written for filename, why not expose it to folders… Based on some of the viewers and sites i use (picasa for ex.) I need to have the year in the child folder name to avoid having several ‘albums’ named ’01’.
Brian
Awesome and useful plugin, as usual; I’m having a little trouble though.
I have an image sized x,y = 3888×2592 that I am trying to export for an iPhone4. It is only tagged “iPhoneCropLeft”, but other than replacing the word “iPad” with “iPhone” in the keywords, and choosing the iPhone4 aspect ratio, the crop control settings are exactly the same as your screenshot example.
However, on export, I get:
“Crop-for-iPad: keyword/crop conflicts: Too tall for a best fit, but keywords match only for a too-wide crop (1)”
It was my belief given the examples here, that only specifying one axis of cropping would cause the other to drop to the “If none of the above match” fallback (which is set to center). This doesn’t appear to be happening.
Or, does it assume that if you specify a tag, it is a failure to not end up cropping that axis? This would presumably mean that one needs to calculate for every photo which axis is going to be cropped.. Since the image is “Too tall” the dialog seems to imply that it will ignore the “IF the image is too wide..” section..
Am I doing something wrong? Any suggestions for things to try?
Thanks! – Nick (Brighton, UK)
IPad and iPhone screens have a different aspect ratio, so images may well need crops on different axes. If you need a too-tall crop but specify a too-wide crop, the plugin could just ignore it I have it go to more trouble to analyze the situation and report it, because it’s almost certainly an error on your part, and if you were thinking about crops in the first place, you’ll likely appreciate being prompted to rethink your selection in the proper frame of mind, so to speak. —Jeffrey
I guess I might understand your keywords wrong:
iPadCropTop – take crop from top – does that mean the remaining picture will be taken from top, so it effectively cuts the bottom,
or does the last term indicate the part being cropped off, hence the top will be missing afterwards?
(sorry non-native with always problems with prepositions… and I can’t make it out yet from my sample pics)
Image quality resulting on iPad is amazing !
Hah, yes, I guess when you think about it, the English is vague… “crop the top away” or “crop, leaving only the top”. In my case, I intended the latter, so your initial impression, that the remaining picture will be taken from the top, is correct. —Jeffrey
Thanks so much. Your blog have provided a wealth of info, nothing more than the “1536” rule. However in my experience on my iPod Touch 4g picture always grow so the short size fills the screen no matter what the resolution is. I would much rather get the “letterbox” effect and see the whole composition. How do I do that?
Is there perhaps an option controlling that? Apple isn’t big on providing a lot of options here, so probably not. Maybe it’s just something specific to the device or the iOS version, but in either case I’m sorry to say I’m not familiar with it. You could prevent it if you created a perfect-fit image by adding the letterboxing pixels yourself. I don’t know of an easy way to do it automate it, but you might ask the Lr/Mogrify plugin author to add support. In the mean time, you might be able to add gray letterboxing with a careful combination of reduced scale (in the manual lens-correction section) and crop, but that would be a lot of work. —Jeffrey
Thanks for pointing me to Lr/Mogrify. It’s canvas function set at 2304 x 1536 pixels did the trick!
Set up a bunch of ‘smart leafs’ then decided to organize them better, but got an error message about allowing re-parenting yet? Any chance of adoption then? or do I need to re-create all the leafs? Thx, Jim from AZ
You’ll have to re-create them, sorry. I finally got around to completely rewriting the Tree Publisher plugin the way it should have been, will soon release two separate plugins to replace it, so you might want to wait a bit if it’s a lot of collections. I’ve also completely revamped my export-for-iPad workflow, so a new post about that is on the horizon soon… —Jeffrey
Hi Jeffrey,
You mentioned that when iPad has resolution of 1,024 × 768 we should resize our photos to have the short-side of 1536. Now that the 3rd generation iPad has resolution of 2048 x 1536, do you know if the magic short-side is the same or twice (just a wild guess)?
Thank you,
Peter – Calgary
As I wrote in the followup article linked at the top, I no longer use the built-in Photo app because of its problems, so this “magic short-side” bit no longer applies to my workflow. But if you’re still there, yeah, I’d assume 2x (3,072), but it’s just a guess until someone sends me a third-gen iPad to test. (Or, an *.ithmb file from the “iPod Photo Cache”) —Jeffrey
Thanks for that, what I was looking for… Do these settings hold true for the ‘New’ IPad?
I haven’t tested with the new iPad yet, but you’ll likely want to double the sizes. —Jeffrey