
Nikon D4 + Nikkor 70-200mm f/2.8 @ 130mm — 1/640 sec, f/2.8, ISO 140 — image data
Unrelated Cherry-Blossom Snow
this photo, from this recent photoshoot, has nothing to do with this post
Lightroom 7.2 introduced an entirely new version of its “Auto Tone” feature, a one-click adjustment of photo brightness and contrast to hopefully-pleasing results. The prior version of Auto Tone used what might be called a “stupid, brute force” method that merely adjusted tone ranges to try find a numeric balance. It wasn't very useful.
The new Auto Tone, however, is fantastic, being powered by an artificial-intelligence engine trained with thousands of hand-tweaked photos from highly-regarded artists. It does a sufficiently-good job that I now use it as part of my new-photo workflow, to give me a better starting point for my own edits. (I should point out, though, that a good photographer wouldn't need any kind of better starting point for edits; a good photographer will do the work prior to pressing the shutter button. I'm not a good photographer.)
As good as the new Auto Tone is, I've found it tends to be a bit heavy handed with saturation for my tastes. I gather that the artists who worked on the photos used to train the AI engine simply prefer to lay on heavy saturation to make the photo “pop”, and perhaps this is why they are highly regarded and I am not, but it seems cheap to me. I'd prefer not to use that as my starting point.
So, to help quicken my workflow in this area, I added new features to my Bag of Goodies plugin for Lightroom that allow one to perform a personalized Auto Tone.
Your personalizations are configured in a dialog brought up by invoking:
The configuration dialog is this monstrosity:
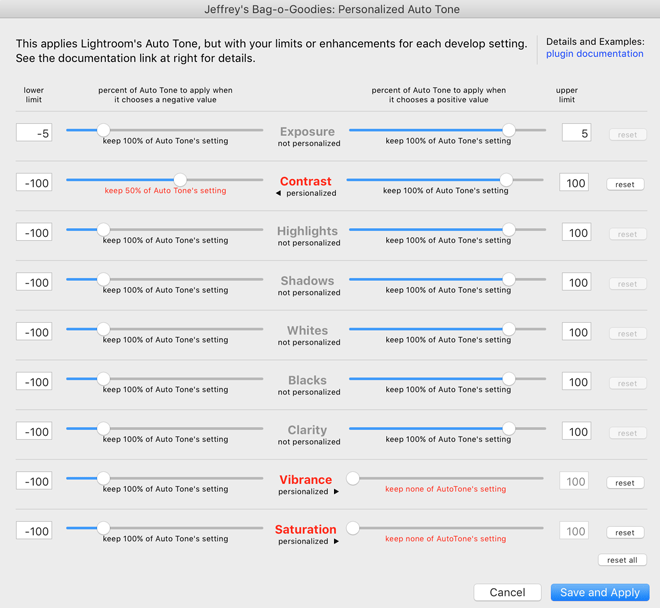
The plugin allows each of the nine develop settings that Auto Tone touches to be canceled, scaled back, or enhanced. The details are explained on the plugin home page.
Note that even though the new Auto Tone was introduced in Lightroom 7.2, the plugin requires 7.3 to work, as that's when Adobe added the hooks that make the plugin possible.
Am interested in learning more.
Thanks for this. Is there a way to make a preset that applies the personalized auto tone?
No, it’s a computed action for each photo, so there’s no way to make it part of a static preset. —Jeffrey
Interesting…and, expect, very useful. I always seem to have to make many of the same tweaks. Now, I am going to have to document them to build up a history for the customization of auto.
I fear there is no solution, but, once set, is there any way to get a “one button apply”, rather than via ‘file’….which can be tedious to apply one at a time?
Thanks, John
If you’re on MacOS, you can use the standard system stuff to assign a keyboard shortcut to any menu item. If you’re on Windows, you can do the same by switching to Mac. 😉 (In all seriousness, the way Windows handles keyboard shortcuts makes it difficult to use them with Lightroom plugins.) —Jeffrey
I have not seen ‘Auto’ ever apply a value to Clarity or Dehaze, for that matter. Would it be possible to allow this plugin to apply a value for Clarity? For example, my starting value is often ’20’.
Thanks, John
If it’s a pretty standard thing, your best best would be to create a develop preset with the values you like, and have it applied automatically during import. “Auto” doesn’t touch Dehaze. (It does overwrite Clarity, though.) —Jeffrey
What do you mean by, “It does overwrite Clarity”? Does it ever do an “analysis” and apply something?
Ha, Ha….very “Mac-funny” .
I’m not sure what’s “funny” or “Mac”(?), but yes, the new Auto Tone does an AI-driven analysis and updates develop settings accordingly. What it doesn’t do is update “Clarity” as I said earlier. I’m not sure why I ever thought it did, but you’re right, it doesn’t. I’ve just pushed out a new version of the plugin that removes “Clarity” from the “Personalized Auto Tone”. So my original comment about creating a develop preset to apply upon import also goes for Clarity as well…. —Jeffrey
Mac-Funny = “If you’re on Windows, you can do the same by switching to Mac. ”
Ah, yeah, gotcha. 😉 —Jeffrey
Hi Jeffrey,
Love your plugins, particularly the new addition to the Auto Tone settings. I set mine up on the Mac with the Control-Command-U shortcut (so it relates to the standard Command-U for normal Auto) – it can be tricky to find an unused combo that still makes sense.
Anyway, it works great, I love being able to fine tune the settings, particularly toning down the Exposure and Contrast controls a little.
I’ve found it doesn’t work on any image that’s been converted to B&W using a B&W profile. I just get the following error message:
PersonalizedAutoTone:778: attempt to compare nil with number
Usually needs two clicks to clear it. Although that could also be that it’ll be a virtual copy, as I create them to make B&W versions of the original.
Great website too.
Regards
Andy
Good catch, thanks. I’ve just pushed out a new version of the plugin that fixes this. —Jeffrey