About a month and a half ago I was futzing around with night exposures and took this 30-second picture of the Kyoto Municipal Museum of Art. I was wondering whether I might get the really interesting results as I did during cherry-blossom season, but in this case the result was thunderously boring.

However, it was about this time that I decided to finally start playing with the new sharpening controls in the betas I was testing for Lightroom 1.1, and for whatever reason, I used this image as my first test.
Proper sharpening seems to be more an art than a science, but I don't really know much about it in either sense. I've learned a bit since starting to play with this (and now there's a long tutorial by Jeff Schewe on the same controls as they appear in Adobe Camera Raw), but it's still somewhat of a guessing game for me..
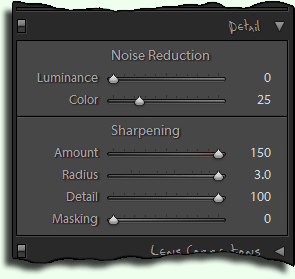
Anyway, at that time I didn't know anything and was just futzing around, and discovered that if you turn the controls way up (as shown at right), you can get an artsy “painting” effect. This is not at all how the controls are intended to be used, of course, and the effect is strongly dependent on the image, but it certainly can be interesting.
I couldn't talk about this until 1.1 went public, and so now that it has, I can show the results: here's the image with the maxed-out sharpening.....

Not Freaky. Not Artsy. Still Boring
Hmmmmm, it's not so different.
To see the freaky effects, you have to look at the full-resolution image (that is, one without a resize down to a smaller size). Here's a snippet at 100% resolution:
Painting-like Sharpening Effects
As usual, clicking on the images yields a larger version.
By the way, take care to note that the Masking control is the opposite from the others in that moving it to the right reduces the effect of the other controls. It indications how much of the image should be masked off (protected) from the other controls: fully left (a value of zero, the default setting) means nothing is protected and sharpening applies equally to the entire image. Fully right means that most of the image is masked off, with only the most high-contrast areas subject to the sharpening controls.
One more warning about using these controls in Lightroom. Results from sharpening changes are normally updated on screen in real time only when viewing at 1:1 or better. If you're in “Fit” or “Fill” or any other less-than-1:1 zoom, moving the controls has no apparent effect except to flash the “!”-in-a-triangle warning badge that's shown on the controls when not 1:1 or better.
The sharpening effects will eventually be propagated to the grid thumbnail and other smaller versions (you can force it by rendering 1:1 previews for the image) but you generally want to be in 1:1 mode while adjusting the sharpening.
Anyway, I've since found out that this kind of effect is a well-known artifact of over-sharpening, but having “discovered” it myself, I thought it was particularly interesting.